Moving from Squarespace to WordPress is a common step that many growth-oriented businesses do at a certain point in their development. Drag-and-drop simplicity makes Squarespace a great fit for beginner entrepreneurs. But when businesses scale up, their demand for platform flexibility also increases, so they start searching for a more customizable solution. WordPress, eventually, turns out to be the most optimal choice. It allows users to create any kind of website while keeping content management easy and straightforward.
In this article, we’ll guide you through the process of the Squarespace-to-WordPress migration. We’ll also explain what to do if you have an ecommerce business and want to move products from Squarespace to WooCommerce.
Things to know before moving from Squarespace to WordPress
Even if you’ve already decided to move your Squarespace site to WordPress, there are certain things you need to know before kicking off the process. They will help you grasp a clearer picture of what you’ll get after the migration and properly estimate the required resources.
1. You can’t transfer everything from Squarespace to a WordPress site
Since Squarespace and WordPress are designed differently, there is no way to migrate the entire website from one platform to another automatically. You will still have to do some portion of the work manually. It means a lot of copy-and-pasting and paying much attention to detail. On the flip side, transferring a website from Squarespace to WordPress is a great chance to declutter its content and rethink the way your business communicates with customers.
2. Your site’s URL structure will change upon migration
If you have a lot of quality traffic, this news might be quite upsetting. Not to lose all loyal visitors, you’ll need to edit each URL manually to make them mimic the Squarespace URLs. But, in most cases, Squarespace links are too long and not especially SEO-friendly. Moving a site to WordPress allows you to make them more concise and SEO-optimized.
3. You’ll probably want to have a different design for your site, too
It’s not possible to transfer the template of your Squarespace website to WordPress. So you’ll need to select a new WordPress theme during the migration. Fortunately, there are thousands of them (free and premium) to choose from. You will probably be able to find something very similar to what you have on Squarespace. Alternatively, you can develop a custom WordPress theme that would fully replicate your Squarespace site’s design. But this option is neither cheap nor fast.
Switching from Squarespace to WordPress: preparation steps
Before exporting Squarespace content, you have to create a self-hosted WordPress website that will become its new destination point. This task shouldn’t be too difficult, but it will still require some time and effort. So here’s what you need to do:
- Choose a hosting provider. Your Squarespace fees cover all administrative expenses required to maintain a website, including hosting charges. Meanwhile, a new WordPress site will be self-hosted, meaning you need to choose a services provider yourself. But it shouldn’t be a problem since there is a wide range of them. Some hosting providers also offer WordPress pre-installs.
- Set up a temporary domain. If your Squarespace domain name is custom and you want to keep it, you’ll need to create a temporary domain for migration purposes. The best way to do this is to contact your hosting provider that should help you with this task. Free Squarespace domains cannot be transferred to another registrar. So if it is your case, you’ll need to register a new domain name.
- Install WordPress. If your host doesn’t offer some kind of simplified WordPress installation services, you’ll have to set up a WordPress site yourself. Go to the WordPress official site and follow the guidelines that you’ll find there. If your business doesn’t belong to the e-commerce industry, you’ll also need to pick a WordPress theme for a new website (here) at this stage. But don’t waste too much time on it since it’s possible to change everything later.
- Install WooCommerce (for e-commerce businesses only). In case you run an online store on Squarespace, you’ll have to install the WooCommerce plugin on your WordPress site before the migration. On the WordPress dashboard, go to Plugins and select Add new. Find WooCommerce using a search bar. Click Install -> Activate, and then follow the instructions that you’ll see on your screen. Once everything is ready, go to the WooCommerce Theme Store and choose the theme for your online store.
When you’re done with these steps, you can start transferring content from your Squarespace site to WordPress.
How to move from Squarespace to WordPress
Unfortunately, there is no way to migrate Squarespace to WordPress in one click. But the good news is that you’ll still be able to transfer most categories of website content automatically or semi-automatically.
Exporting Squarespace content (layout pages and posts)
To get started, you need to export content from Squarespace. As mentioned, it’s impossible to migrate everything to a new WordPress site, but you can move a lot of your website using this method. It will allow you to transfer all blog posts from the first blog page, the site’s layout pages, text blocks and image blocks. Here are the steps you need to take:
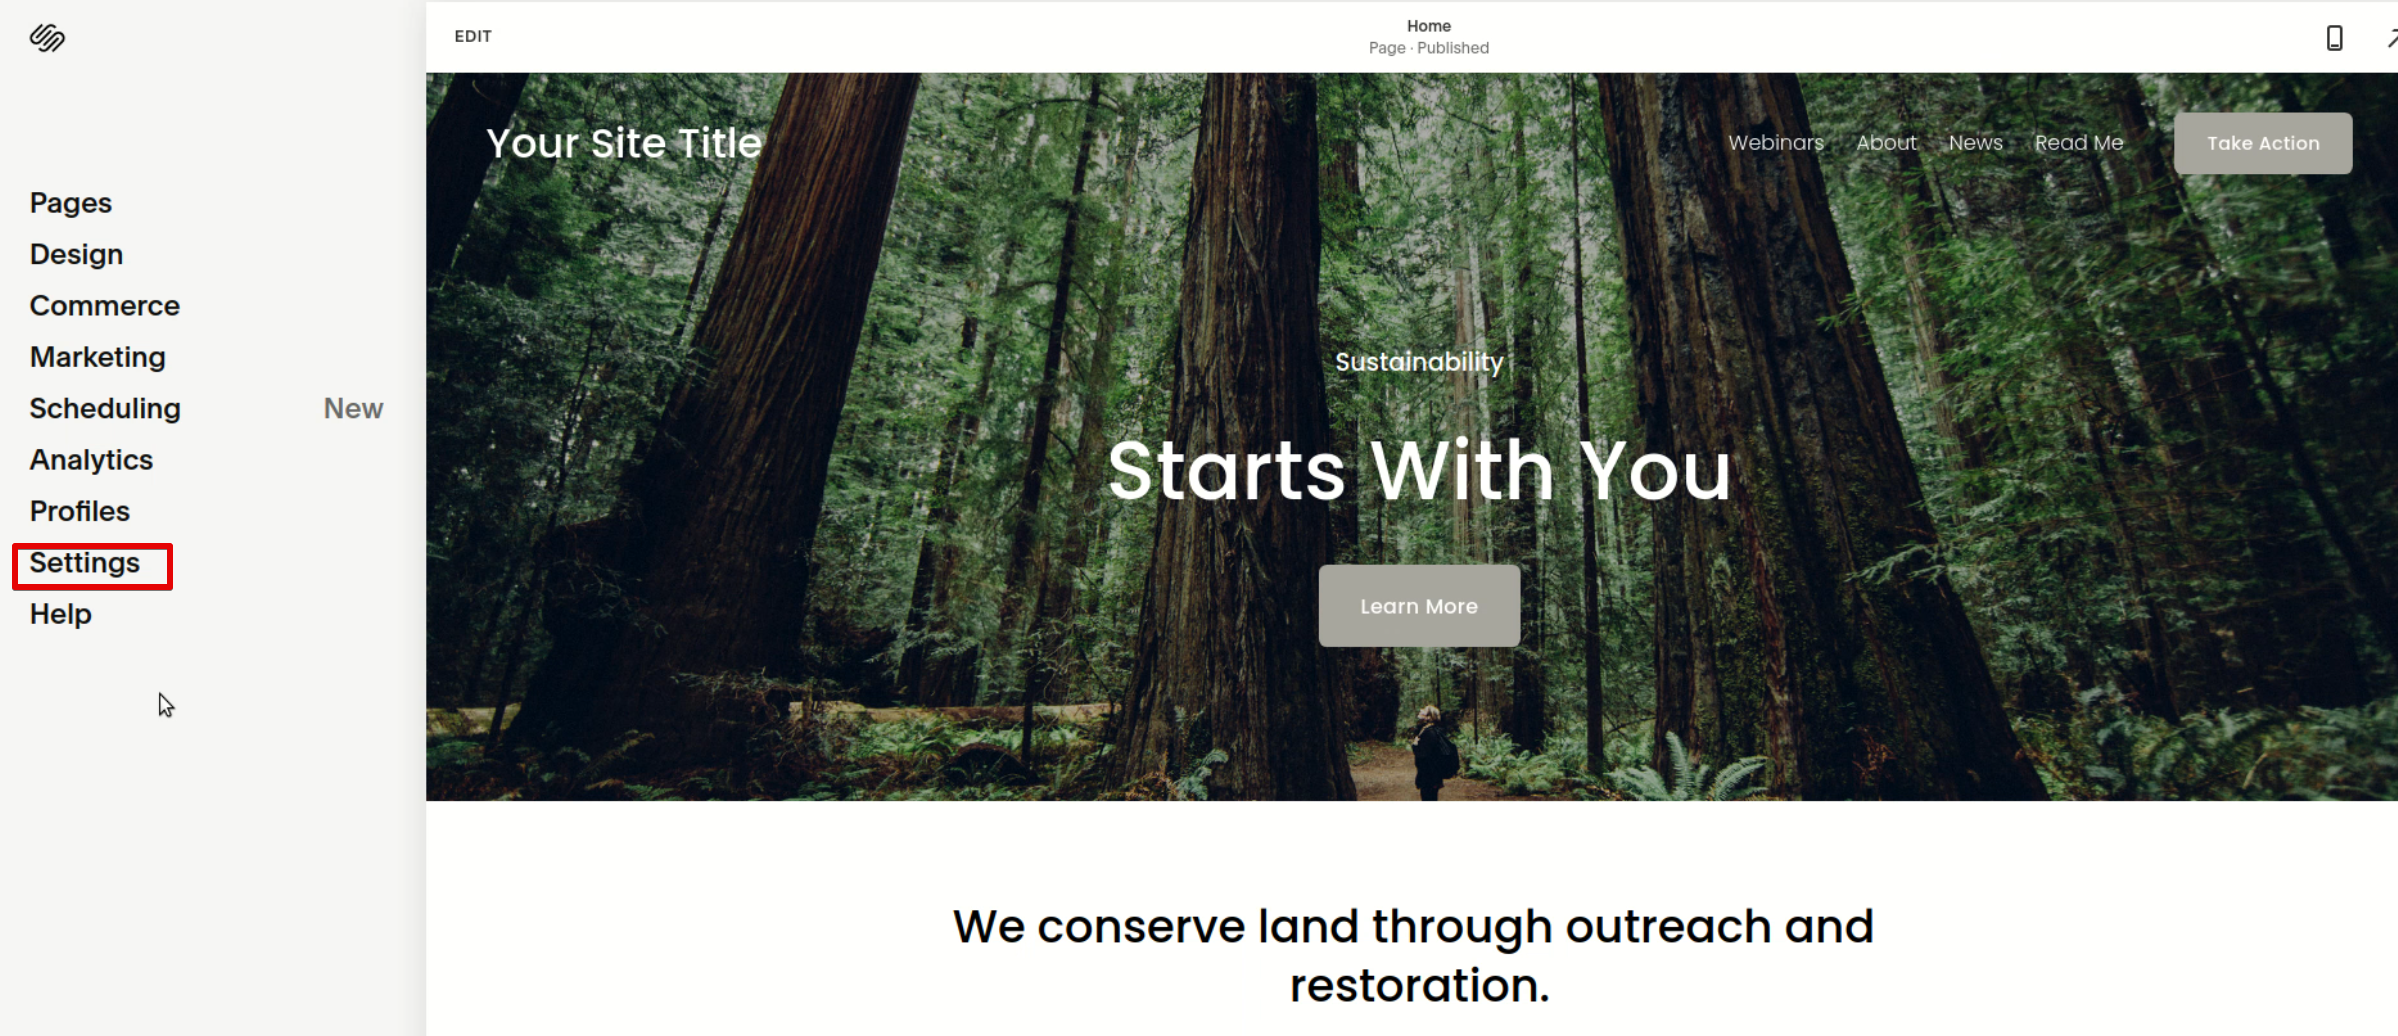
1. Go to the Squarespace dashboard. In the left sidebar, find Settings, then click Advanced and Import/Export.
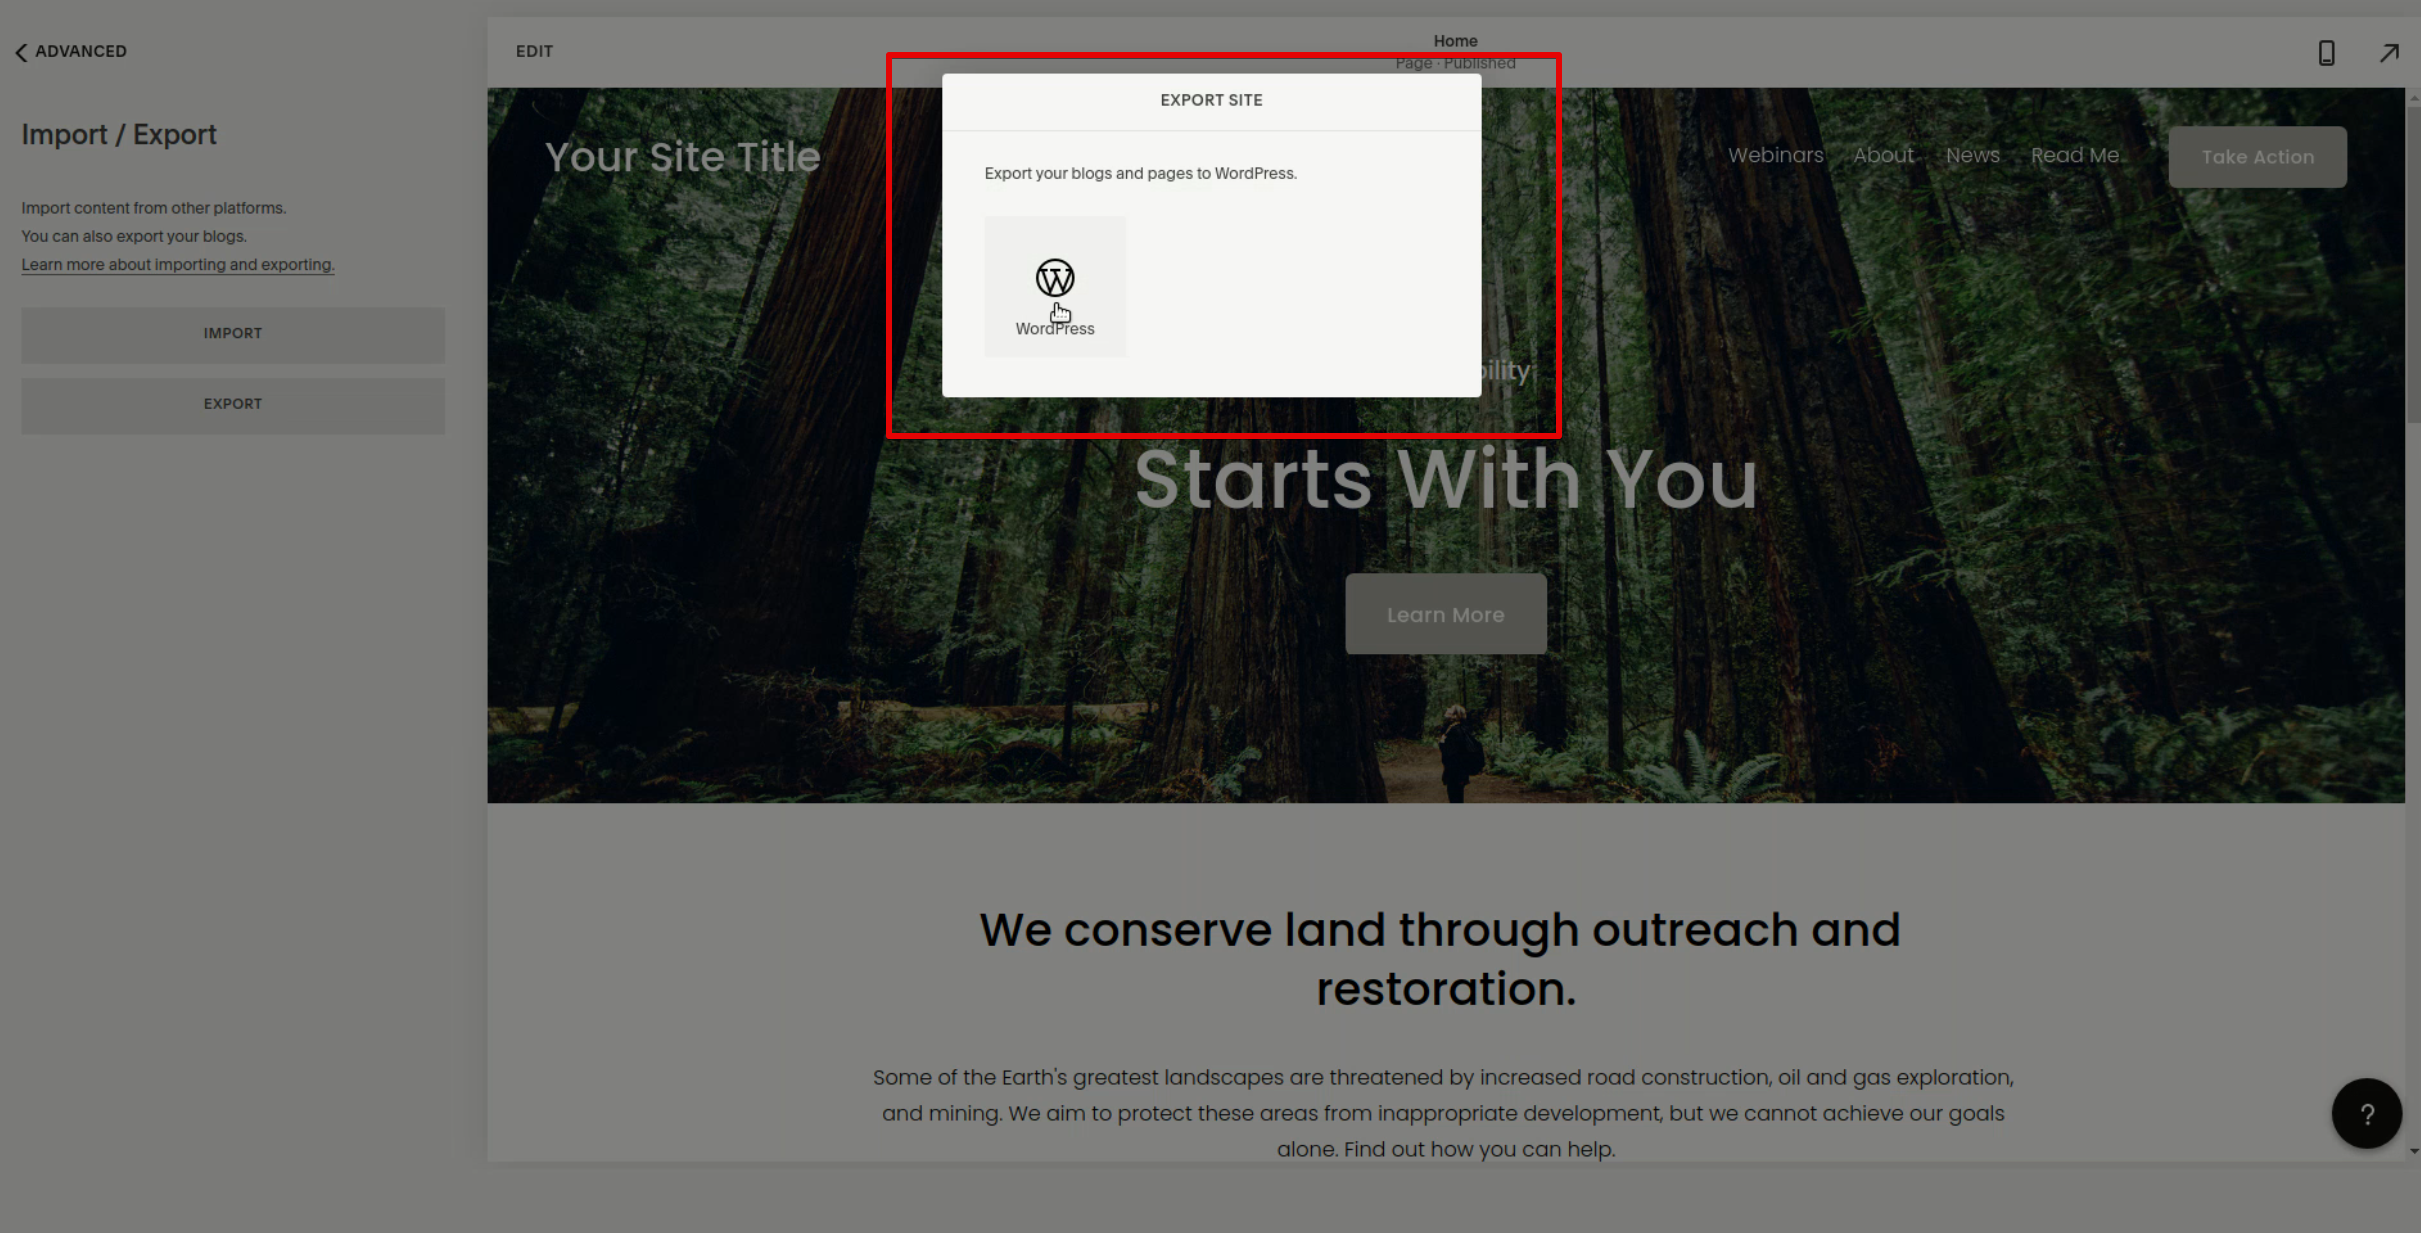
2. On the next screen, click Export. You’ll see a popup with the WordPress logo. Click on it to continue.
3. The progress of the exporting process will be shown on the left part of the screen. Once it’s finished, click Download. The list of pages that have been exported will also appear under the download button.
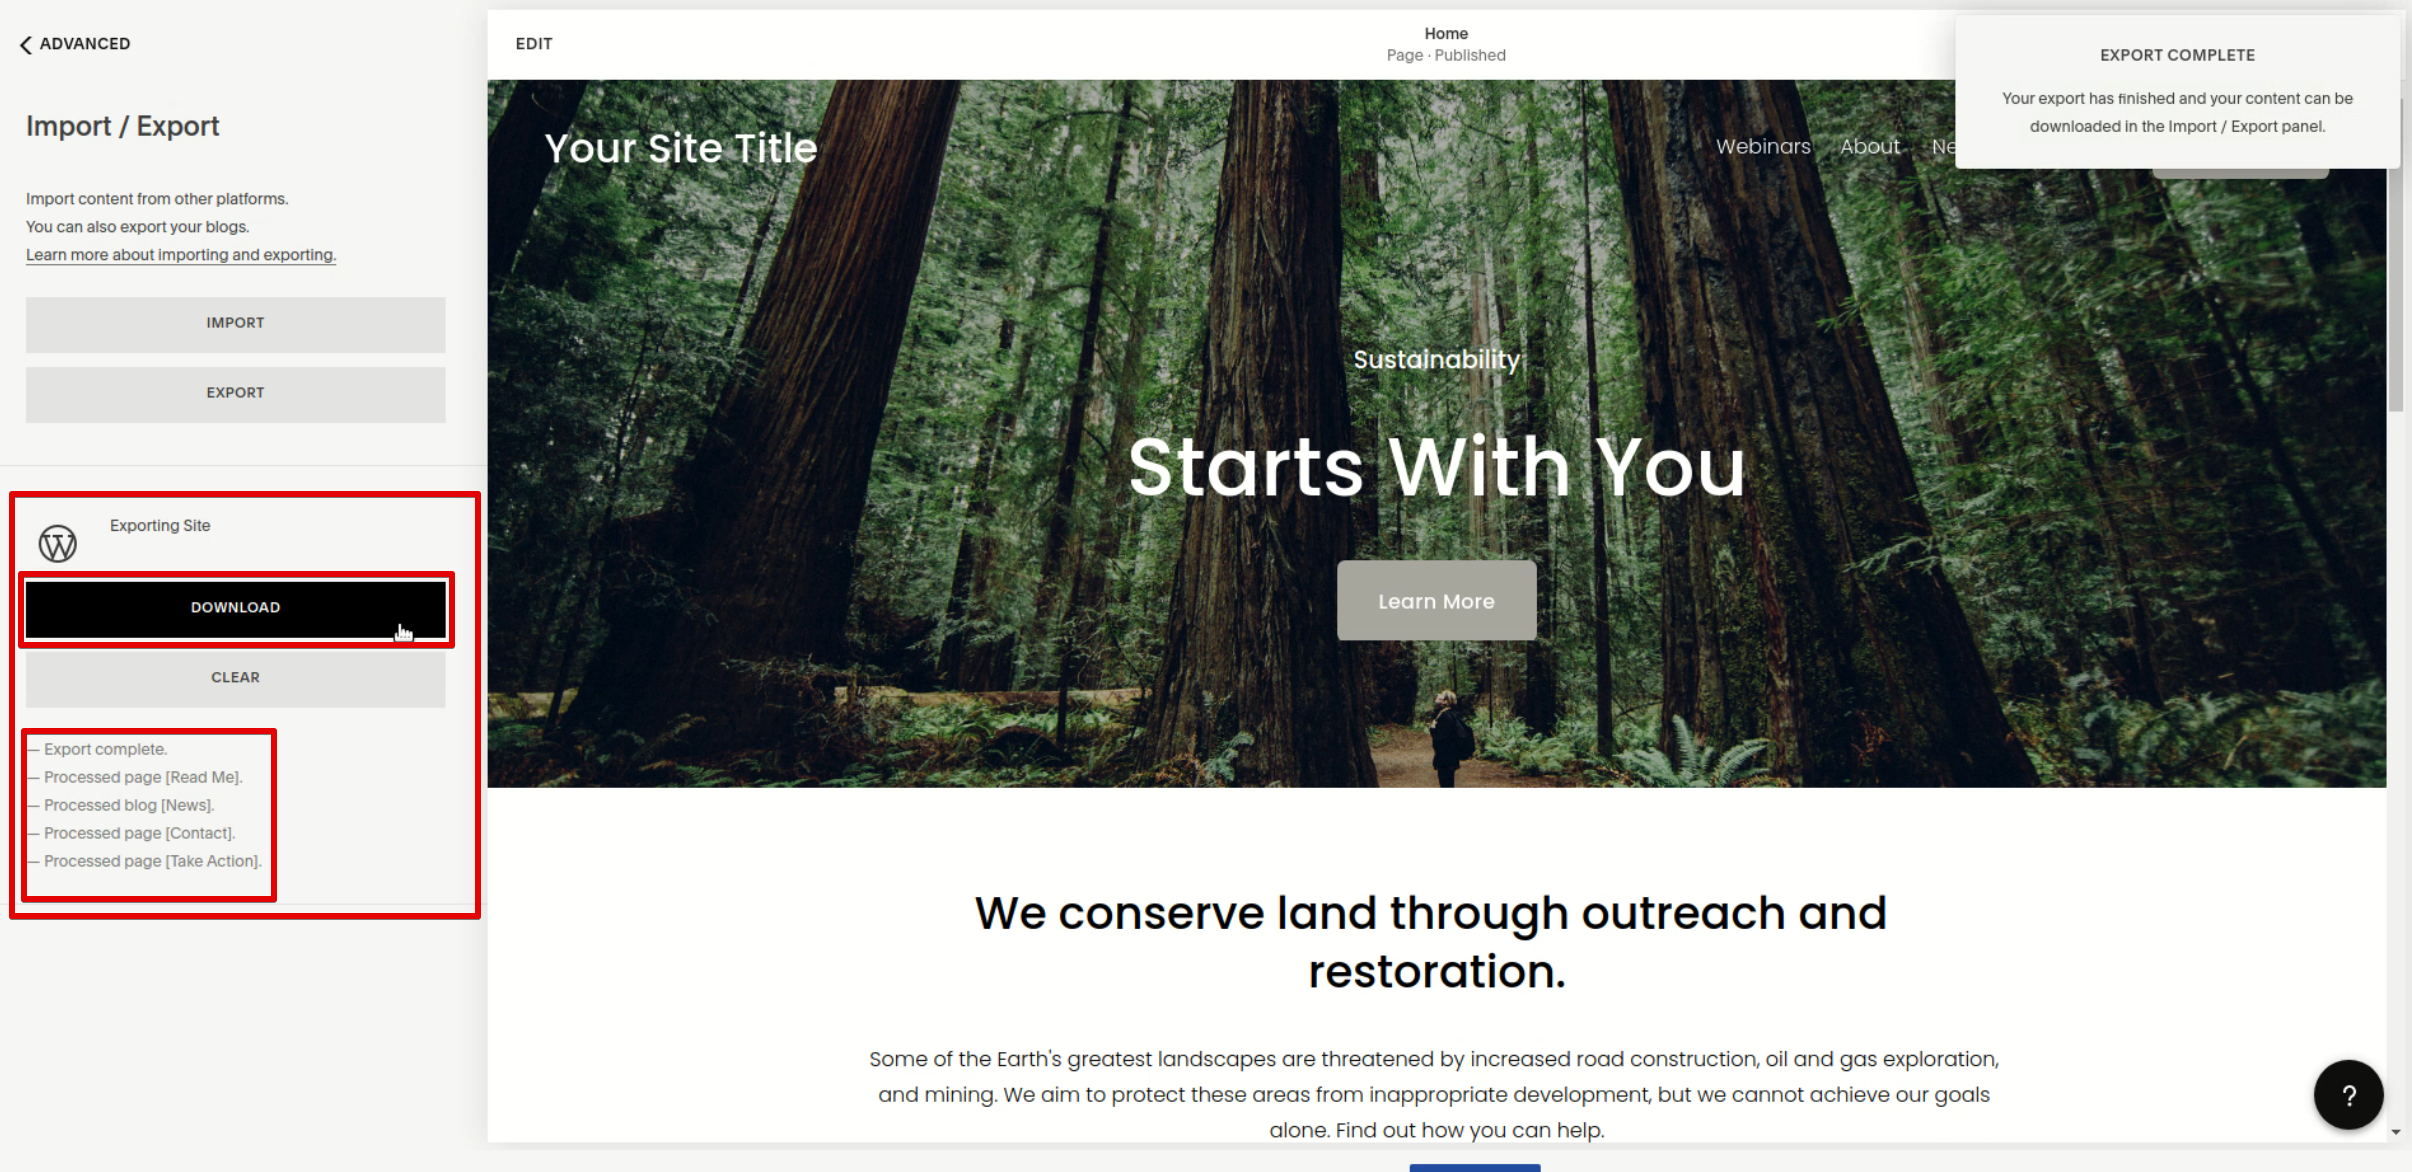
Now, when you have an XML file with Squarespace content downloaded to your computer, let’s proceed to the next stage of the migration process.
Importing Squarespace content to WordPress
At this point, you’ll need to import the Squarespace blog and pages into the new WordPress site. Here’s what you should do:
1. On the WordPress admin dashboard, go to Tools and click Import

2. You’ll see the WordPress tool on the bottom of the page. Click Install now.
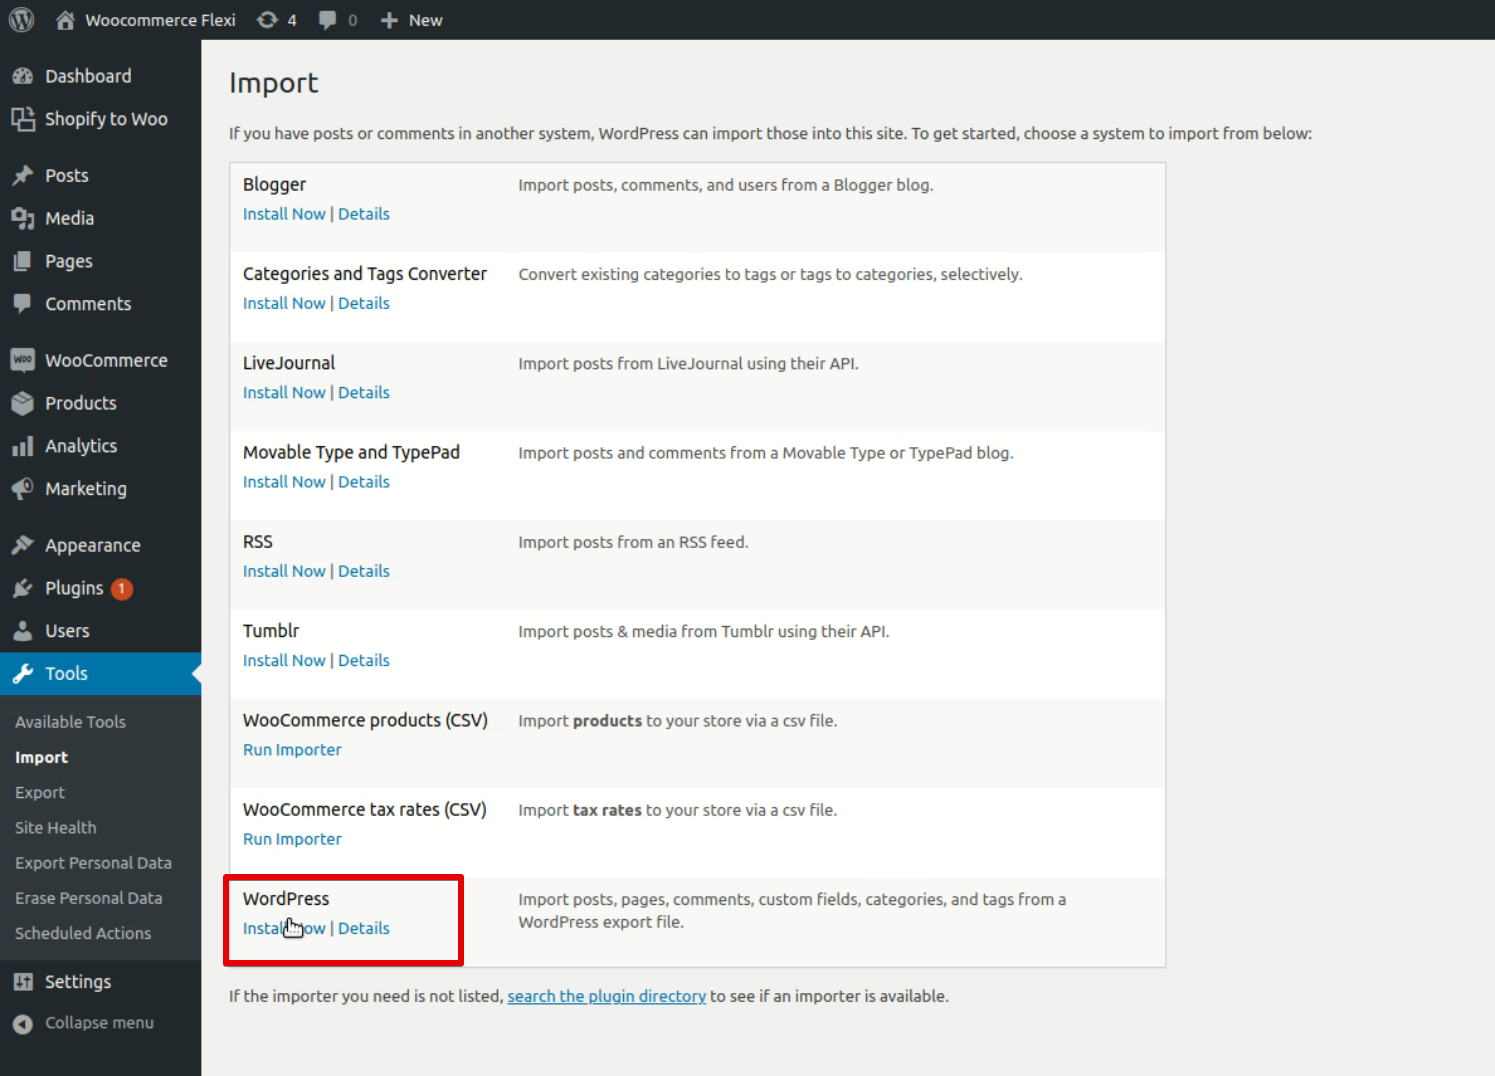
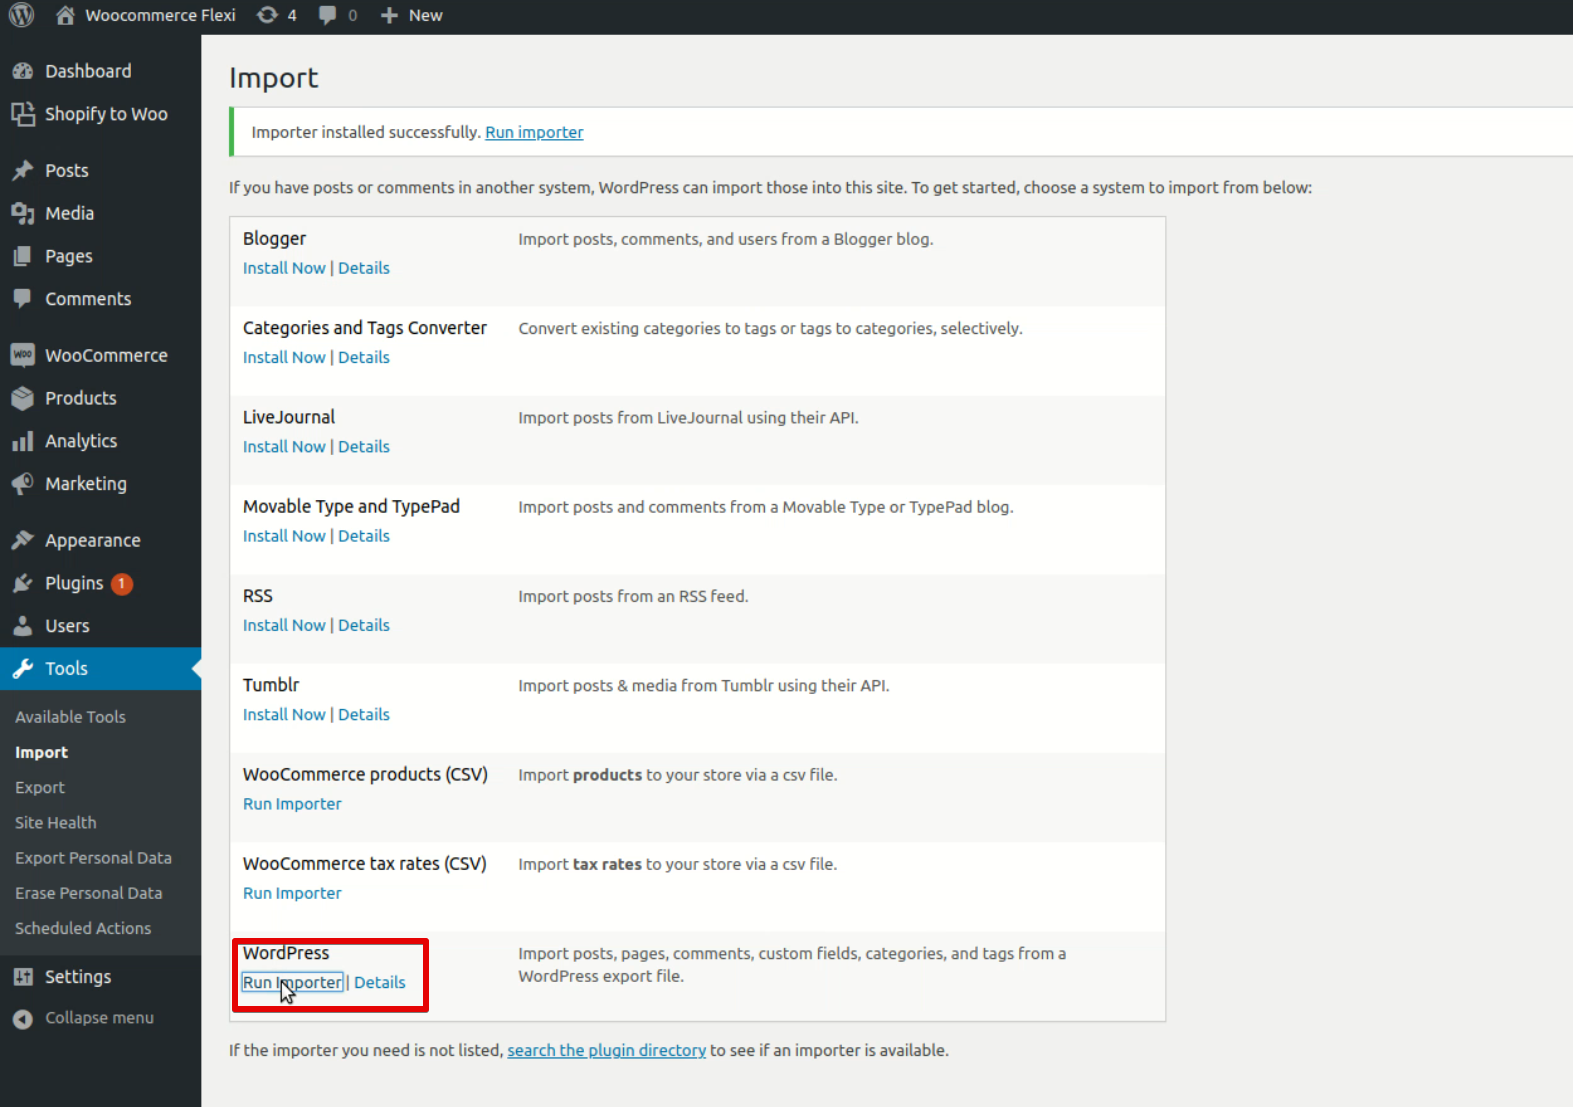
3. Once the installation process is complete, click Run Importer
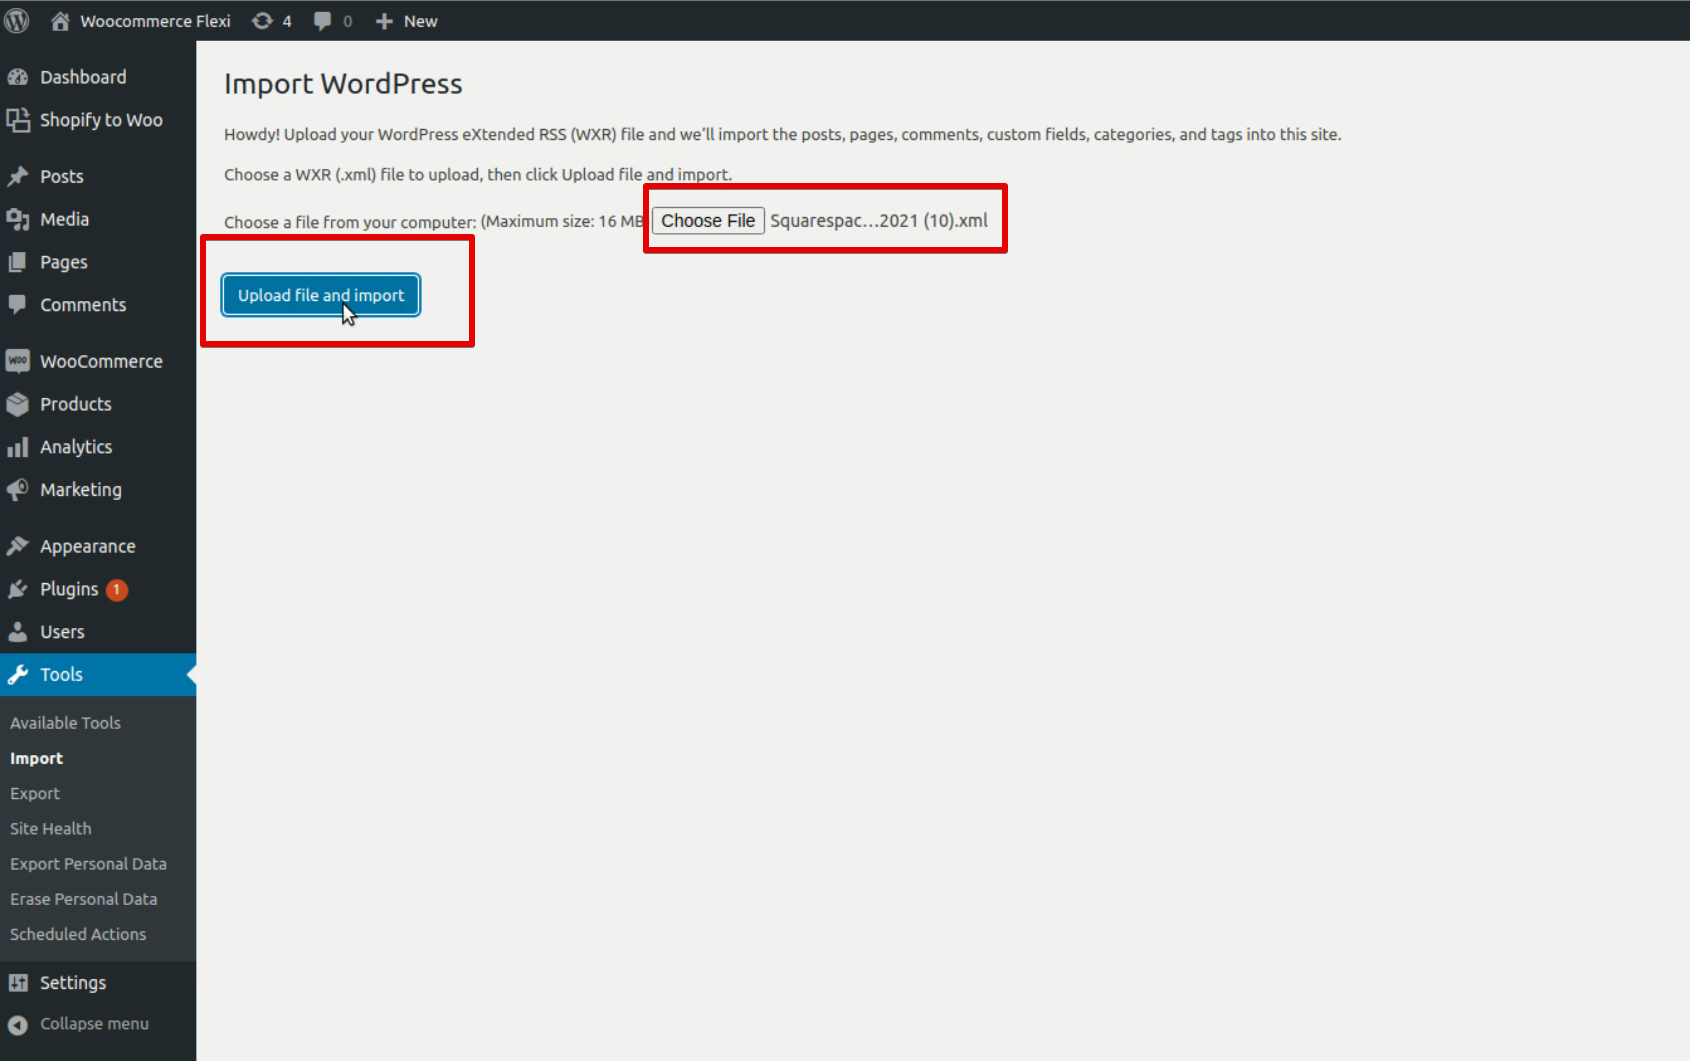
4. Next, you’ll be asked to Choose file. Select the XML file downloaded from Squarespace, then click Upload file and import.
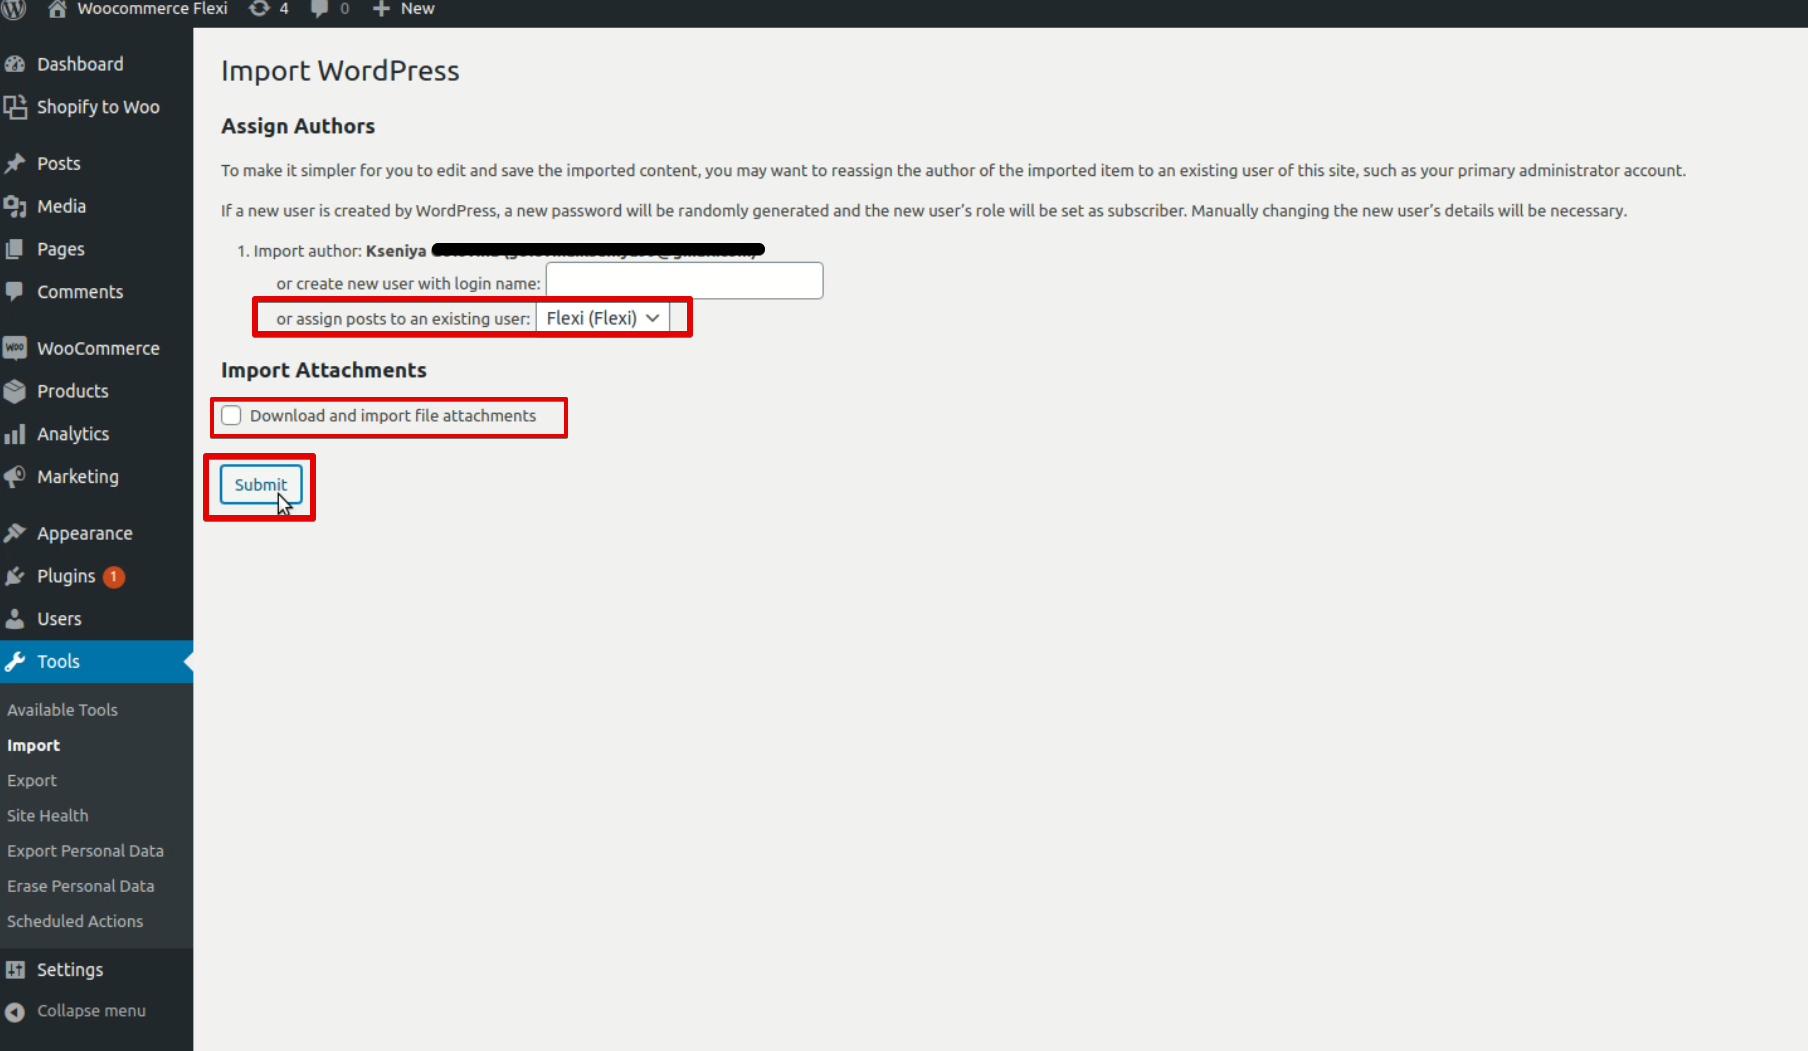
5. In the dropdown menu next to the ‘assign posts to an existing user’ field, select your WordPress account. Make sure that the box ‘Download and import file attachments’ is checked and click Submit.
6. On the next screen, you’ll see a success message telling you that the importing process is finished. It’ll also show you what attachments were not imported for some reason.
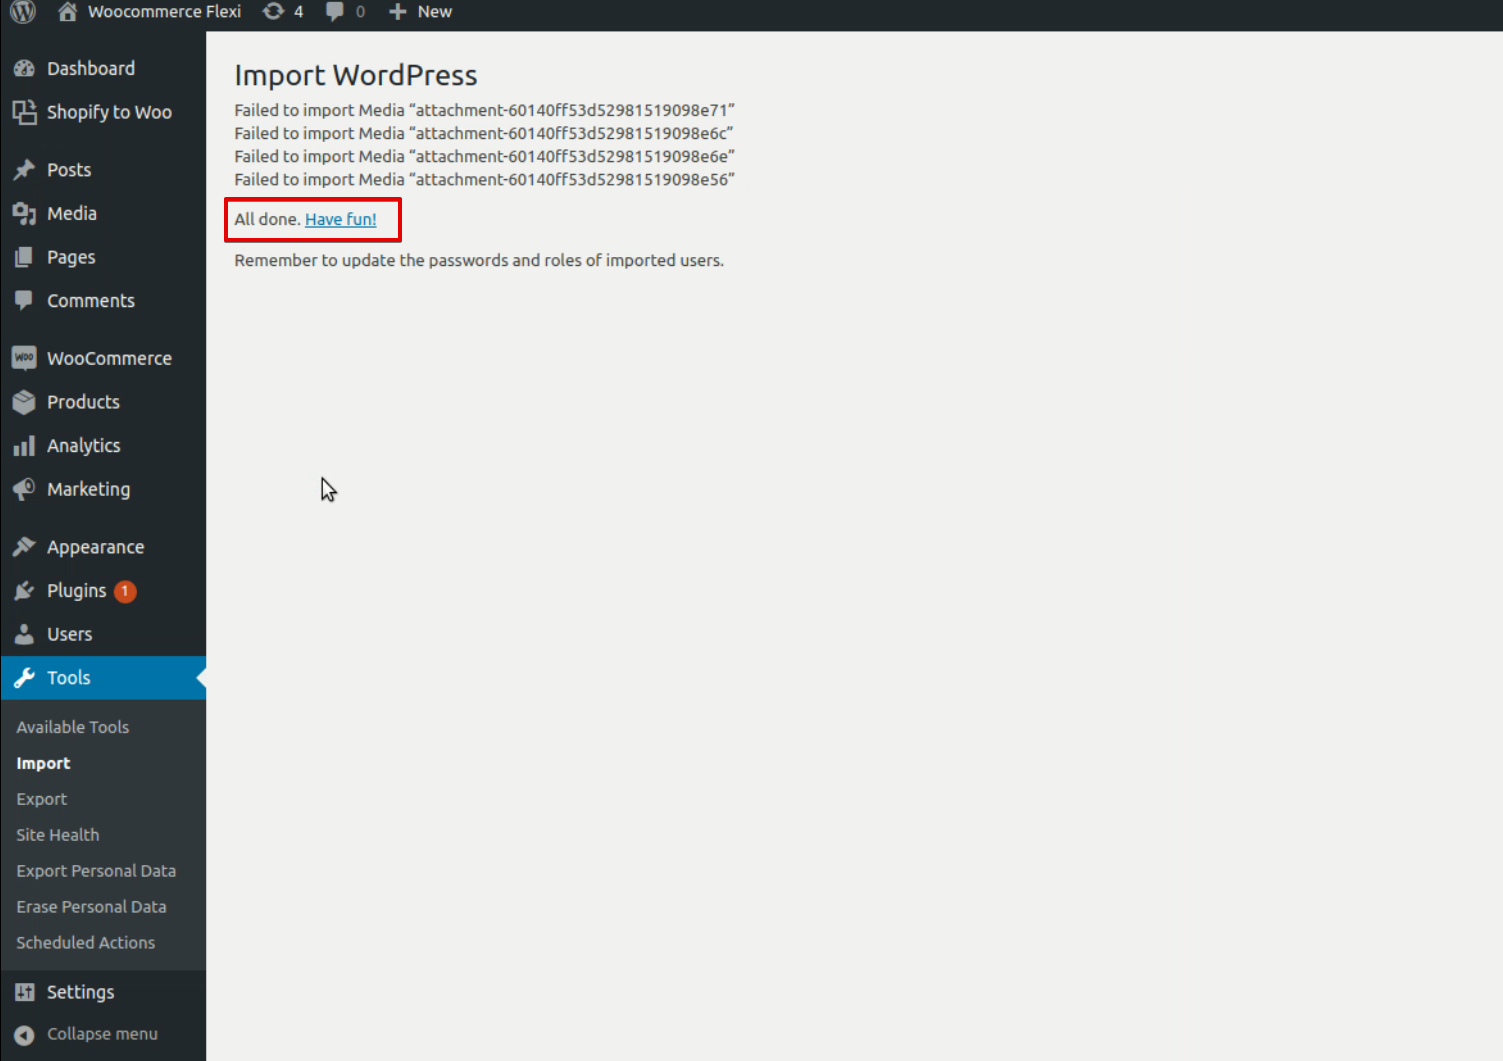
The imported pages and posts will appear on the menu under the relevant tabs. Review them to ensure that everything was transferred correctly. But note that this method doesn’t let you migrate certain blocks (e.g., d videos). So, you won’t see them on the imported pages.
Migrating images from Squarespace to WordPress
The WordPress importer doesn’t import images from Squarespace. Some of them will show up in the imported blog posts. But if you check their URLs, you’ll see that they are served from the Squarespace site. It means that these links will become broken once you deactivate your old website. That’s why you need to migrate them to WordPress either manually or by using the WordPress plugin.
If you decide to do everything manually, you’ll have to save all images to your computer by right-clicking on each of them. After that, you’ll need to upload these images to the WordPress Media Library.
However, the manual method might be very time-consuming if you have many images on your Squarespace site. So, we recommend using the Auto Upload Images plugin:
1. On the WordPress dashboard, go to Plugins -> Add new. Type ‘Auto Upload Images’ in the search bar. Once the plugin is found, click Install Now -> Activate.
2. Now, go to Posts -> All Posts in the left sidebar.
3. Click Screen Options. Then, change the number of items per page to the number of posts you imported or the highest possible number (i.e., 999). Click Apply.
4. The page will be reloaded, and you’ll see the entire list of blog posts. Check all the boxes. Then, select Edit in the drop-down menu above and then click Apply.
5. On the next screen, click Update. Be sure not to change anything on this page.
6. Repeat the same process for other imported pages.
Once you’re done with this task, all images from your pages and posts will appear in the WordPress Media Library. Yet, they might be poorly optimized, which might slow down your site’s performance. So, it’s a good idea to review images after migration and change their sizes manually if needed.
Migrating products using Cart2Cart
If you own an ecommerce business, you’ll also need to transfer products, customers, and orders from Squarespace to WordPress (WooCommerce). The easiest way to do this is to use the Cart2Cart application. Here’s how it works:
1. Go to Cart2Cart, create an account, and click Start Free Demo. The trial version will allow you to migrate a small portion of products and other data from Squarespace to WordPress. To carry out the full transition, you’ll need to pay for the service.
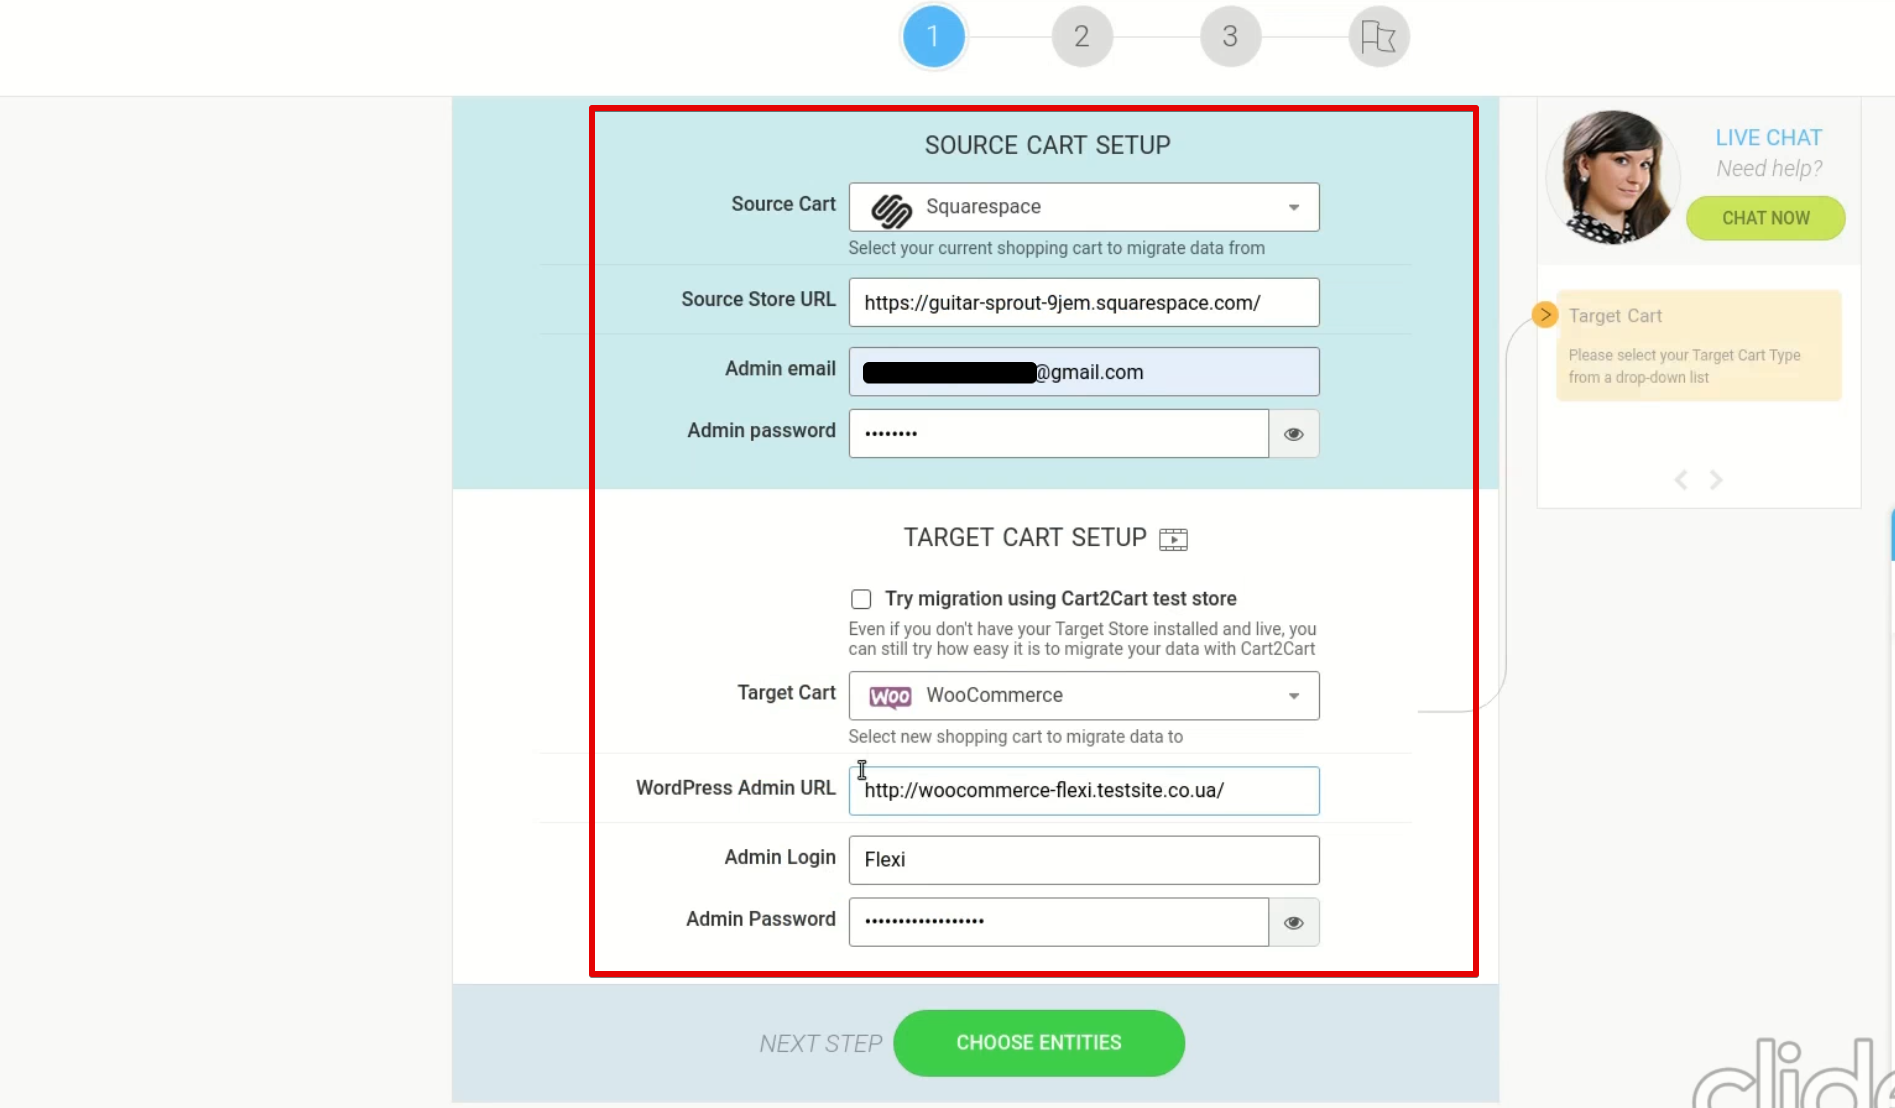
2. Now, you have to connect the source cart (Squarespace) to a target cart (WordPress). Fill out all the fields on the page (i.e., platform, URLs, admin login/email, and passwords). Then, click Choose entities.
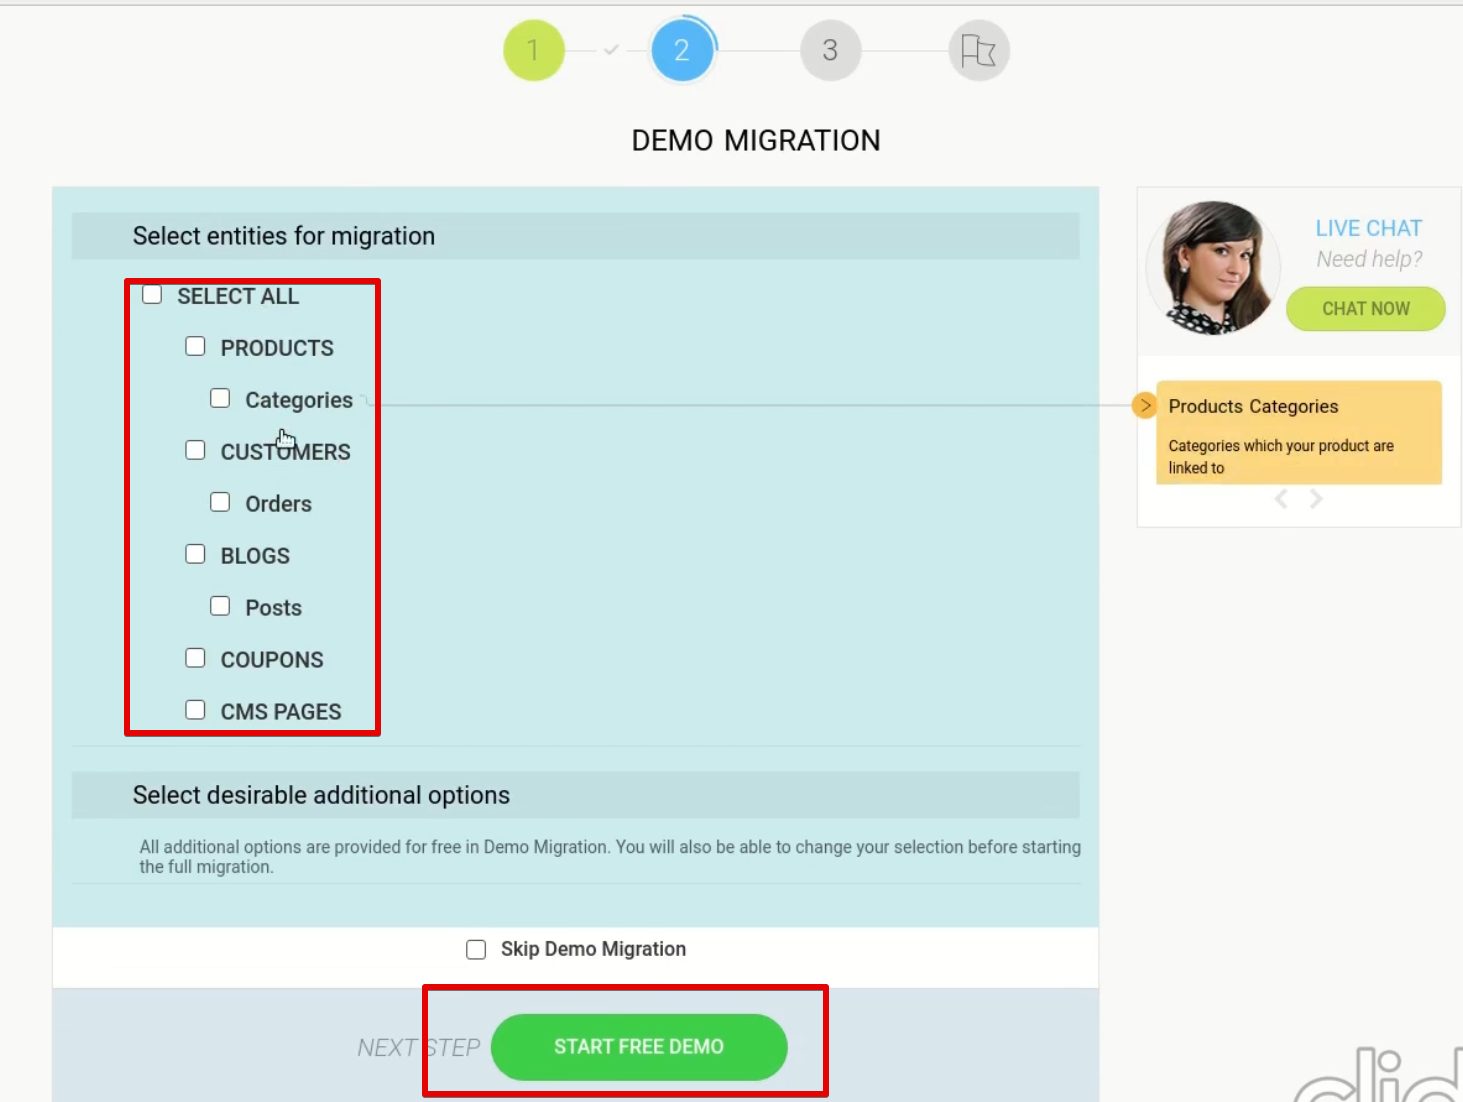
3. On the next page, check the boxes belonging to categories of data that you want to migrate. Click Start Free Demo.
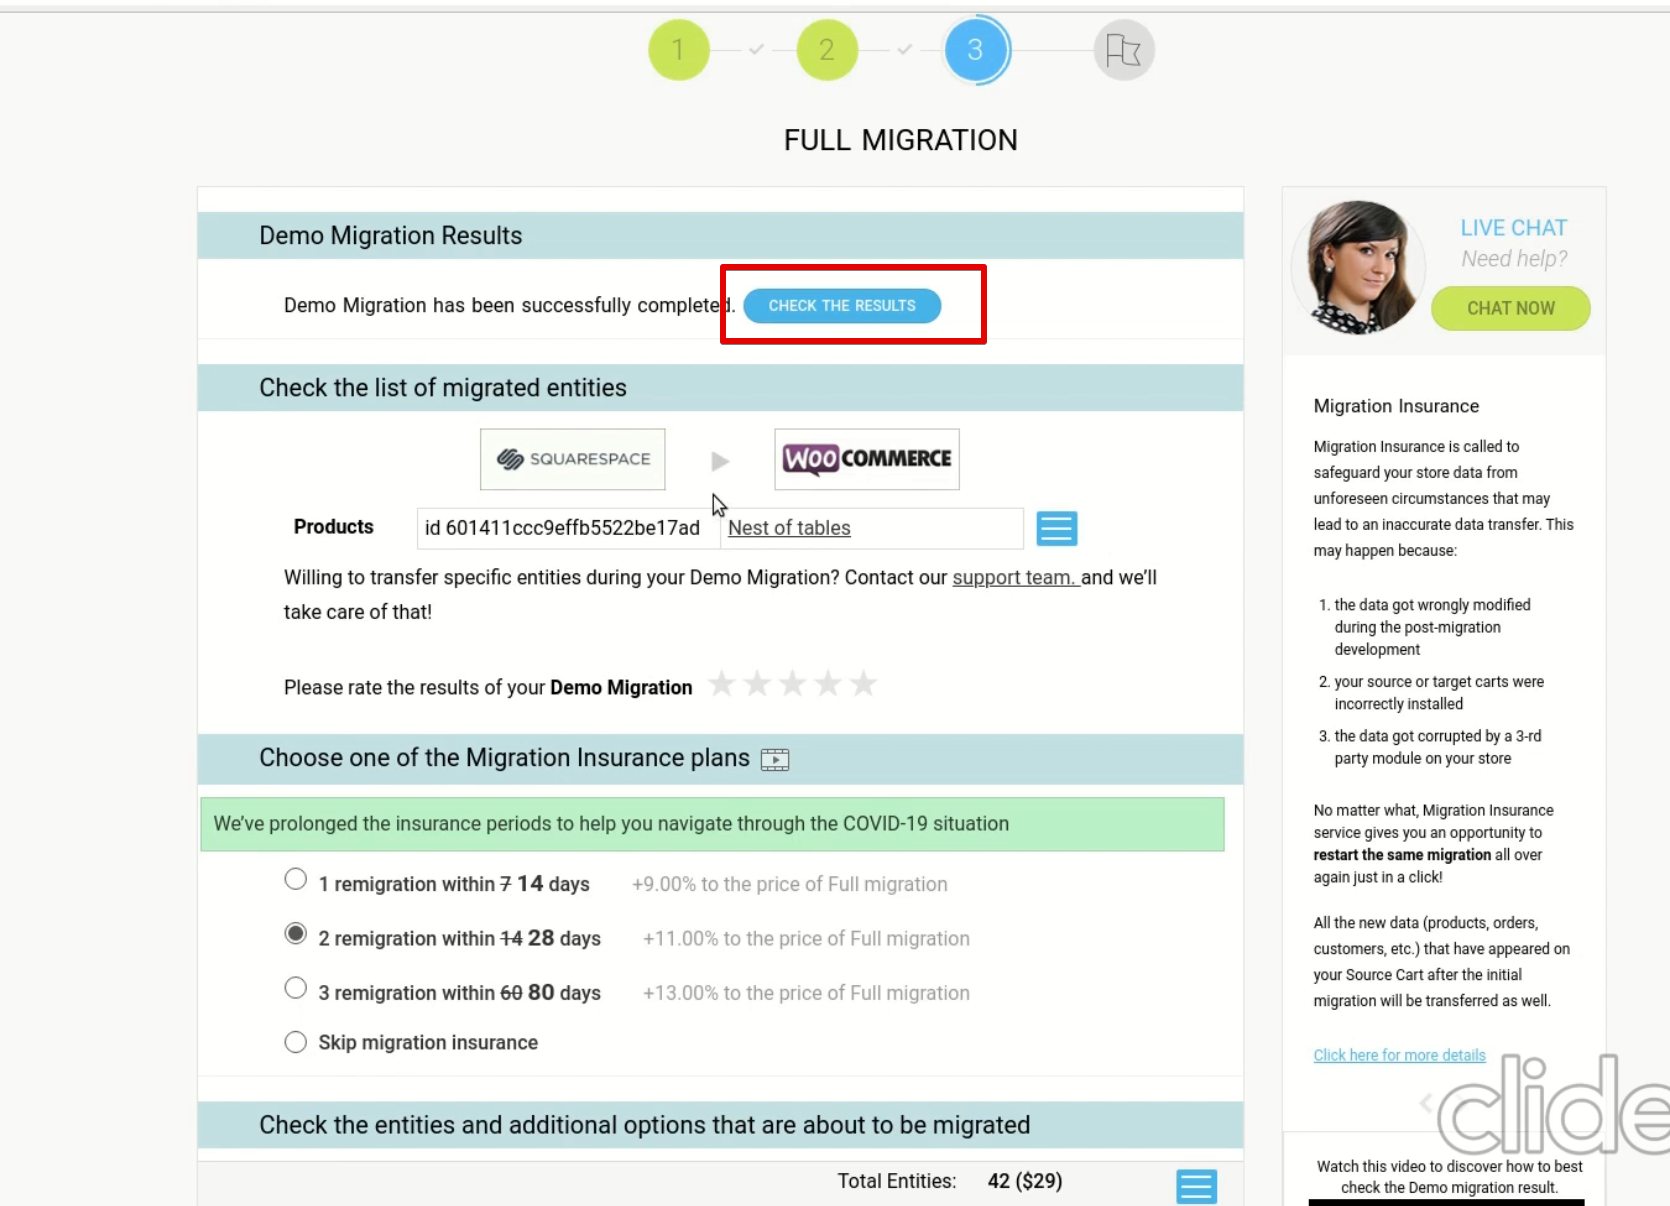
4. After the demo migration is completed, click Check results. If everything is fine, select the plan that suits you best and start the full migration.
The main downside of using Cart2Cart is that it’s a paid application. But it can save you a lot of time and hassle, especially if you need to move a lot of products from Squarespace to WooCommerce. So, usually, these investments are worth it.
Copying and pasting other content
Unfortunately, it’s impossible to convert Squarespace to WordPress using only the methods described above. The matter is that they won’t allow you to migrate blog posts from the second and further blog pages, album pages, portfolio pages, video/audio blocks, and some other information. If you want to have this content on your new WordPress website, you’ll need to transfer it manually.
Go to the WordPress dashboard and create new pages one by one. After that, copy and paste the relevant information and media files.
If you have a lot of simple pages with similar structures, you can speed up the process with plugins for mass creation of posts and/or pages (e.g., Quick Bulk Post & Page Creator, Bulk Page Creator). Install one of them and follow the usage instructions.
Moving Squarespace to WordPress: post-migration steps
Once you move all the content from Squarespace to WordPress, the migration process will be officially over. But there are still a few things that you’ll need to take care of.
Editing permalinks
Unlike Squarespace, WordPress allows you to edit URLs. It means that you can make them shorter, more readable, and more SEO-optimized.
From the WordPress dashboard, enter the Setting section and then click on the Permalinks tab. Choose one of the options offered by WordPress or create a custom URL structure.
You may also want to use one of the WordPress redirection plugins (e.g., Redirection or Simple 301 Redirects) not to lose all the traffic from the old Squarespace site.
Fixing broken internal links
Changing the permalink structure will break internal links to pages, posts, and media elements. That’s why you’ll need to find them and fix everything. This task can be done manually, but it would be rather tedious, and you can easily miss something. So we recommend using the Broken Link Checker plugin. It will help you detect all broken links and update all of them in one place.
Transferring your domain name
After you ensure that the new site works properly and is ready to welcome visitors, you can transfer your Squarespace domain name to WordPress. Go to the Squarespace dashboard and click Settings -> Domains. Then, choose the necessary domain and deselect the Lock Domain field (locked domains cannot be transferred). Click Get Transfer Key below, copy it, and send it to your new registrar. It should help you with the rest.
Conclusion
The goal of this article was to explain how to switch from Squarespace to WordPress. To make re-platforming easier for you, we tried to cover as many aspects of the migration process as possible. However, every site is unique, and there might be unexpected bumps in the road. Flexi IT provides professional WordPress development services. Our team has already helped numerous businesses to move their websites to WordPress. So if you need help, just drop us a line!
