Magento is a comprehensive ecommerce platform that offers advanced functionality for solving a wide range of business problems. A lot of internet merchants choose to set up their stores based on this CMS due to flexibility, reliability, and versatility. However, these benefits come at a high cost. When a business scales up, Magento often becomes too expensive. It is also hard to manage and customize. That’s why online store owners often decide to migrate from Magento to WooCommerce, which is a more affordable and user-friendly option.
This article explains how to move a Magento store to WooCommerce smoothly. We’ll describe four re-platforming scenarios so you can choose the one that fits you best.
How to prepare for Magento-WooCommerce migration
If, after weighing up all Magento vs WooCommerce pros and cons, you’ve decided to migrate, you’ll need to complete the preparation stage first. The steps it covers will create a foundation for the future transition and ensure that you won’t lose any data along the road. So, here’s what you have to do.
Install WordPress and WooCommerce
WooCommerce is a WordPress plugin. So, to create a new store, you’ll need to set up a WordPress site. Since WordPress is a self-hosted platform, the first thing you should do is select a hosting provider. Some hosting providers offer WordPress pre-installs. If it’s the case, you’ll be able to set up a website in a few clicks. Otherwise, go to the WordPress site and follow the instructions that you’ll find there.
Once everything is done, find the Plugin tab on the admin dashboard, click Add new, and look for WooCommerce using a search bar. Click Install -> Activate.
Note that it won’t be possible to migrate the design of your website from Magento to WooCommerce. So, you might also want to choose a theme for your store at this stage. Go to WooCommerce Theme Store and select the free or paid theme that suits its best. In addition, most themes in the general WordPress Themes Store are compatible with WooCommerce, so you can look at them, too. There is also an option to create a custom theme, but it requires some time and financial resources.
Back up information from the Magento store
Backing up the Magento store is not a mandatory step, but it’s highly recommended. Copying a site will prevent major data loss even if some unexpected glitches occur during the migration process. Here are the steps that you need to take:
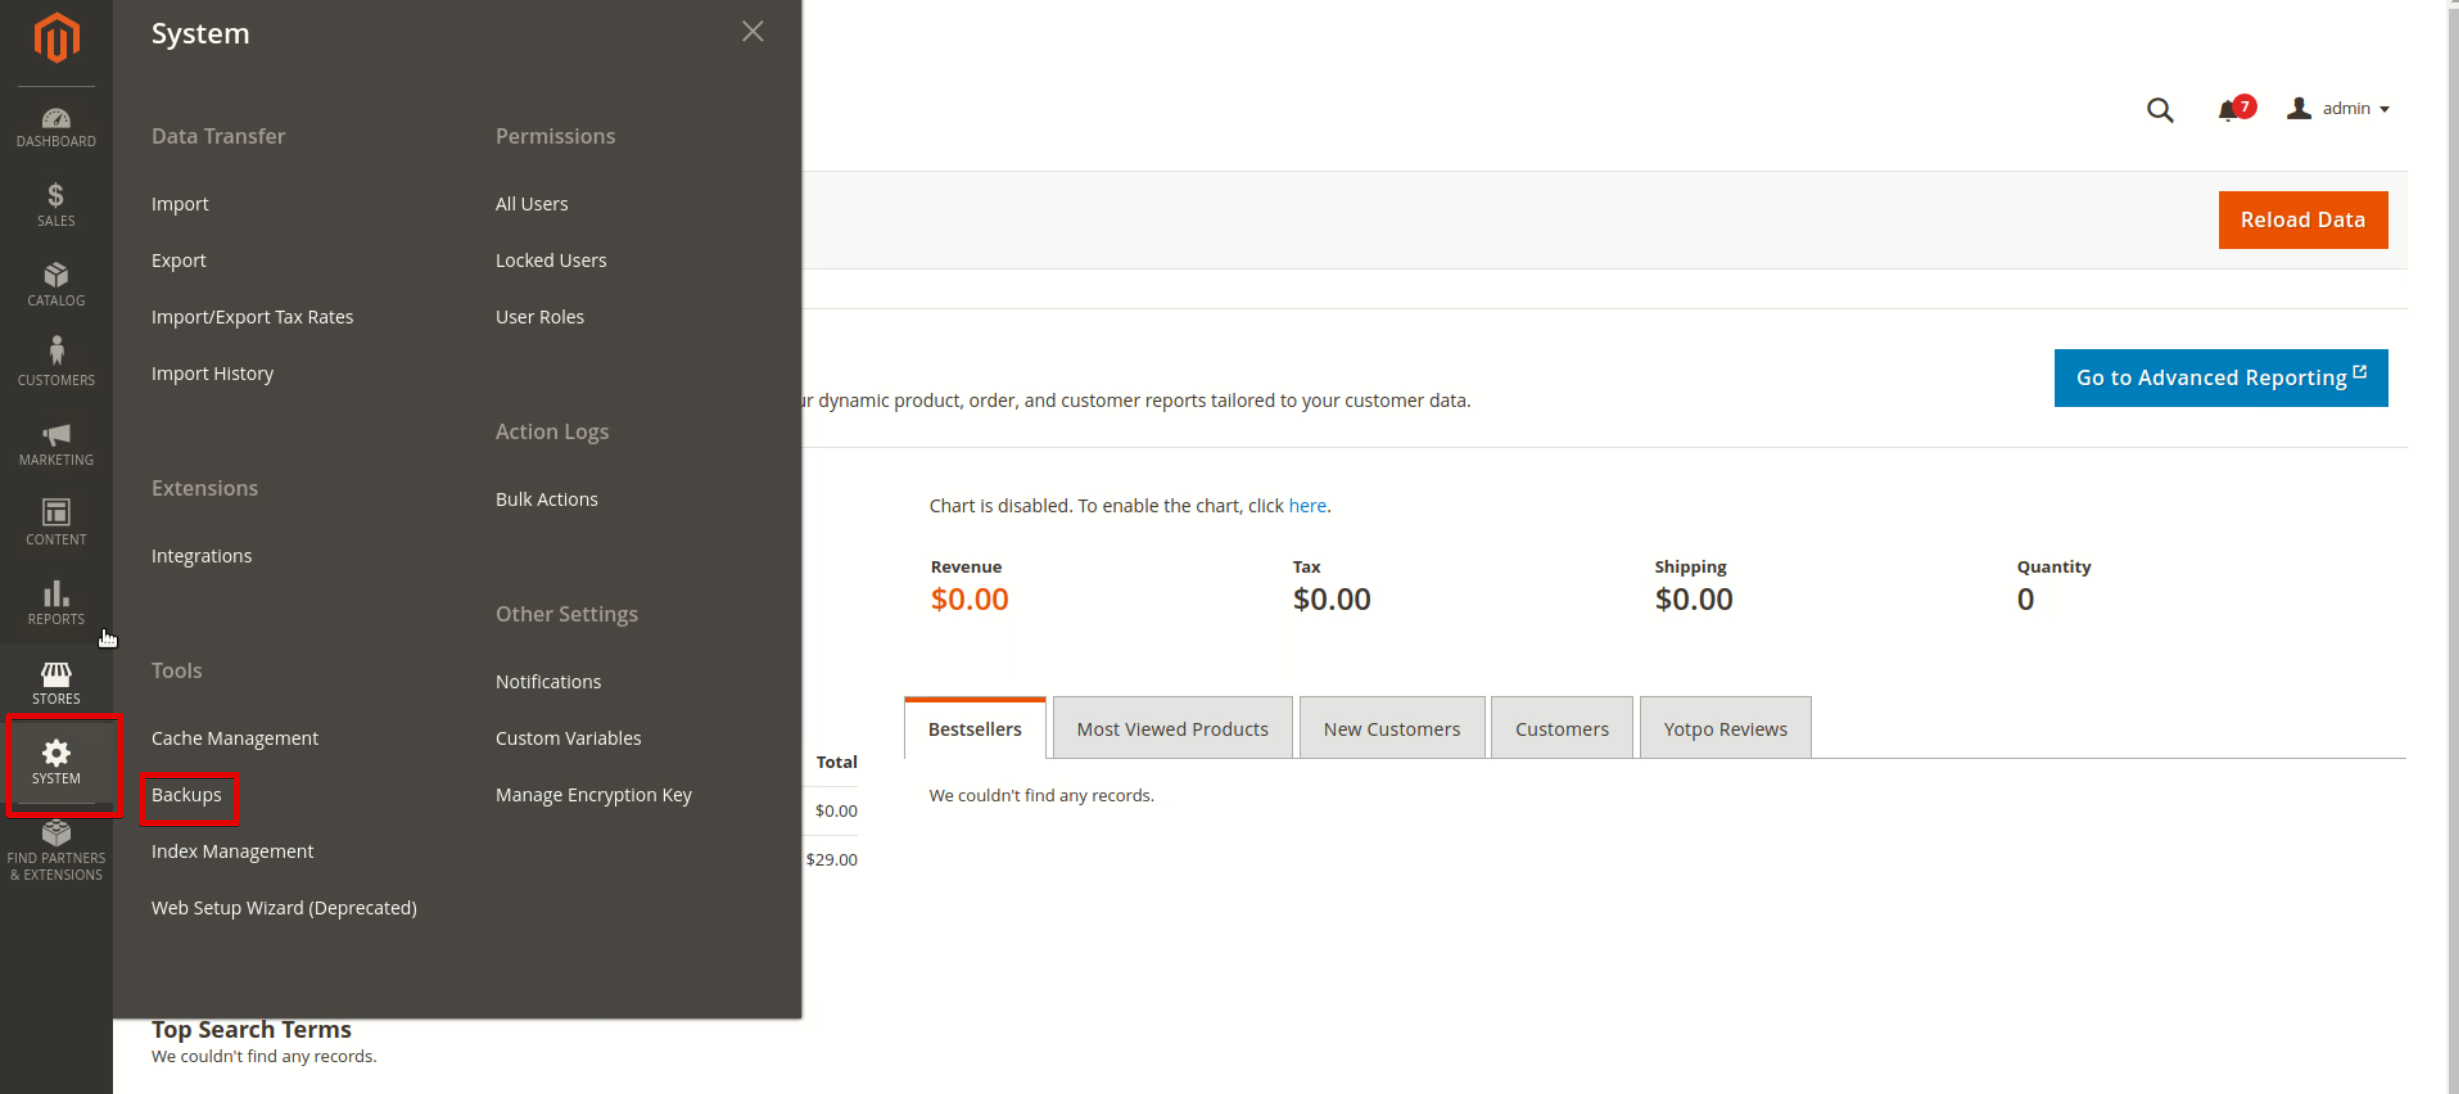
1. On the Magento dashboard, click Systems, then Backups.
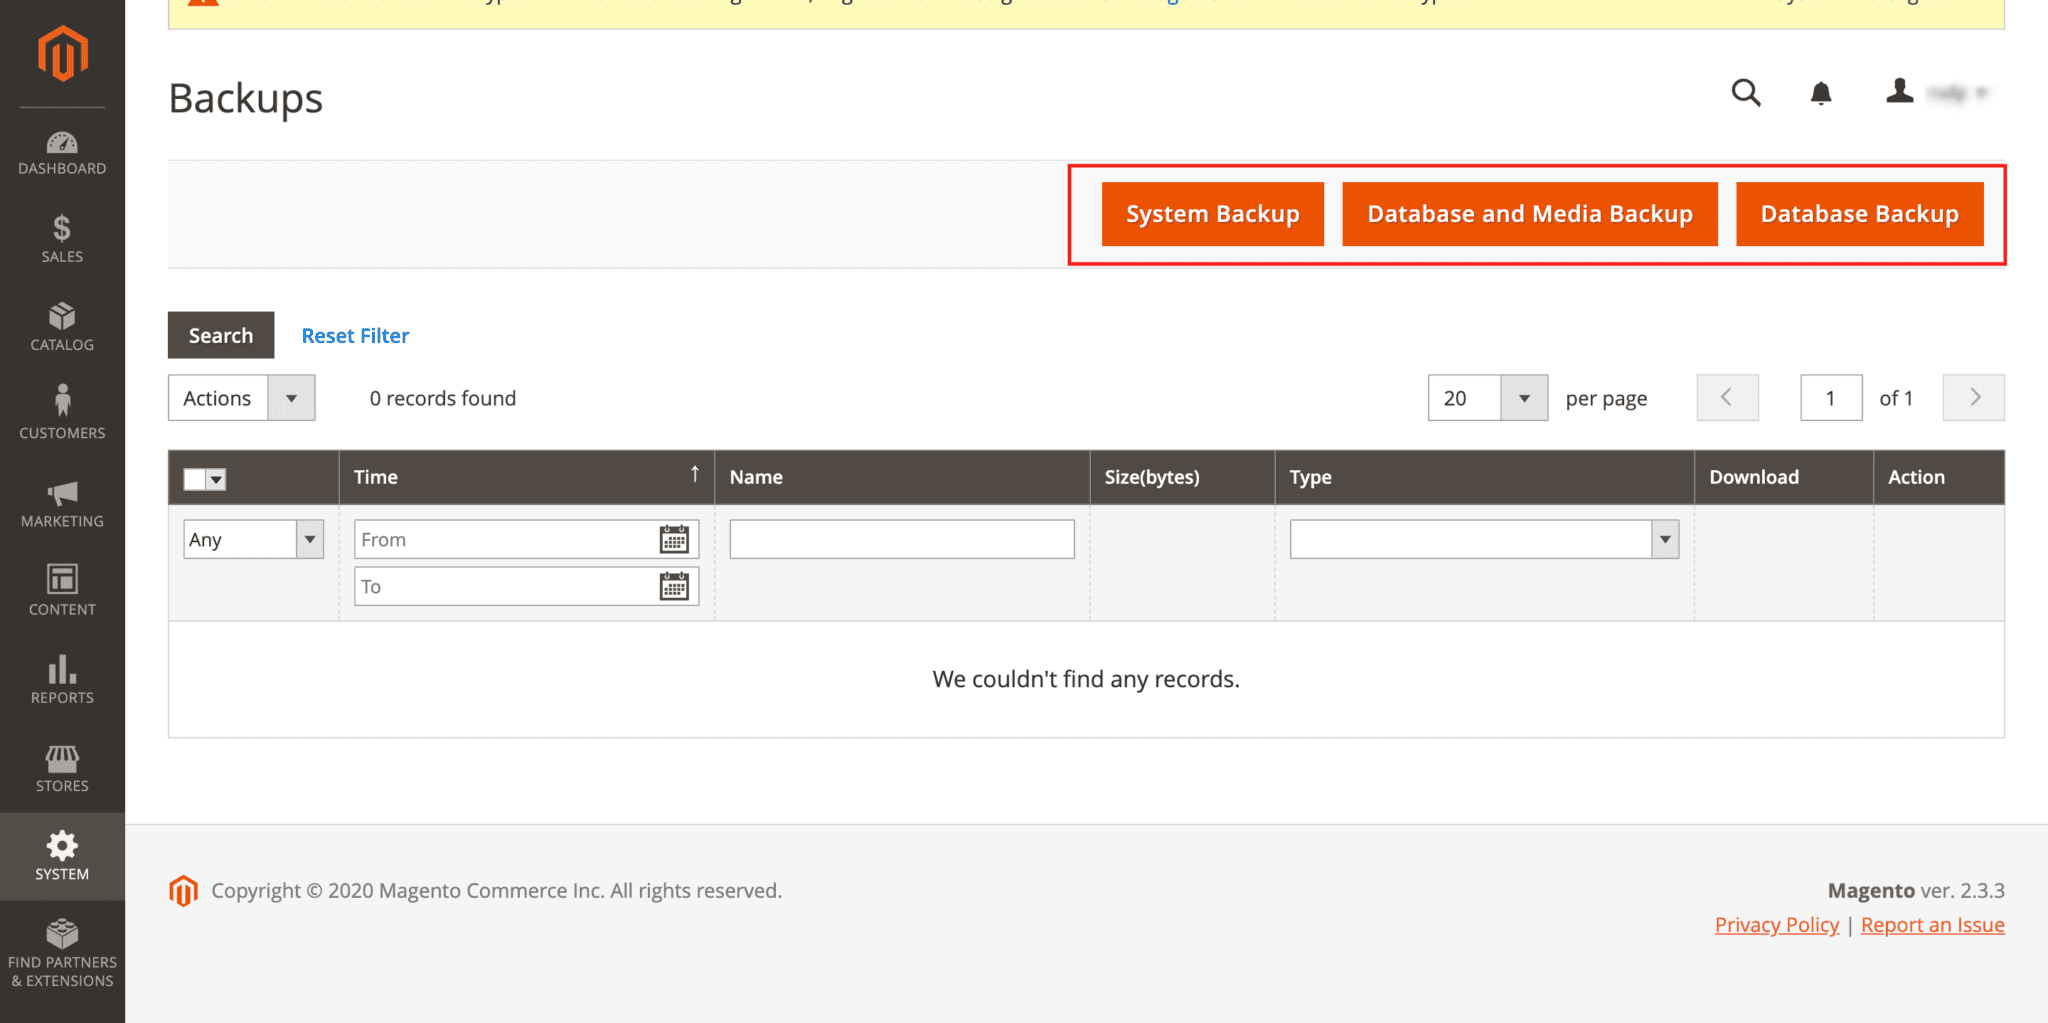
2. You’ll be taken to the page where you’ll have to choose what type of backup you want to create. Select System Backup that covers both the database and file systems.
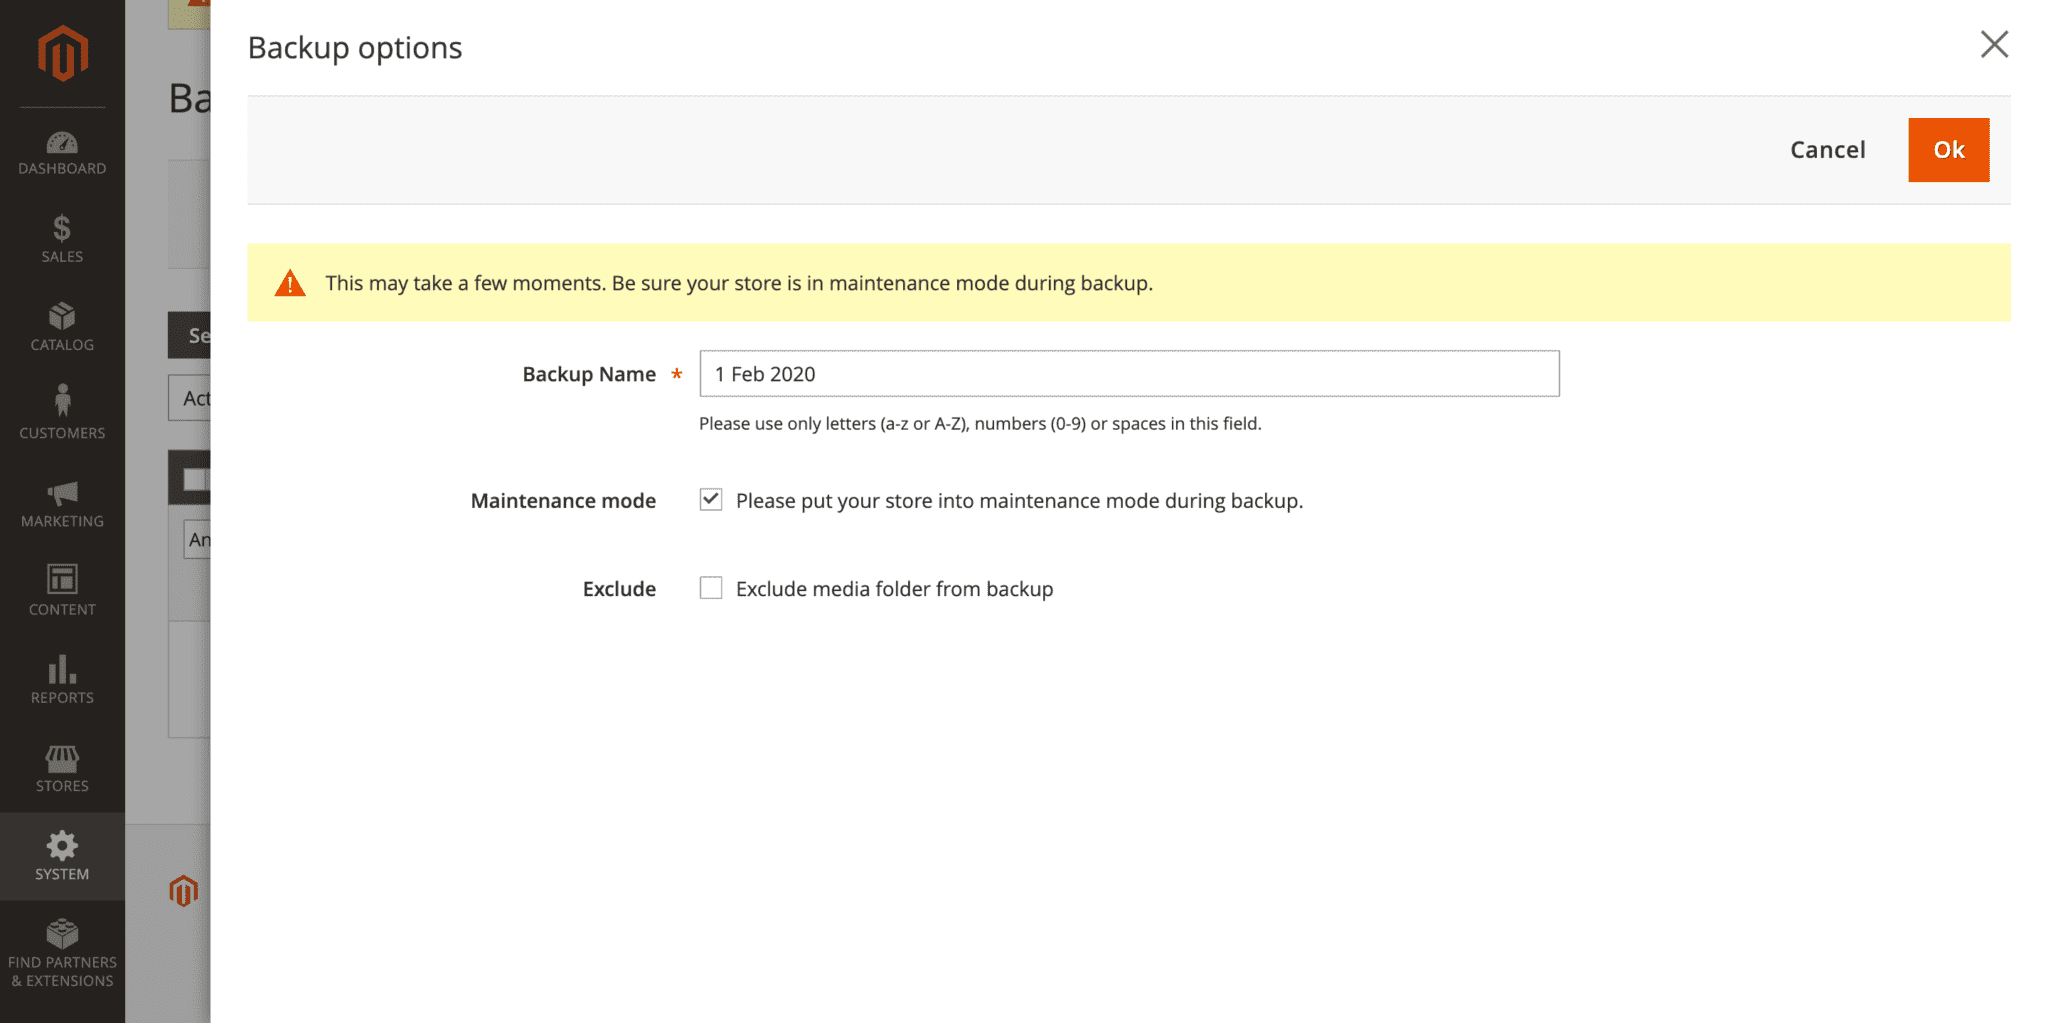
3. On the next screen, enter a backup name (e.g., WooCommerce migration) and check the box for Maintenance mode. Click OK in the upper right corner
You’ll be able to see the name of your backup file on the Backup page. Don’t delete it until the migration is completed and you make sure that all information has been safely transferred.
Once the WooCommerce store is created, and the Magento site is backed up, you can start migrating the data from one ecommerce platform to another.
How to switch from Magento to WordPress (WooCommerce)
You can carry out the data migration either manually or with the help of digital tools (i.e., applications and plugins). We’ll describe the four most popular scenarios and guide you step-by-step through each of them.
Manual migration
In general, the manual migration from Magento to WooCommerce consists of two phases: exporting data from the Magento store and importing it into the WooCommerce store. Here’s how it should be done.
I. Exporting data from Magent
1. On the Magento dashboard, select Systems -> Export.
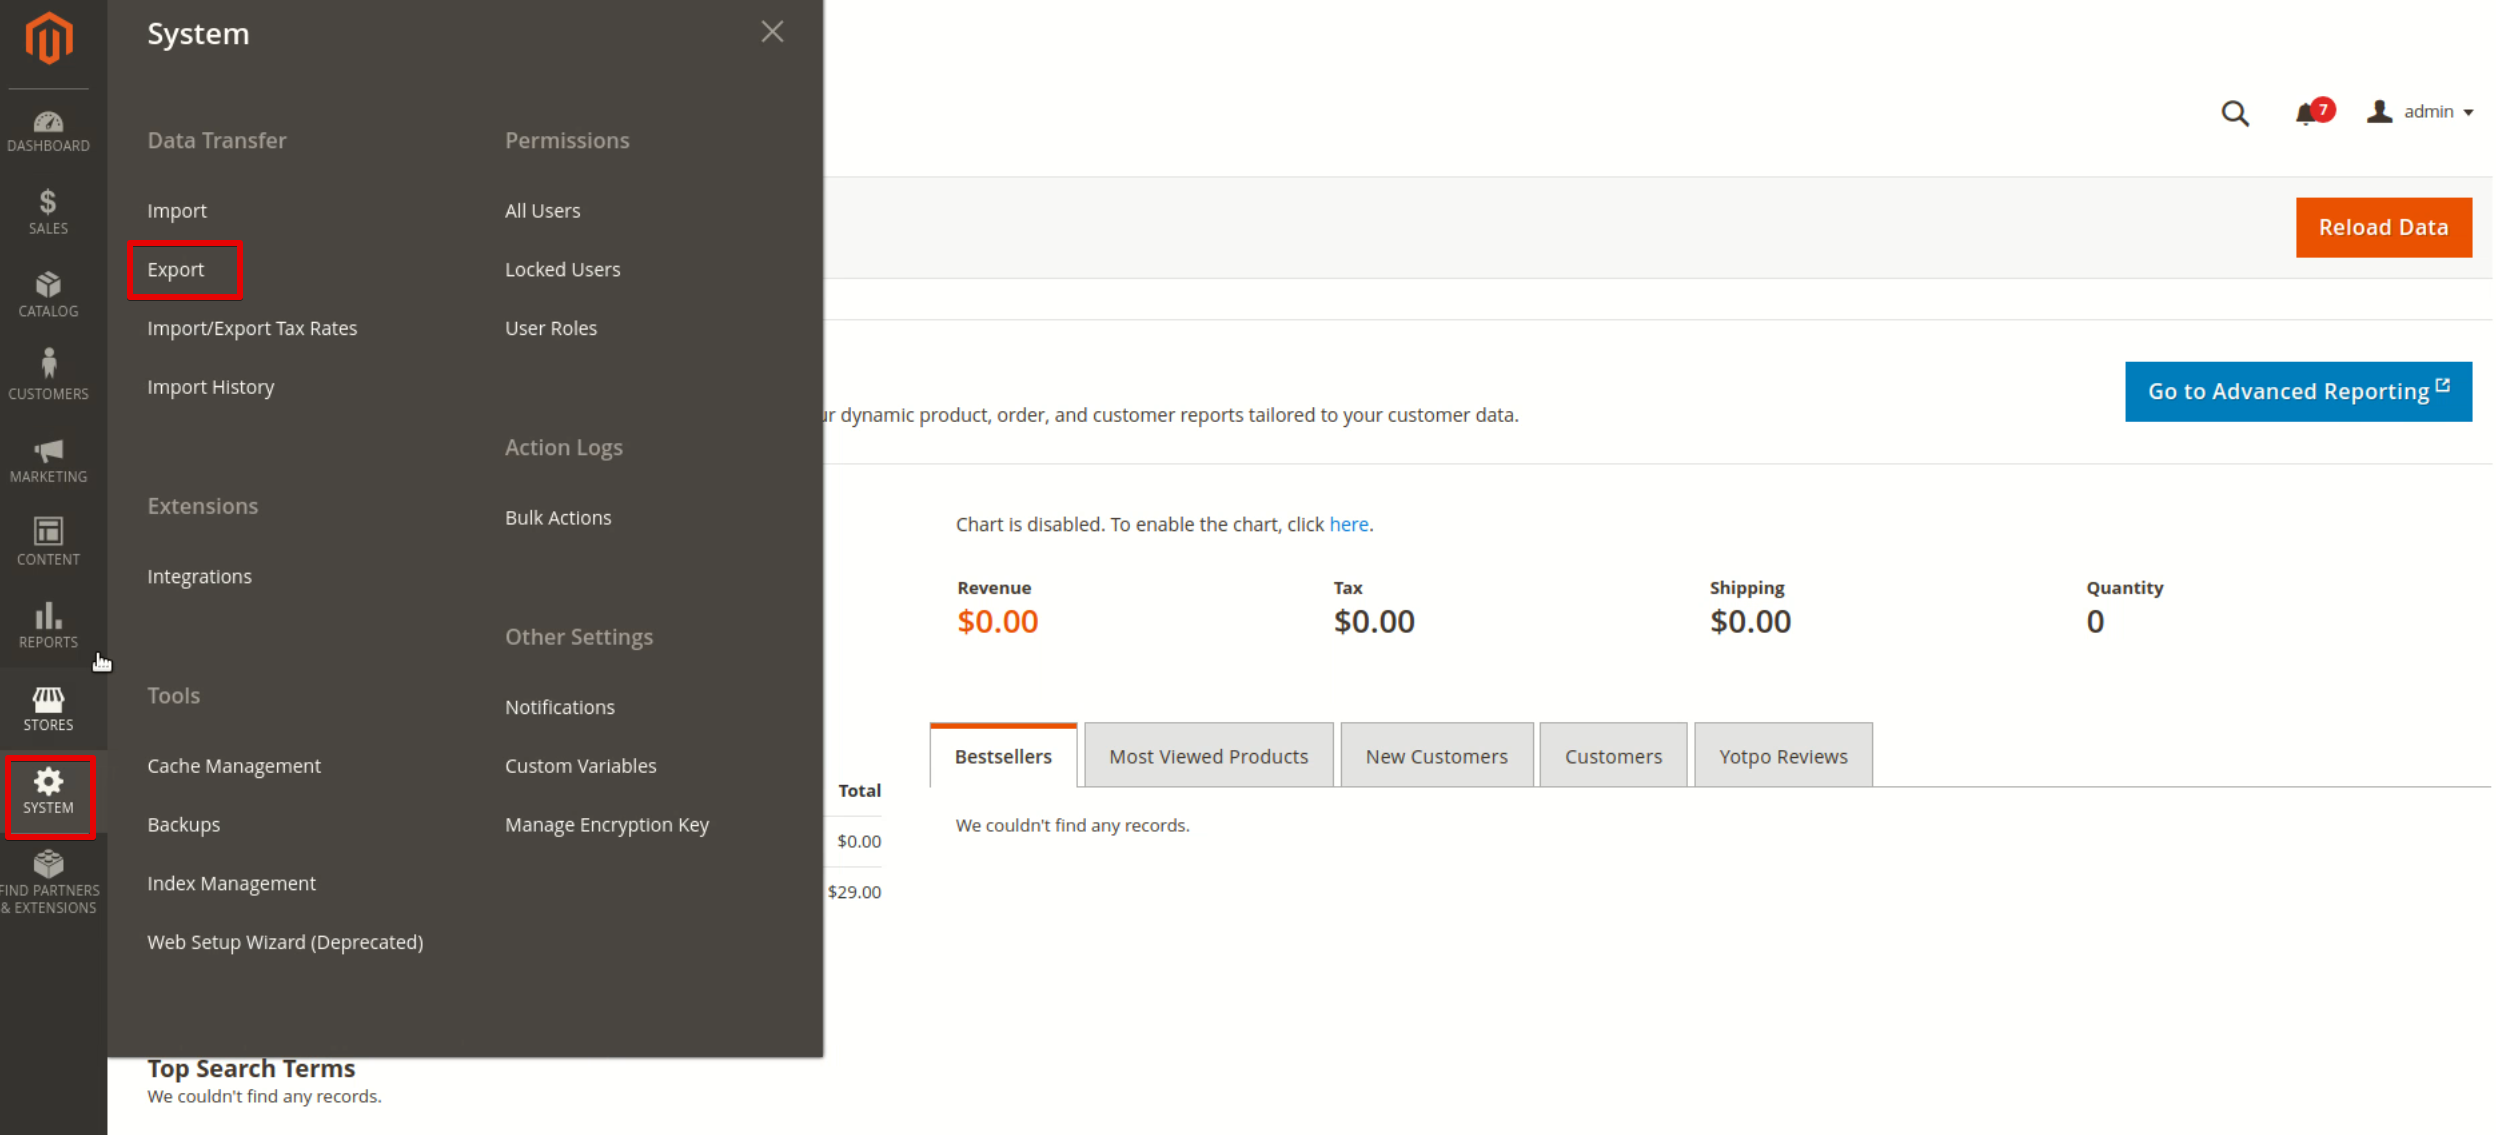
2. From the drop-downs on the next page, select Products and CSV in the Entity type and Export File Format fields, respectively.
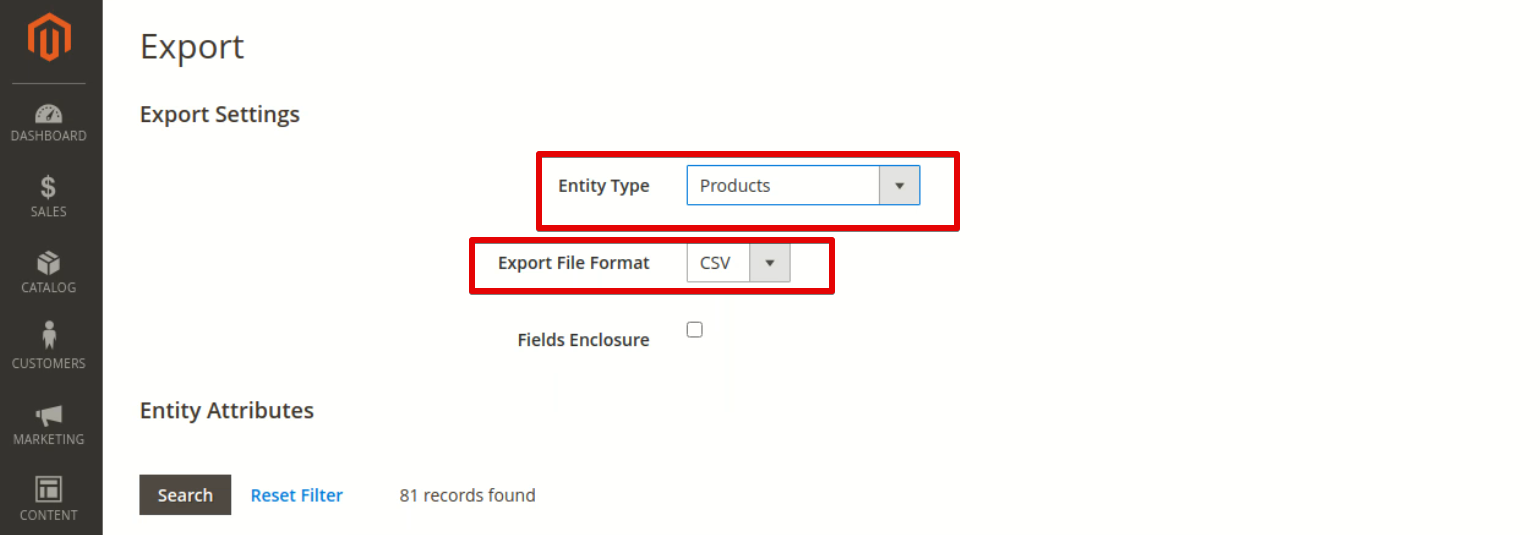
3. Check the boxes in front of entities that should be excluded from the export file. Click Continue below. The system will notify you that the message is added to a queue.
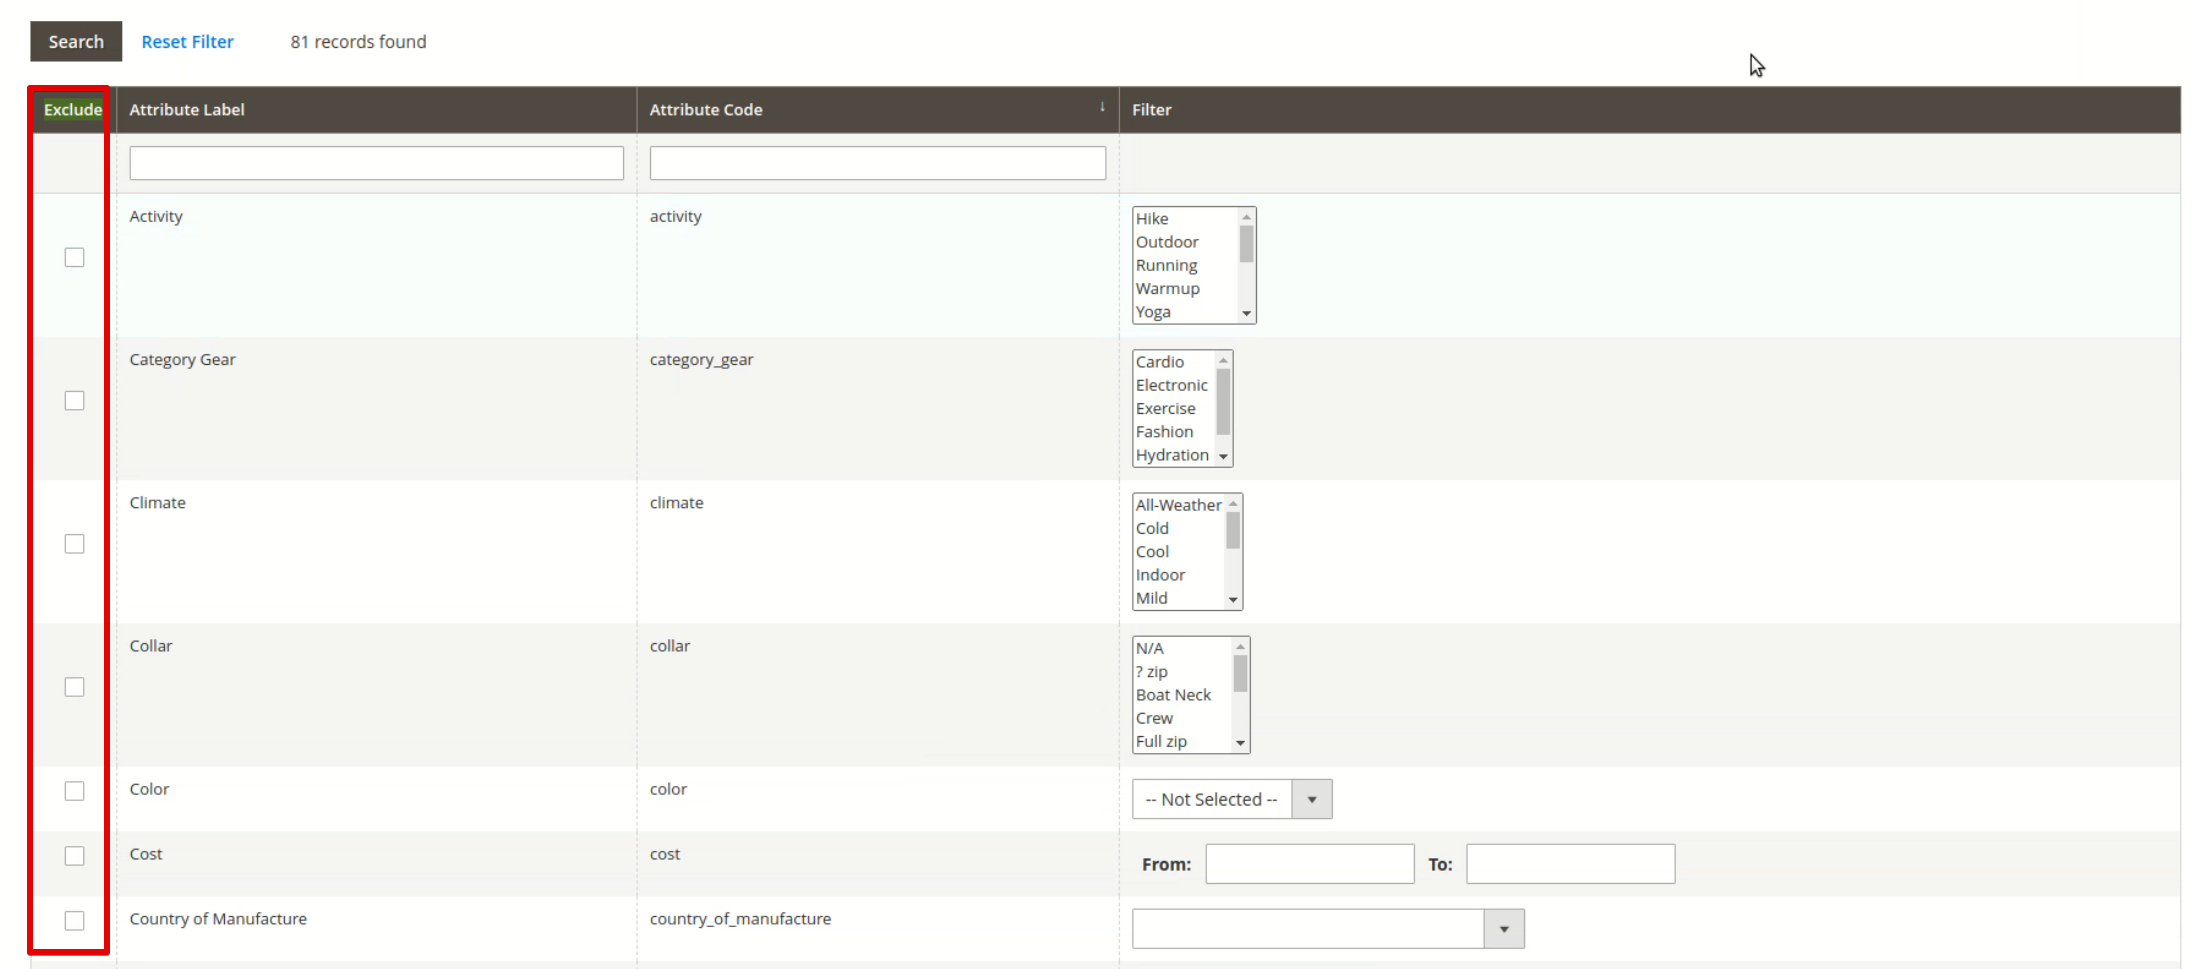
4. Run the following command in Terminal:
queue:consumers:start exportProcessor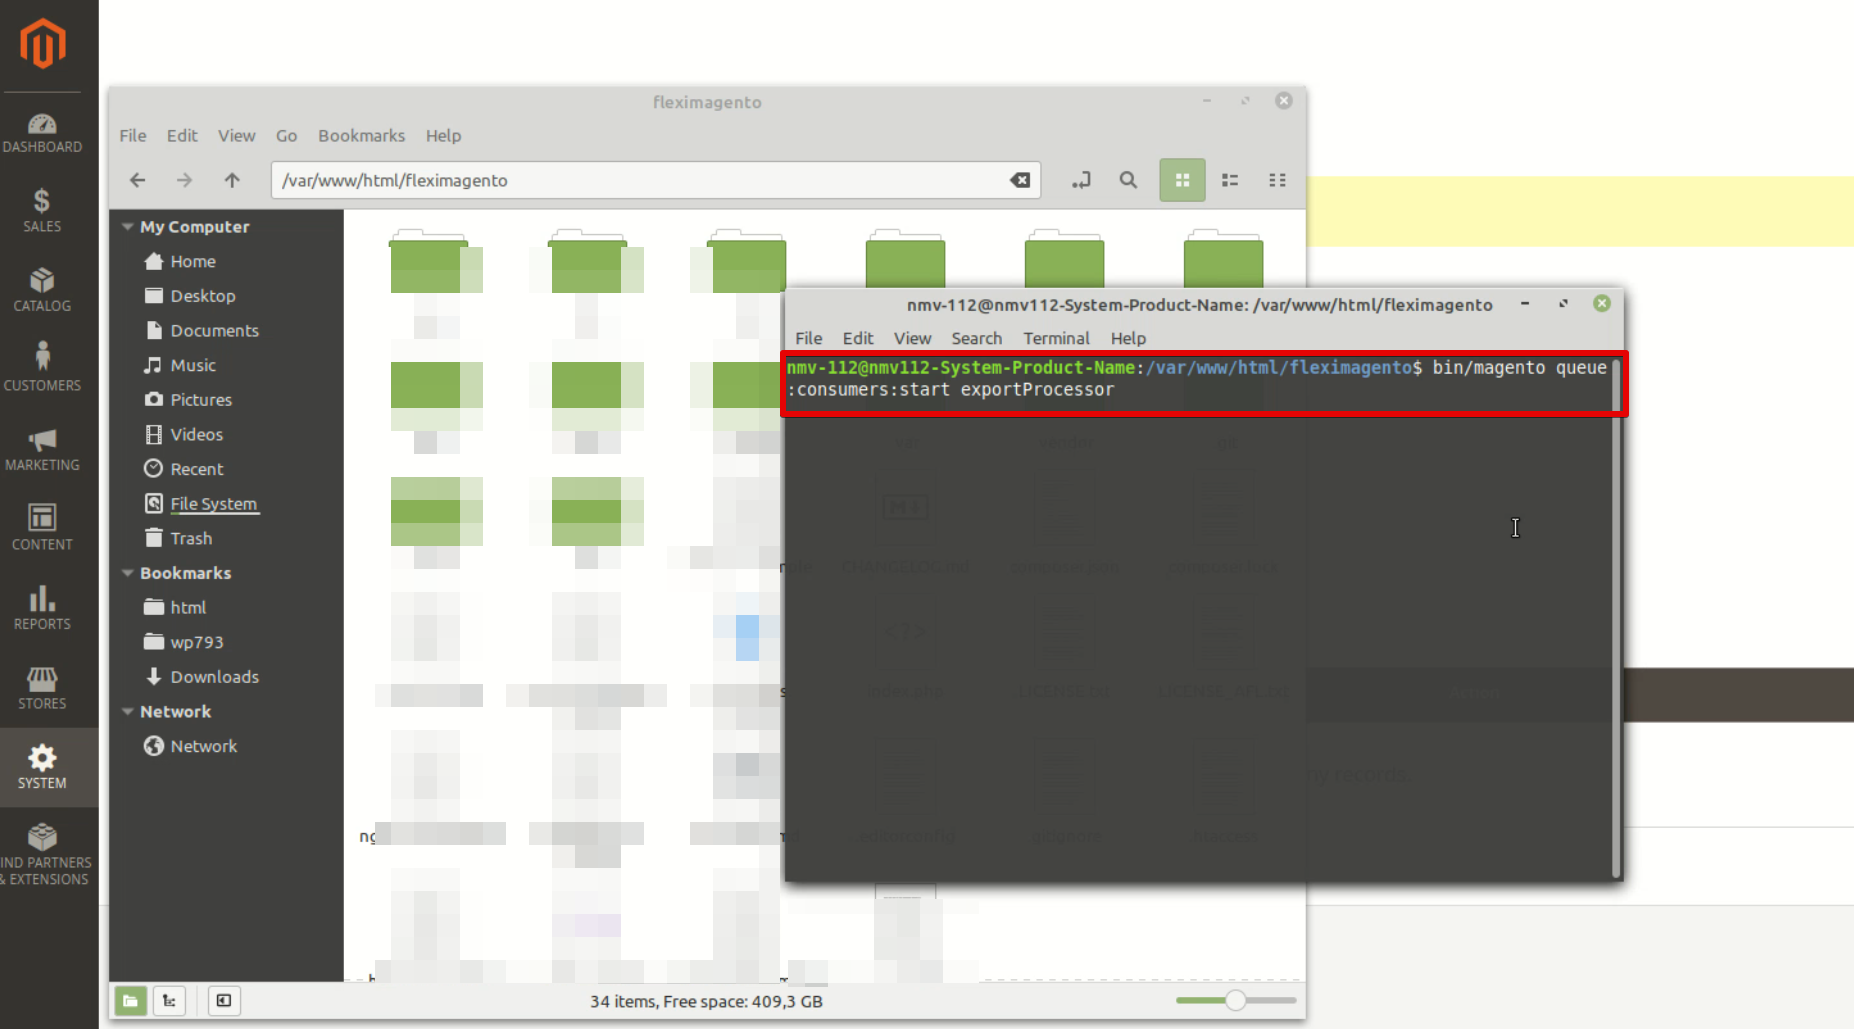
5. Go back to the Export page and update it. Once the command is executed, you’ll see the Export file ready for download.
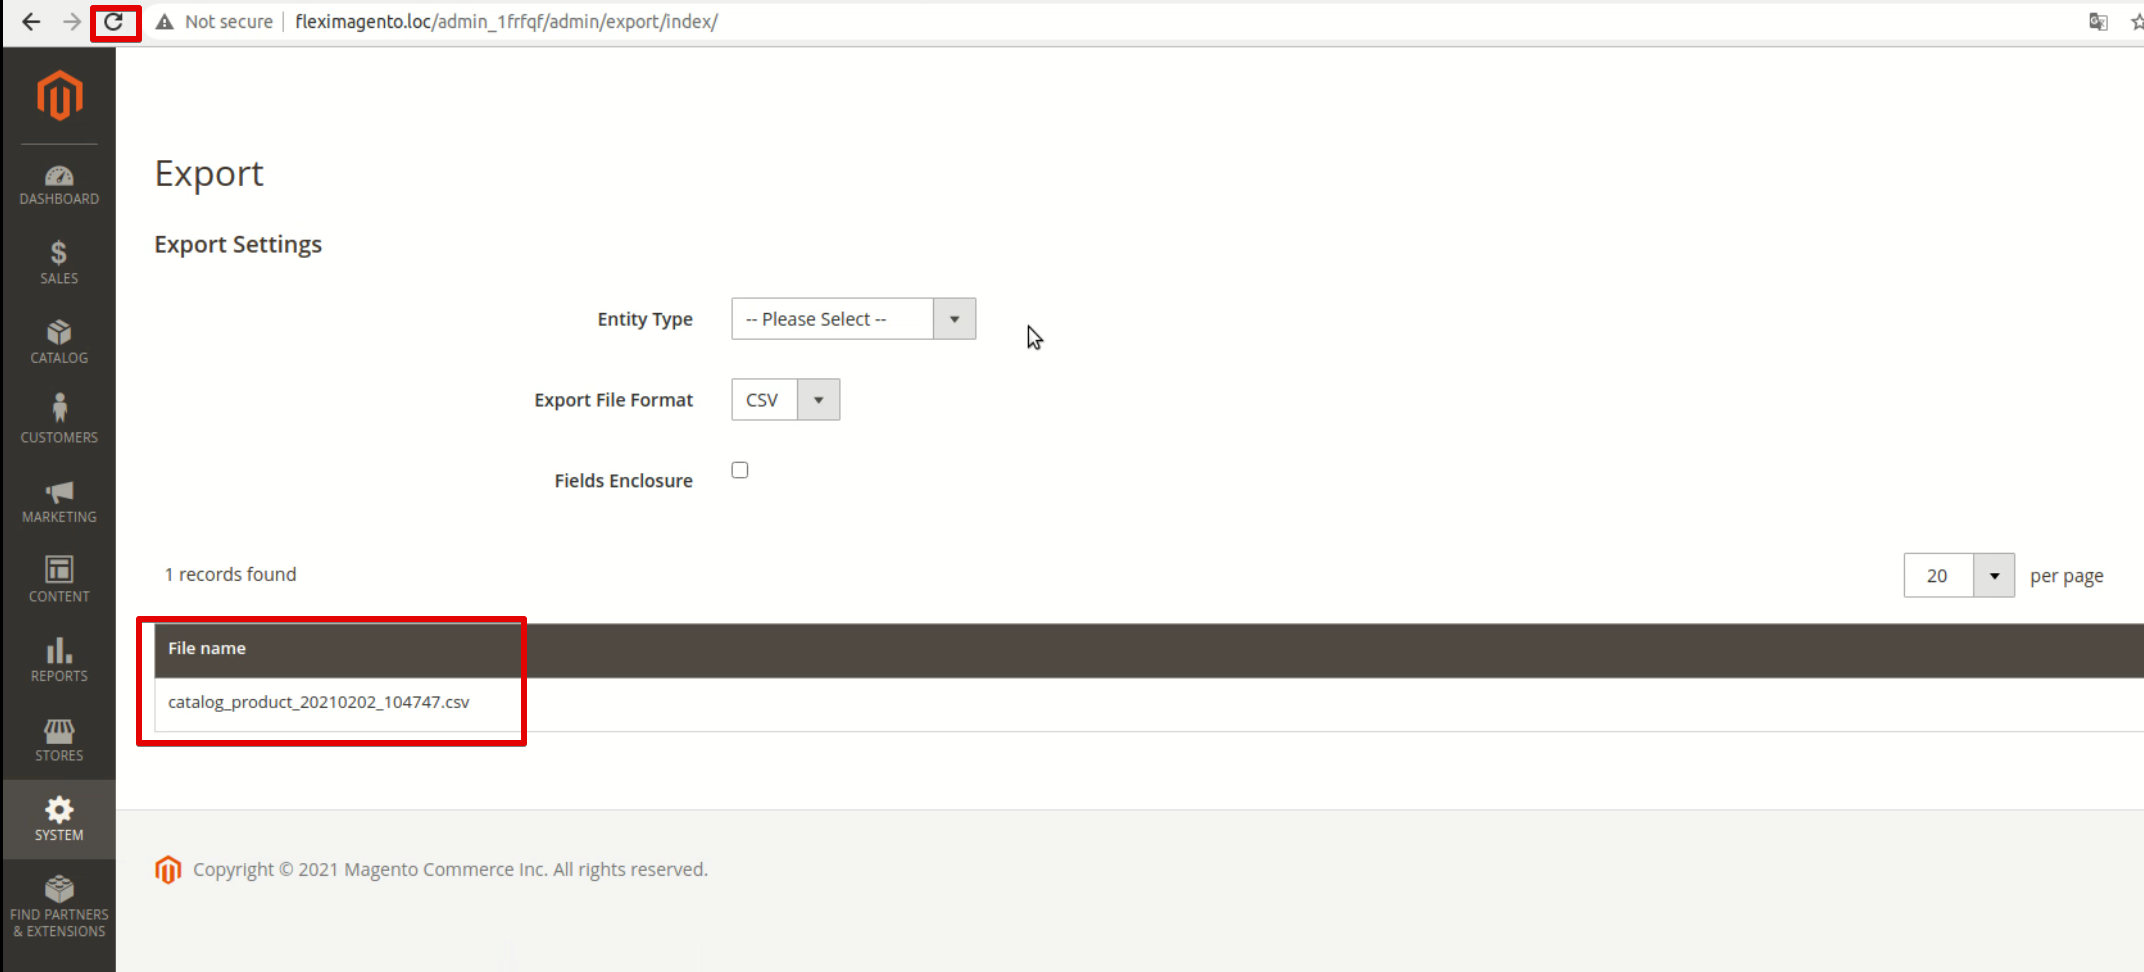
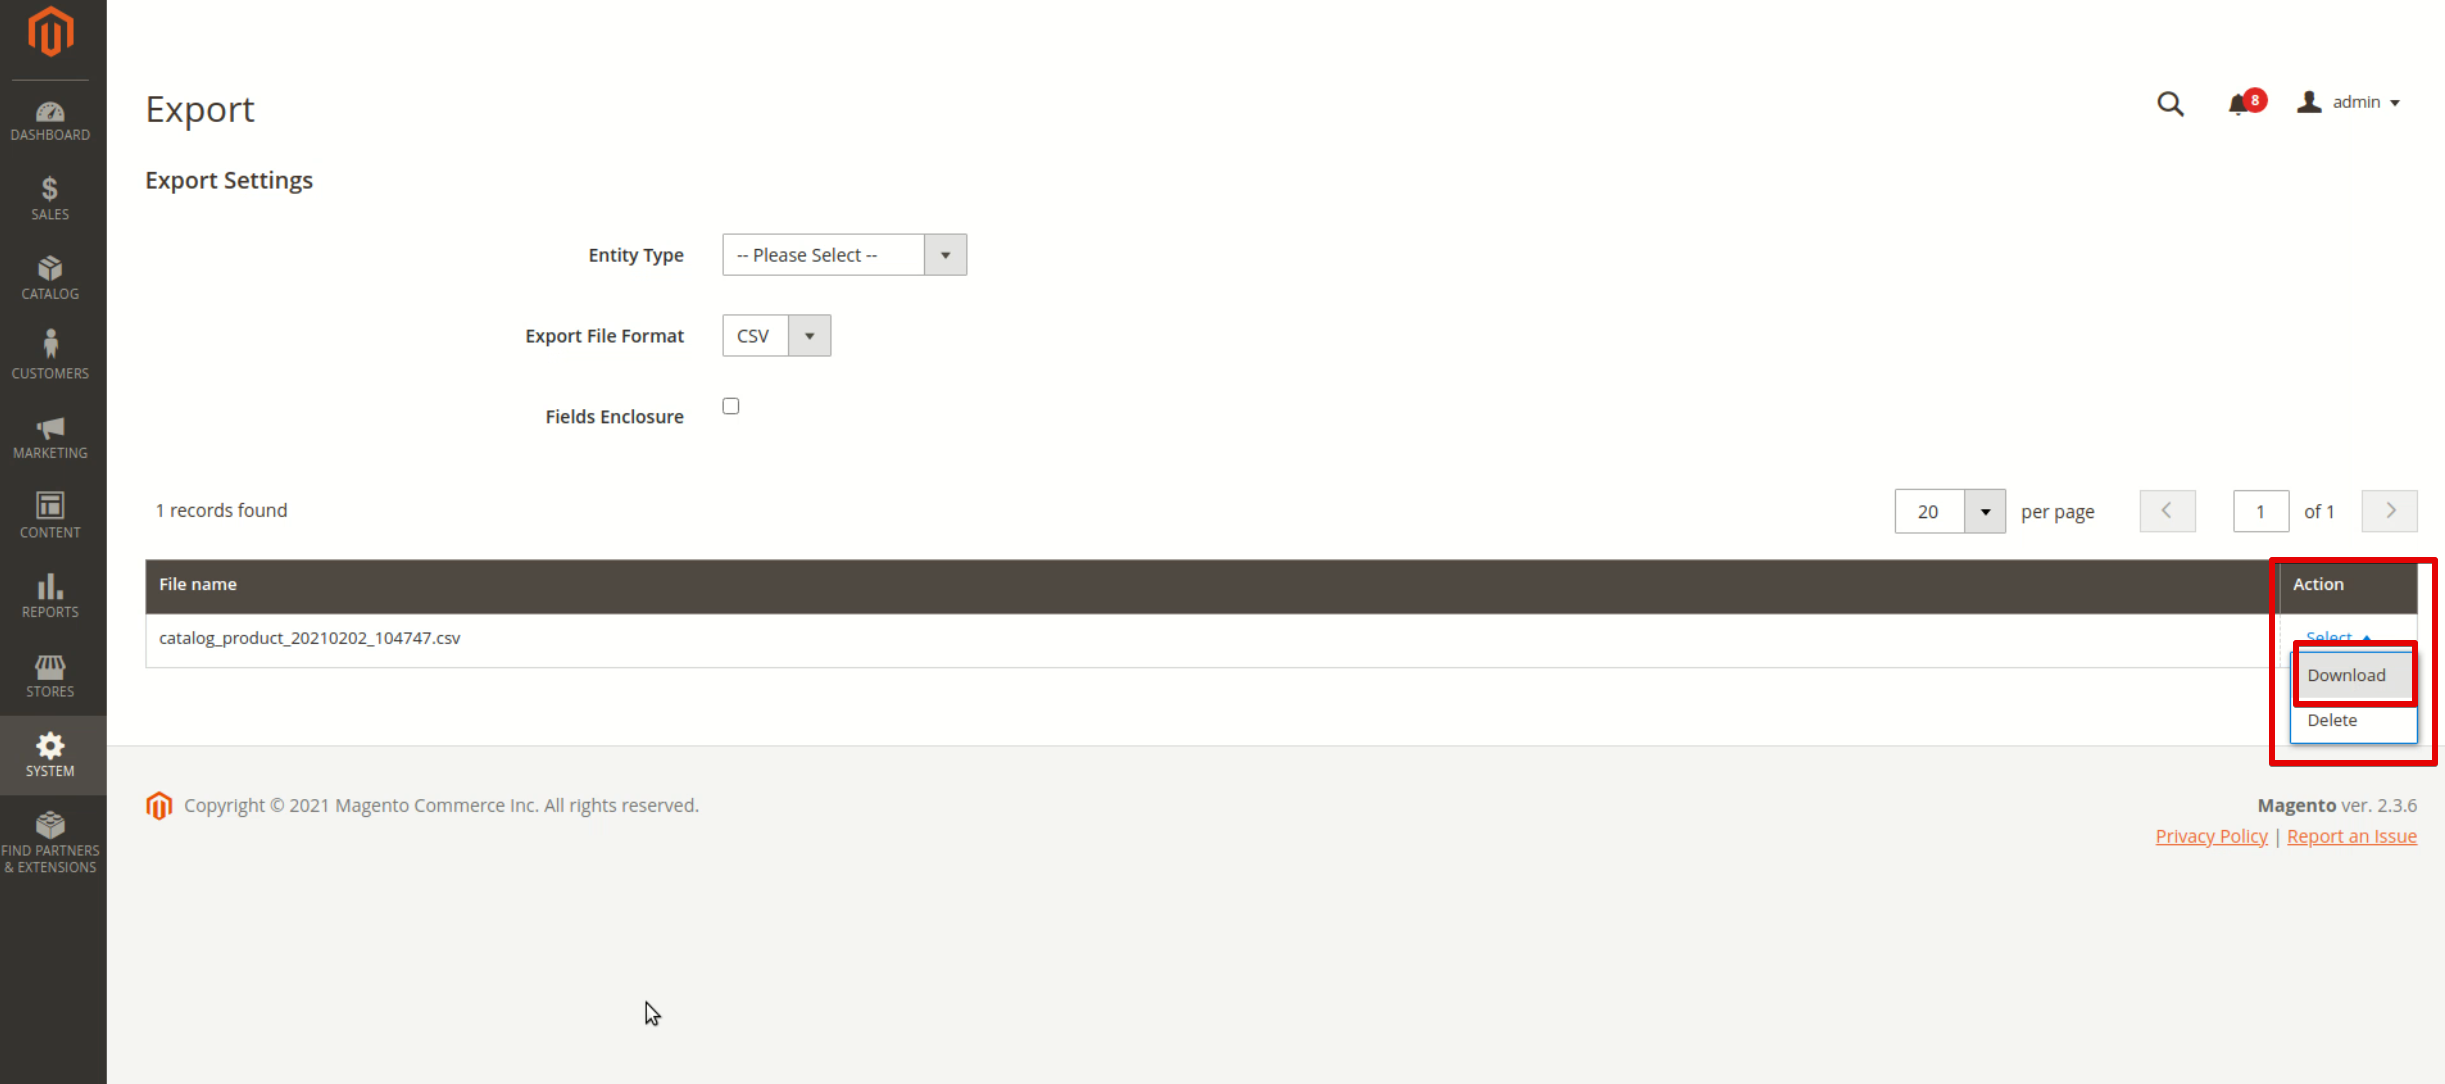
6. Select Download from the drop-down in front of the file name. The file will be saved to your computer.
II. Importing data into WooCommerce
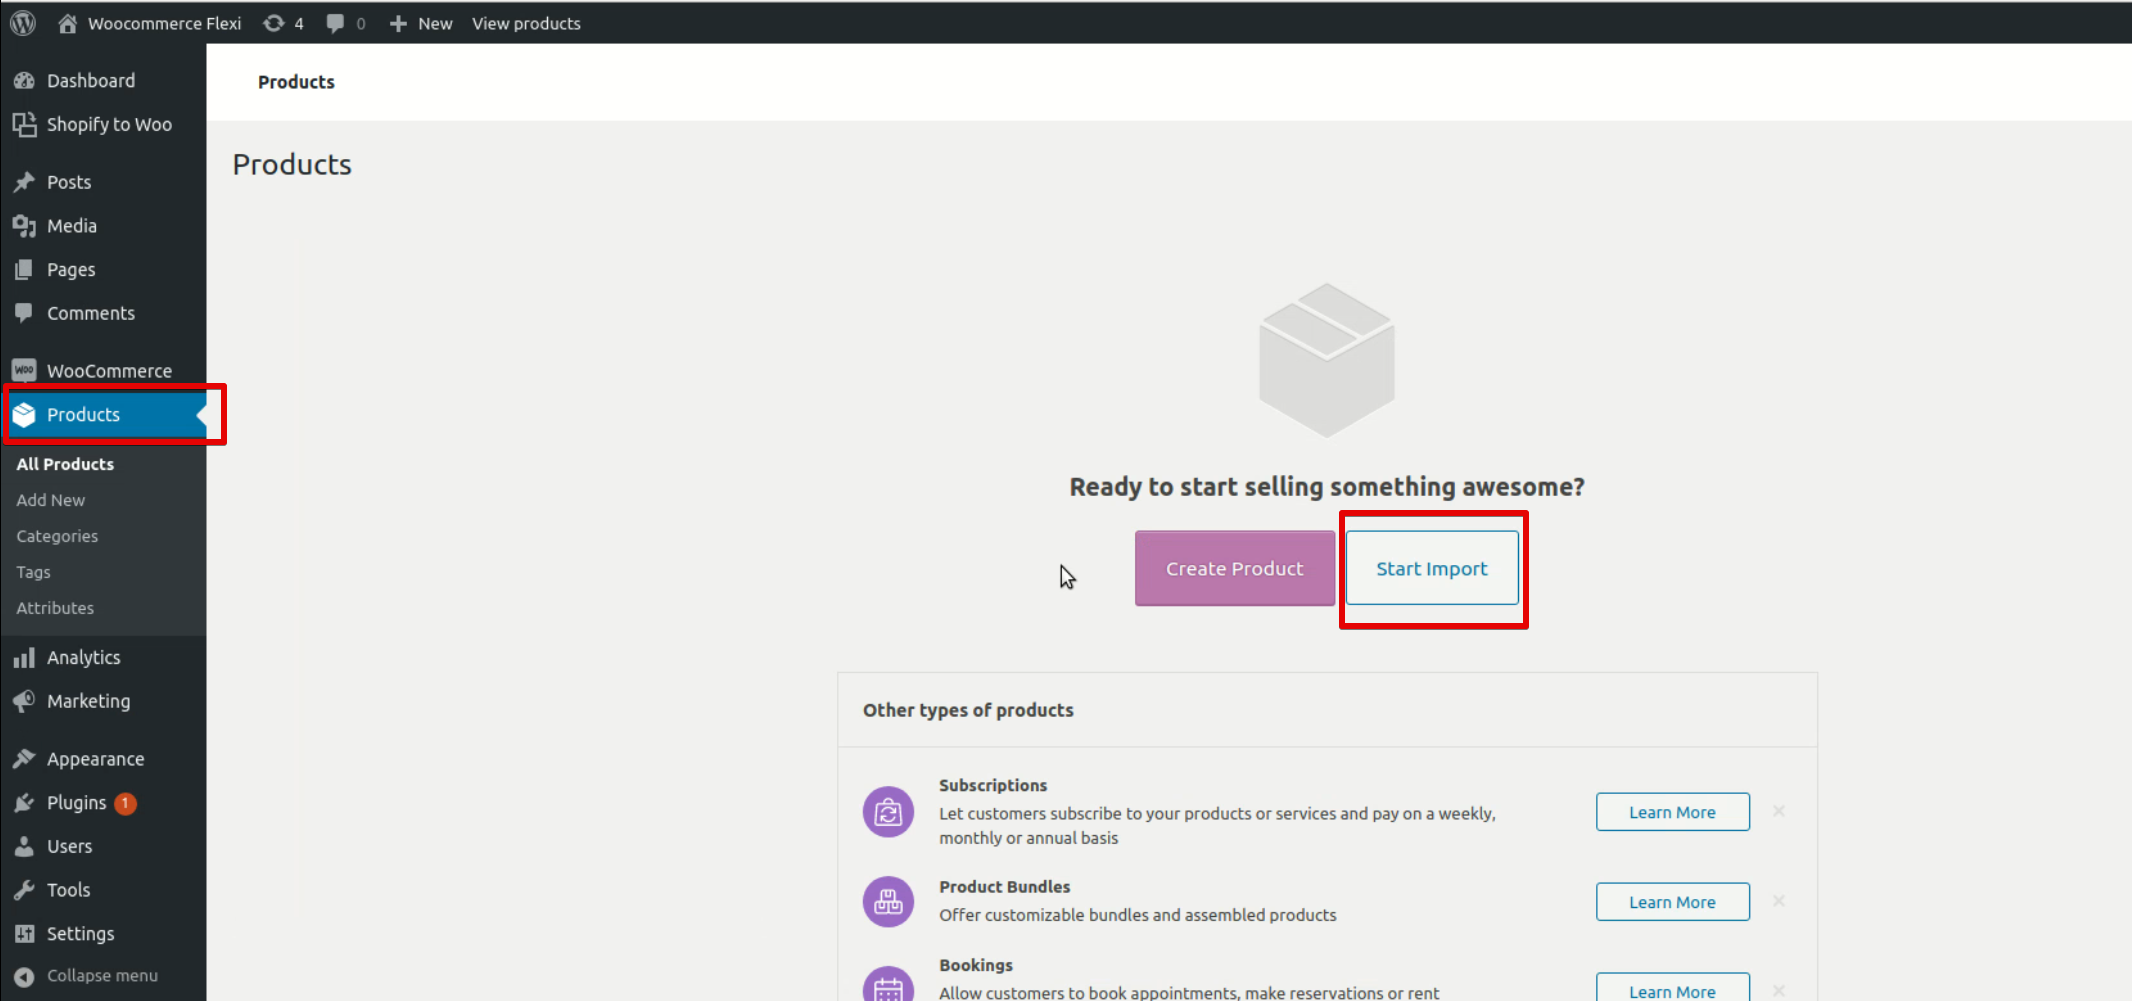
1. On the WooCommerce dashboard, choose Products and click Start Import.
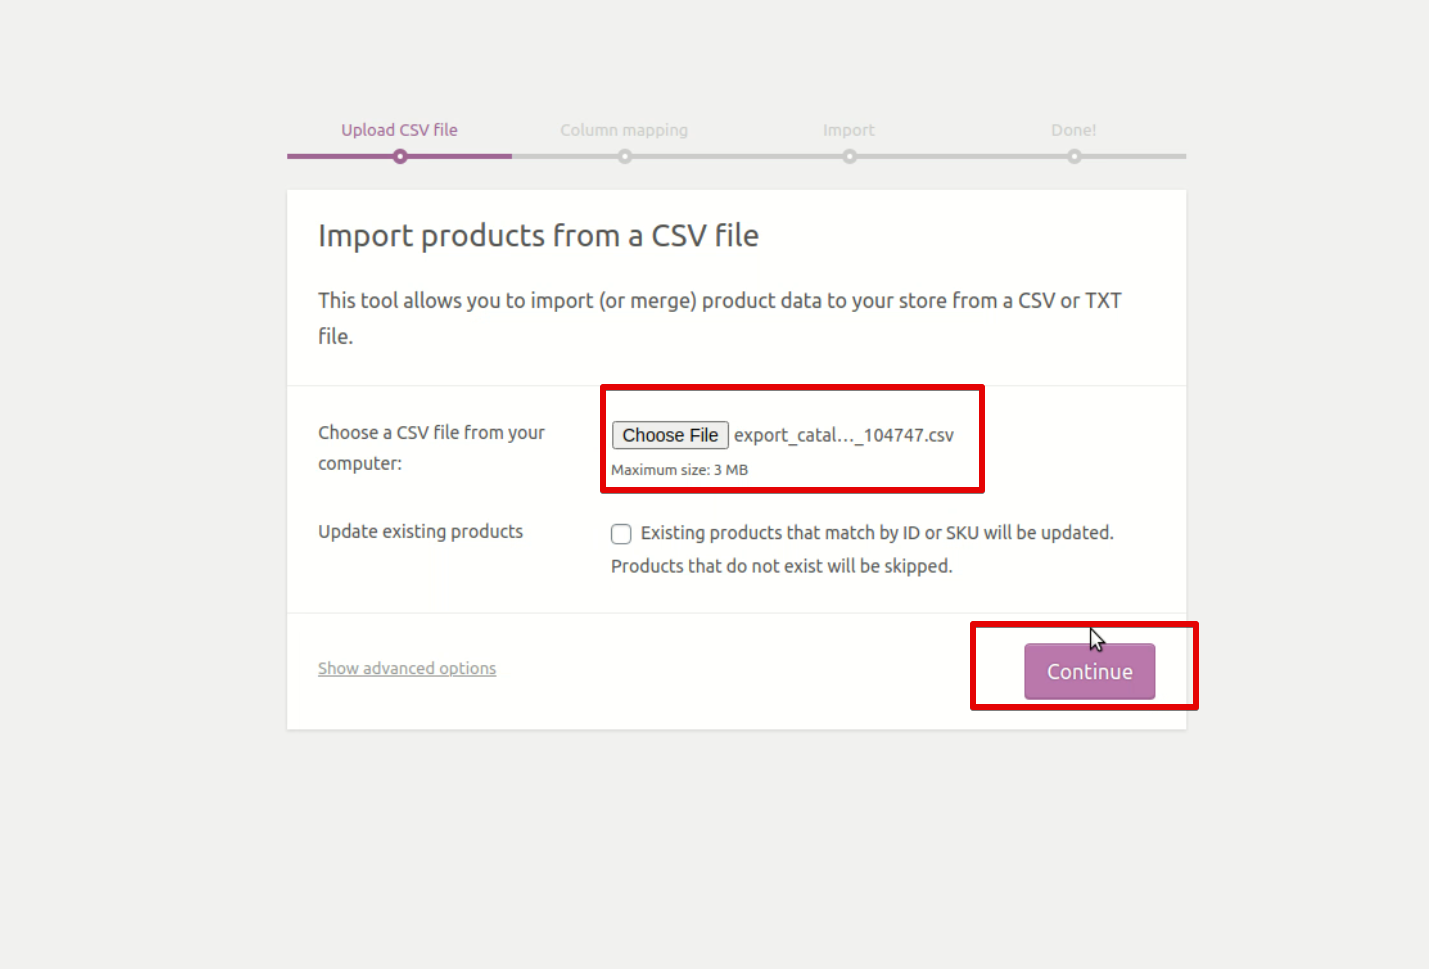
2. Choose the CSV file downloaded from Magento and click Continue.
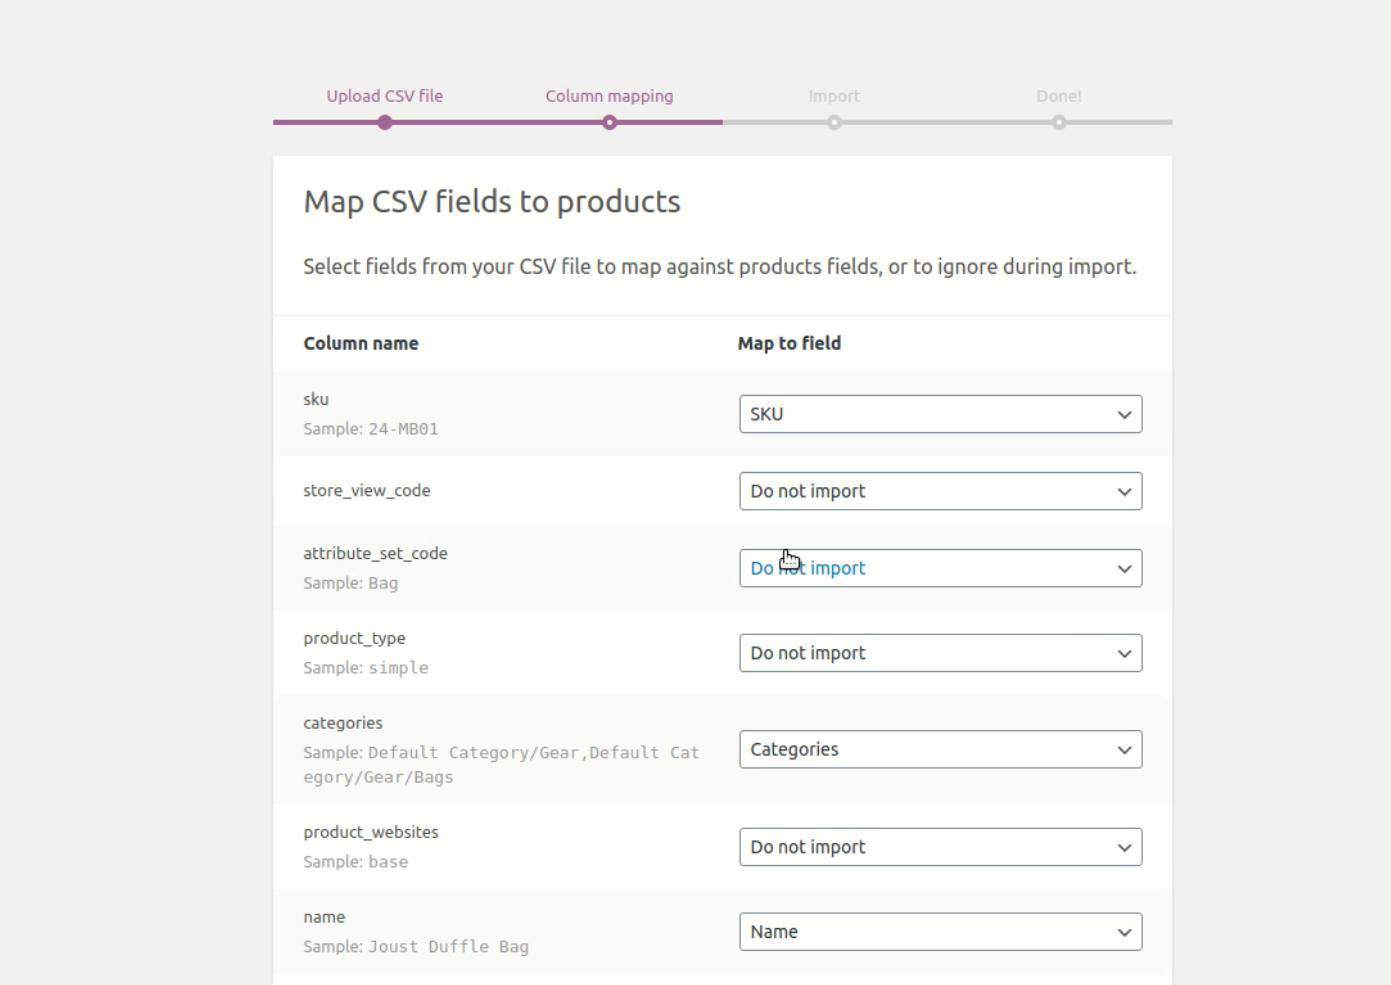
3. At this point, you should see a Column mapping screen. WooCommerce will do most of the work itself by comparing the names of its fields with the names of columns from the CSV file. Still, you’ll have to double-check everything and adjust if needed. After that, click Run the Importer below.
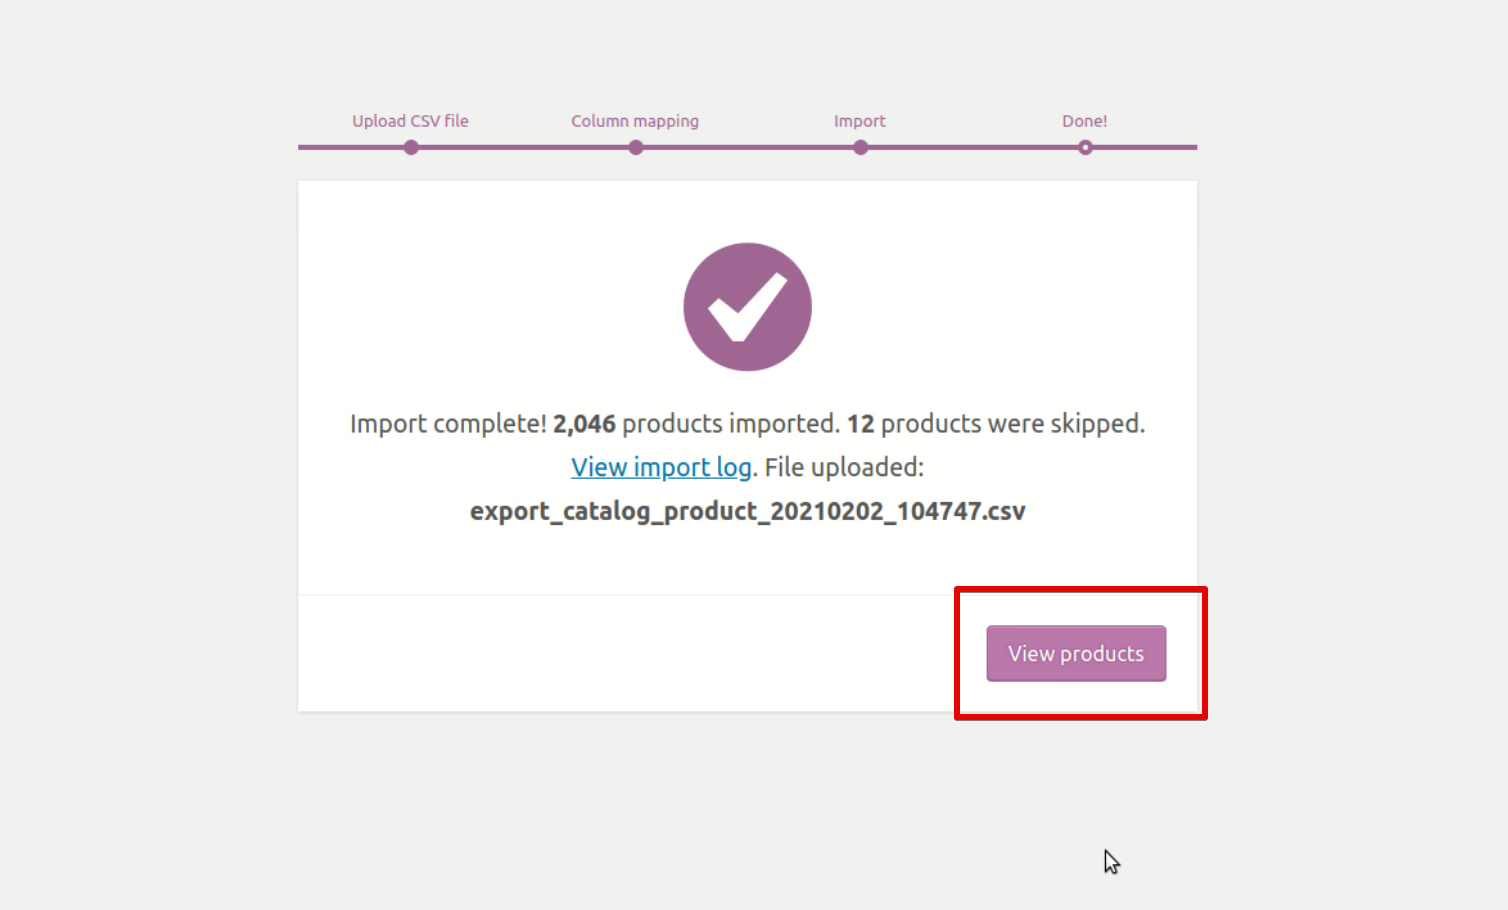
4. Products from the CSV file will migrate to WooCommerce automatically. After the importing is completed, click View products to see if all items and their attributes came through smoothly.
Importantly, product variations (e.g., sizes, colors) are recorded as separate products with different SKUs in Magento. For example, the same T-shirt in red and in green is perceived by the system as two different products. It helps store managers easily track inventory levels for each variation. But it also means that variations will be imported as separate products into WooCommerce, so you’ll need to make some manual adjustments.
Another downside of manual migration is that it allows you to transfer only a limited amount of data, so you’ll need to copy and paste everything else. If you have a lot of content (e.g., blog posts) on the Magento site, this process might be rather time-consuming. In this instance, it’ll be better to opt for one of the other three scenarios, which allows for automatic store migration.
Using LitExtension
LitExtension is an application that enables transferring of data from one ecommerce platform to another, no matter whether it’s Magento or WooCommerce, or some other CMS. If you want to migrate your store using this tool, you need to do the following:
1. Go to the LitExtension website and create an account. Only your email address, full name, and password will be required.
2. Once you’re signed up, click Create migration. It’ll bring you to the setup page.
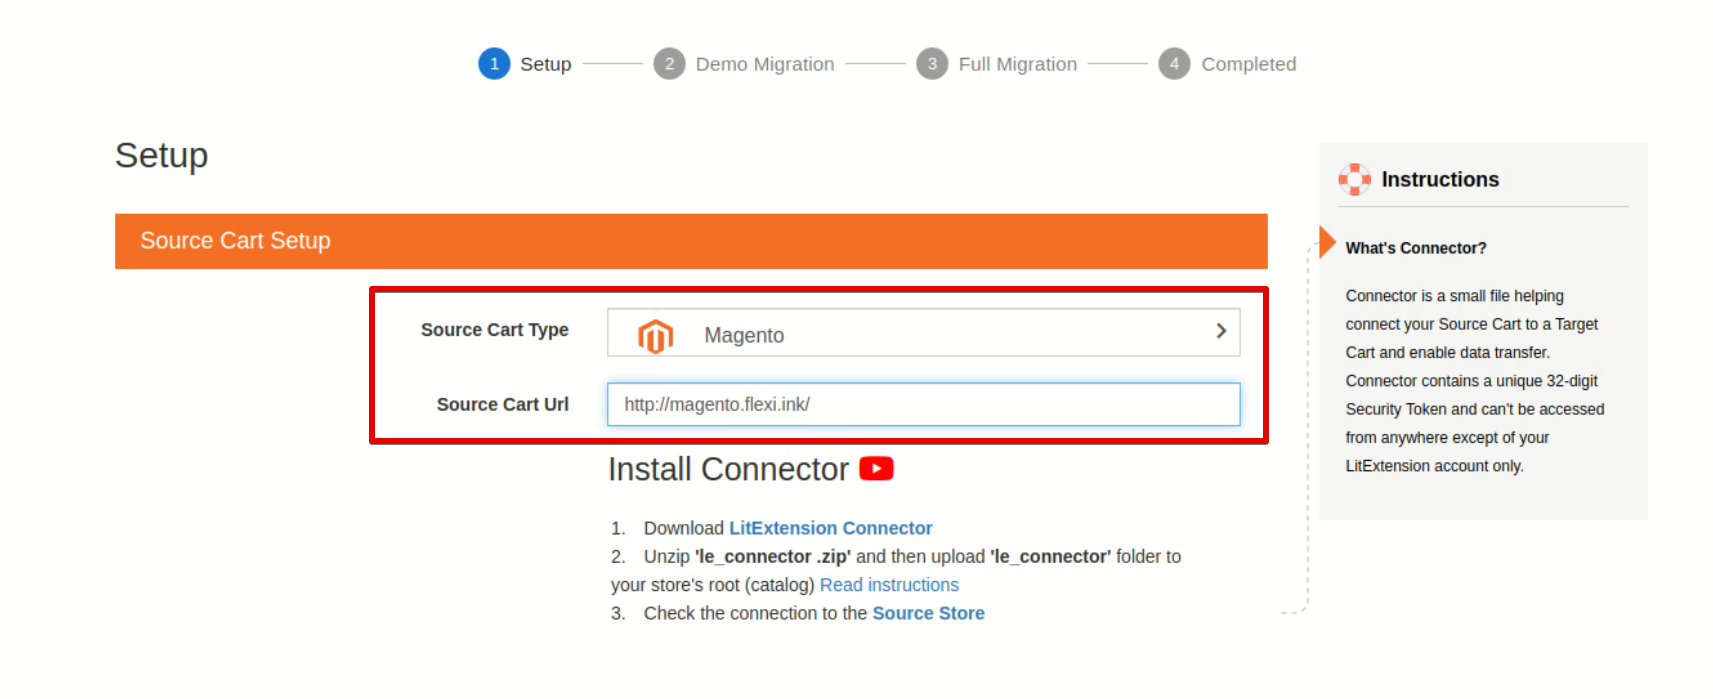
3. Now, you need to set up your source shopping cart. Choose Magento in the Source Cart Type field. Then, insert the link of your store in the Source Cart URL field.
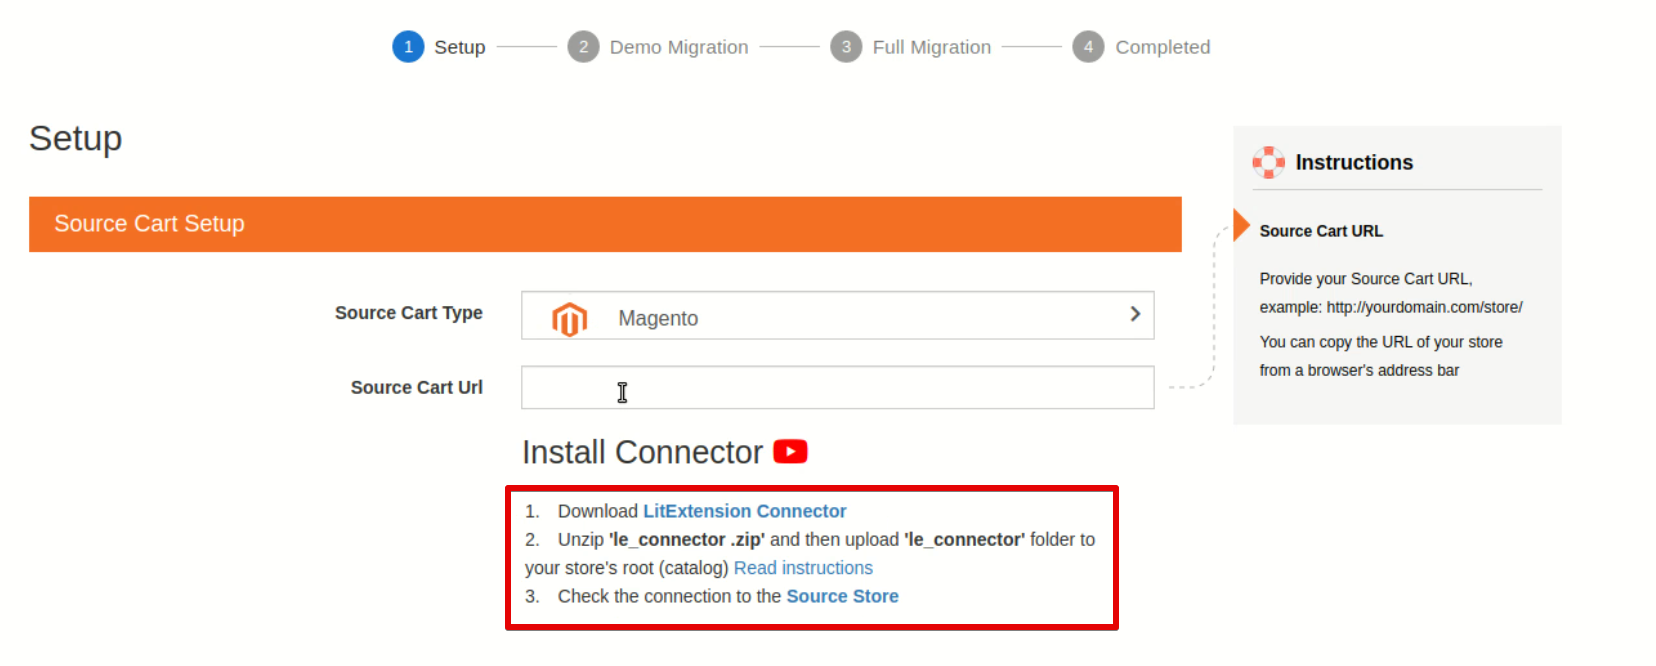
4. Download LitExtension Connector. You’ll receive the le_connector.zip file. Put it into your store’s root folder. Here are the video instructions on how to do this. When you go back to the Setup page, you’ll see the message saying that the connector was successfully installed.
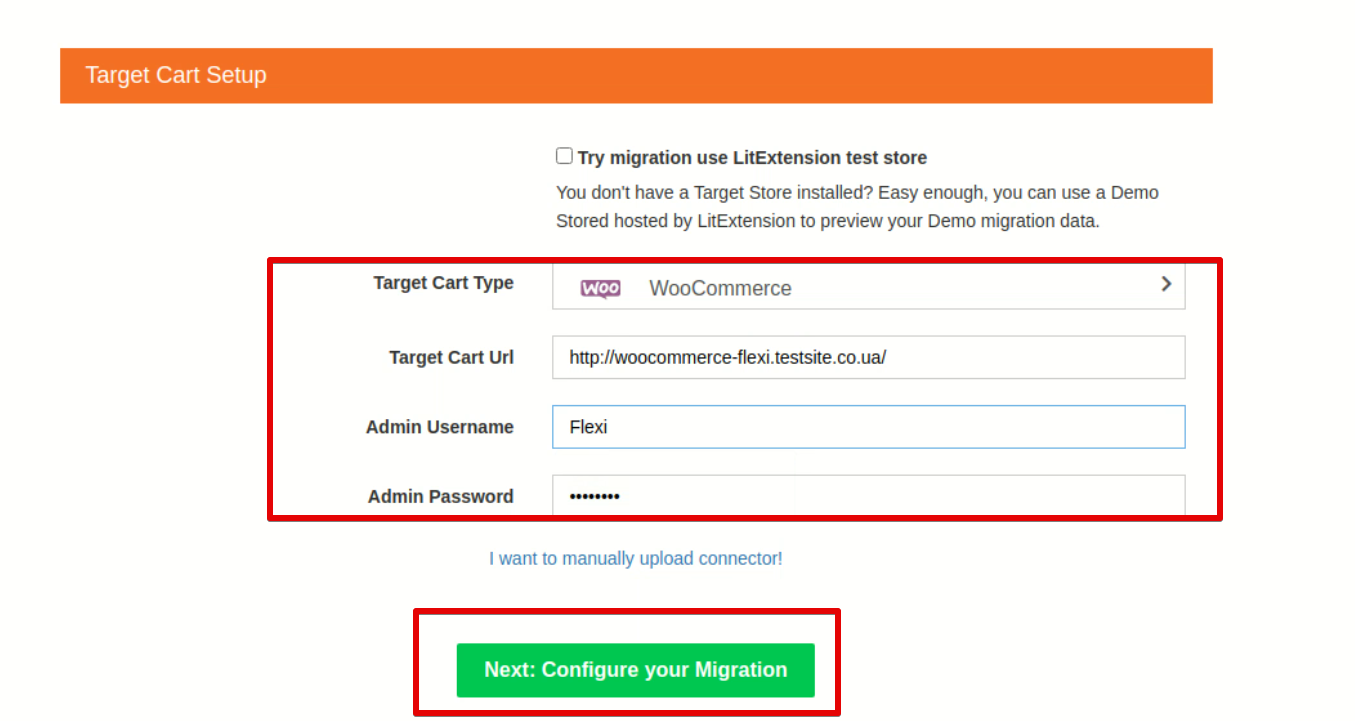
5. As the next step, you have to set up a target cart. Choose WooCommerce in the Target Cart Type field. Then, insert your new store’s URL in the field below. You’ll also need to enter your WooCommerce admin username and a password. Once it’s done, click Next: configure your Migration.
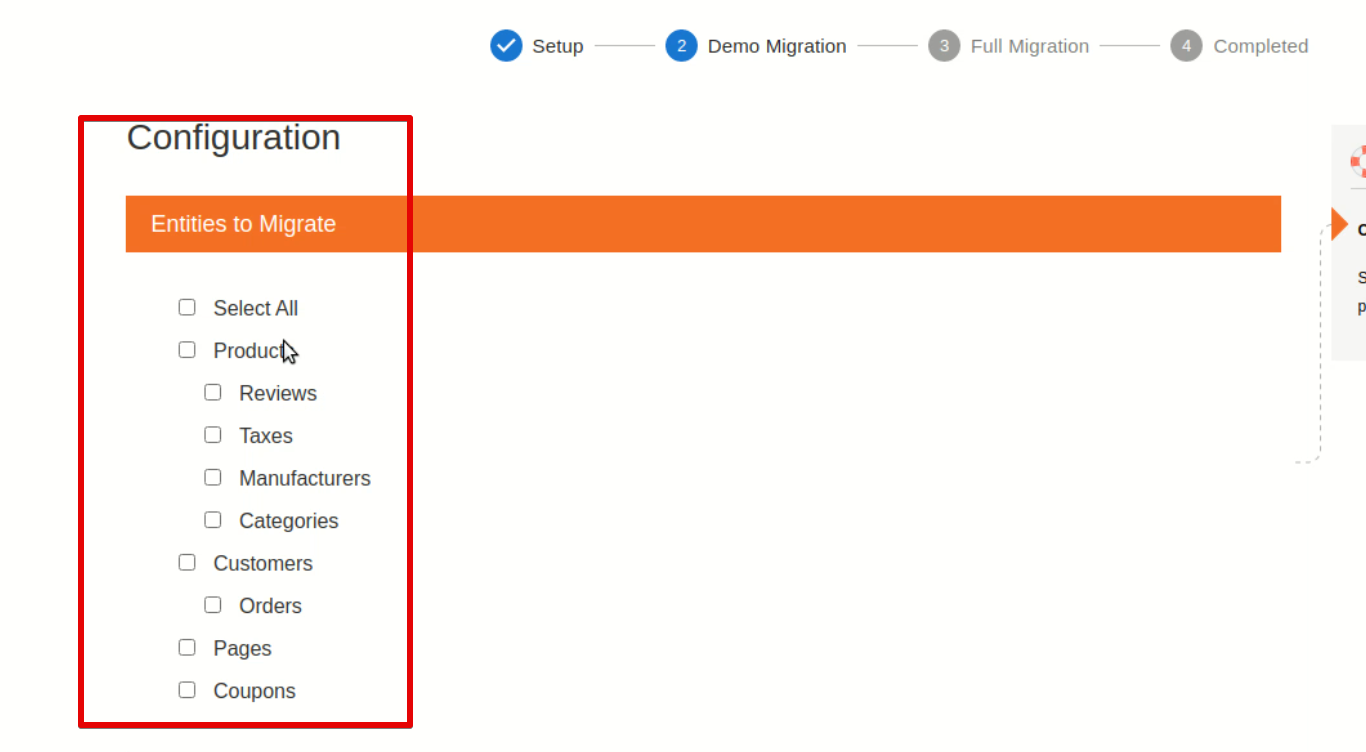
6. On the next page, you’ll have to select entities for demo migration. The available options include products, customers, orders, pages, etc. After that, click Next: Start Free Demo Migration below.
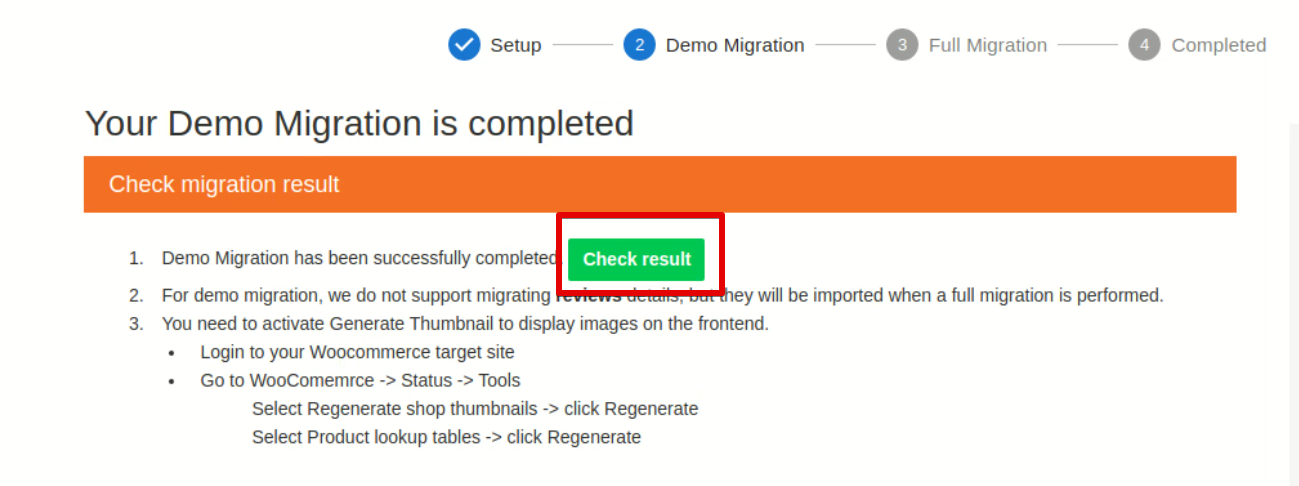
7. The progress of your demo migration will appear on the screen. Once the process is over, you can check the results.
8. If everything is fine, start the full migration. This LitExtension service is paid. The price will be estimated based on the number of products in your store and some other data. You can also purchase additional services (e.g., automatic creation of 301 redirects) if needed.
The main benefit of using LitExtension for store migration is that it’s fast and easy. You’ll be able to migrate most of the data from Magento to WooCommerce without wasting time on copying and pasting. So, if you don’t want to spend ages on re-platforming and are ready to invest some money in this process, this option will be perfect for you.
Using Cart2Cart
Cart2Cart is another application that can help you migrate products, customers, pages, and other content from Magento to WooCommerce. It’s quite similar to LitExtension, and you cannot go wrong with either of them.
To transfer the data from Magento to WooCommerce with the help of Cart2Cart, follow these steps:So, just choose the one that seems simpler to you.
1. Go to the Cart2Cart website and create an account.
2. Click Create Migration to start the free demo migration. It’ll bring you to the Setup page.
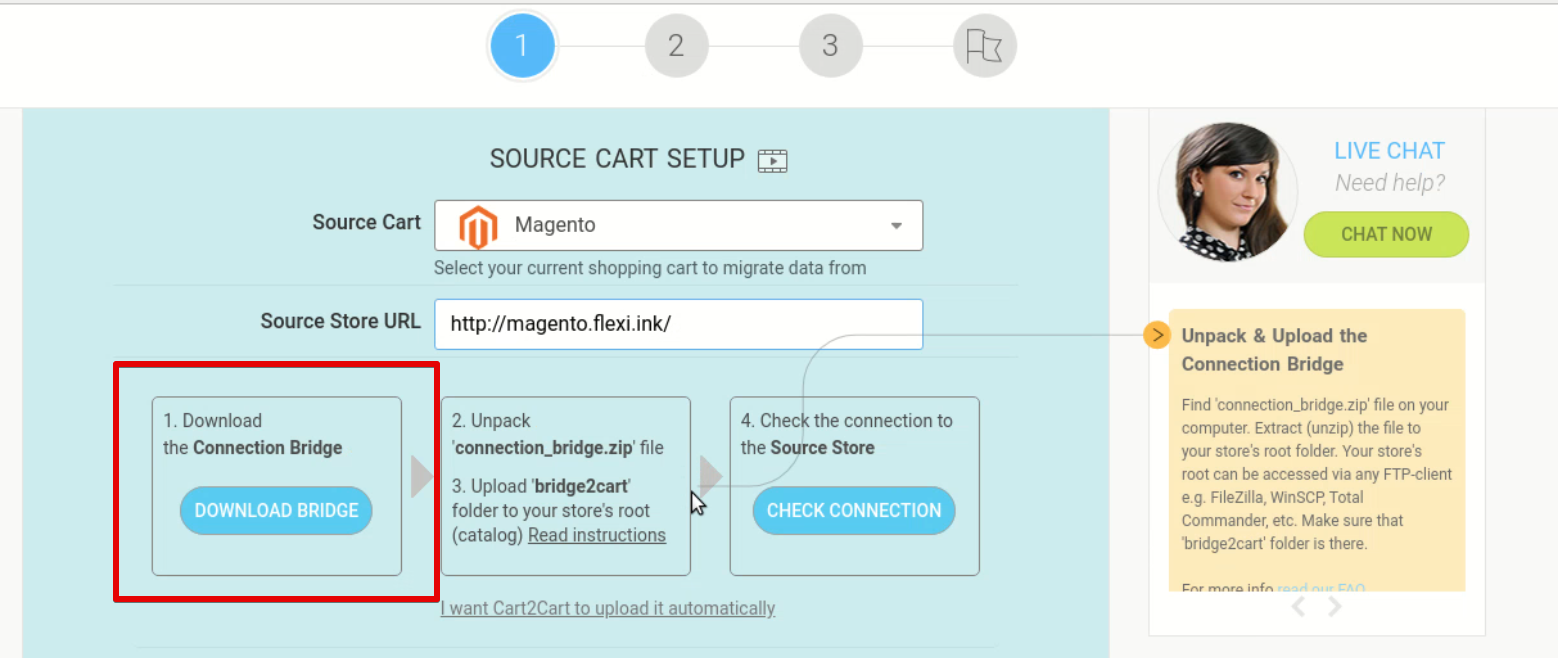
3. Now, you need to connect a source cart (Magento) with a target cart (WooCommerce). First, select Magento in the Source Cart field and enter your old store’s URL below.
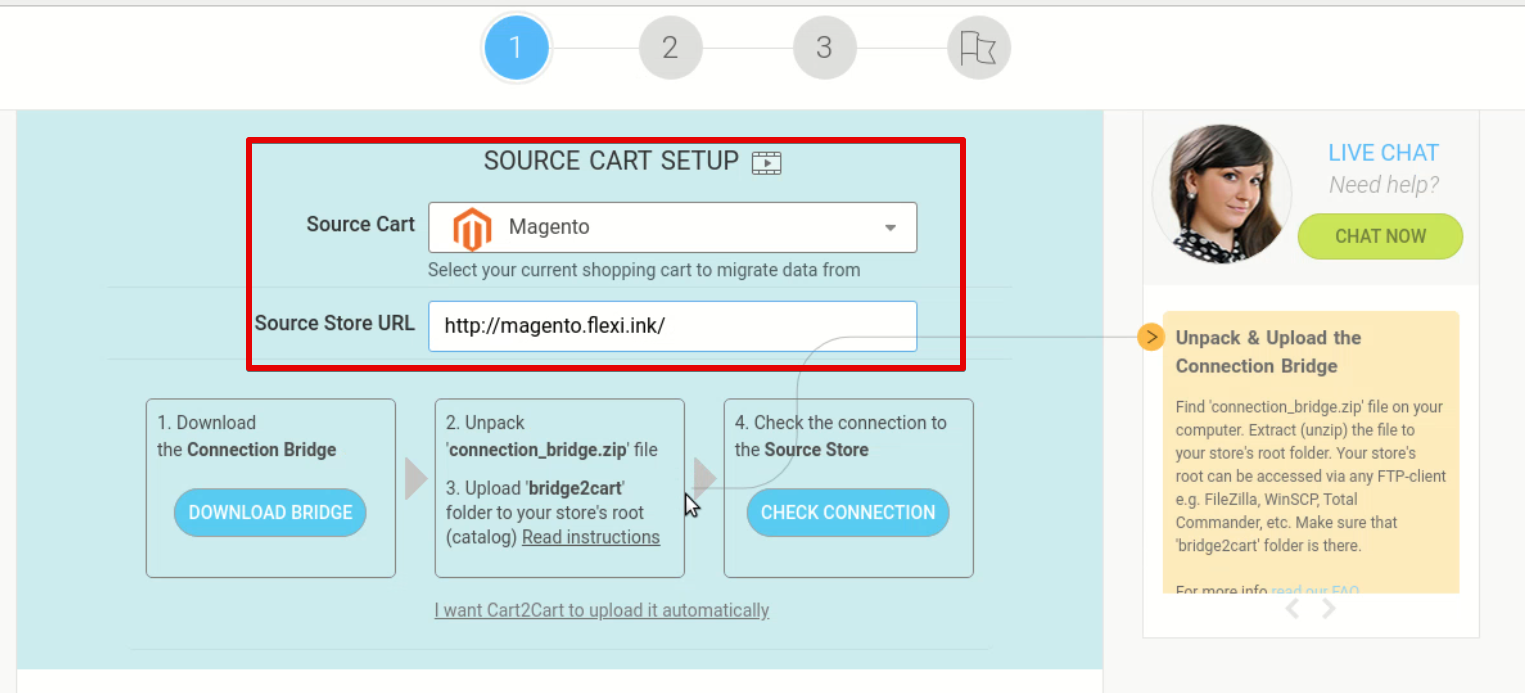
4. Then, download the Connection Bridge archive, unzip it, and put it into your Magento store’s root folder. View this video if you’re not sure how to do this.
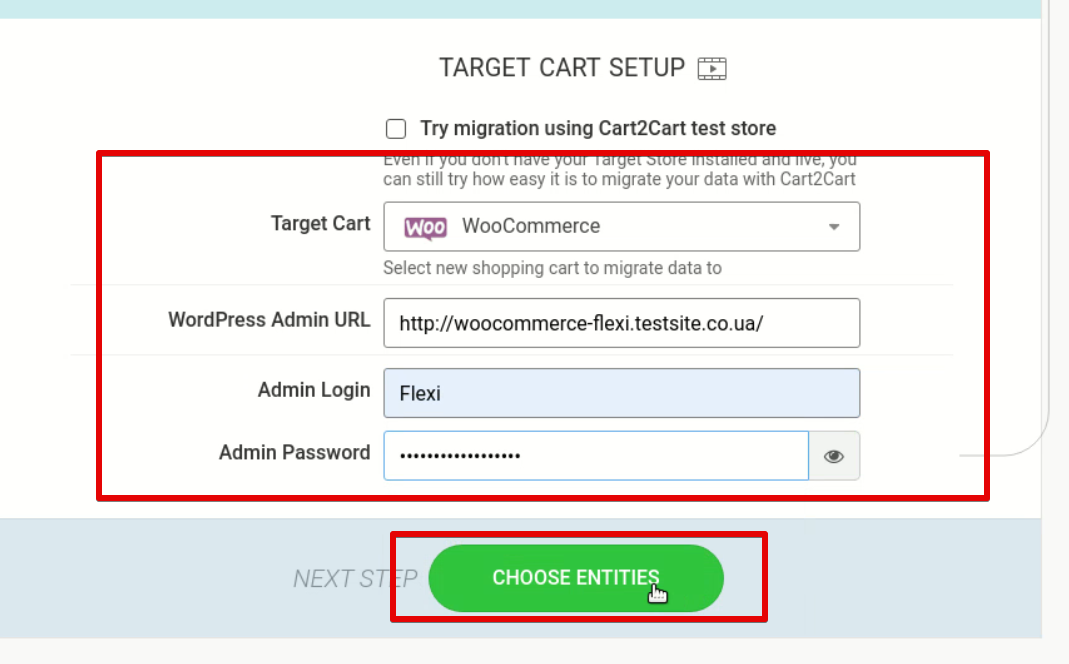
5. Now, set up your target cart. Choose WooCommerce in the Target Cart field. After that, insert your store’s URL, admin login, and admin password. When everything is ready, click Choose entities.
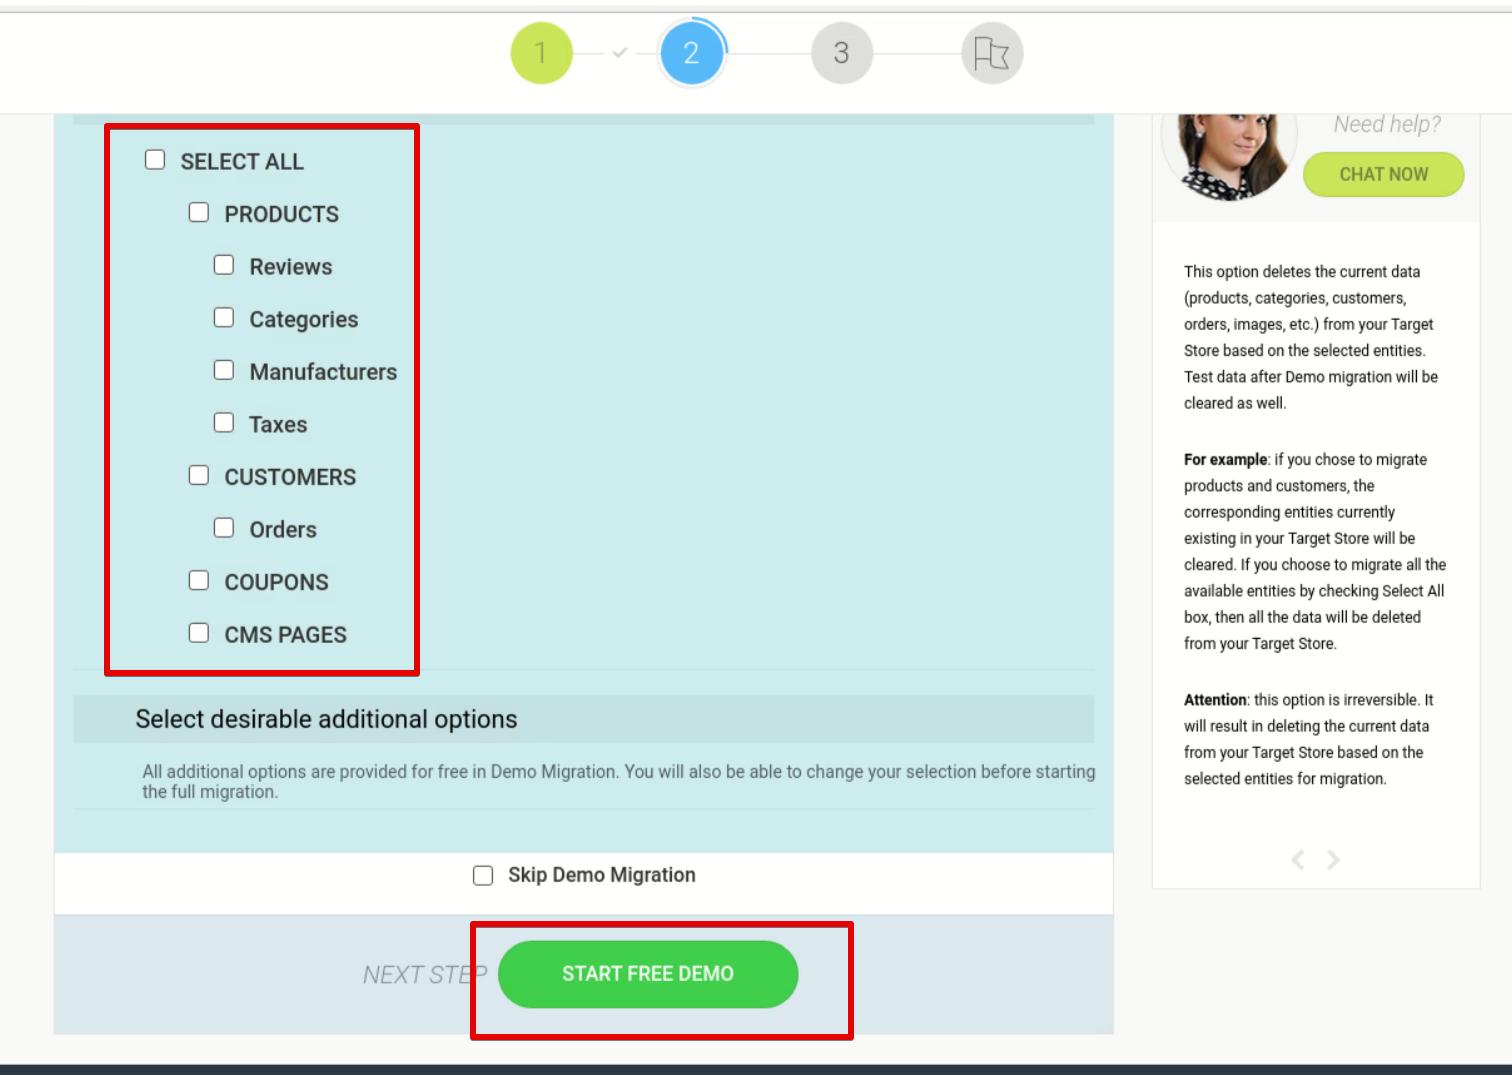
6. On the next page, you’ll need to select entities for the Magento-to-WooCommerce migration. The available options include products, customers, orders, CMS pages, etc. Then, click Start Free Demo below.
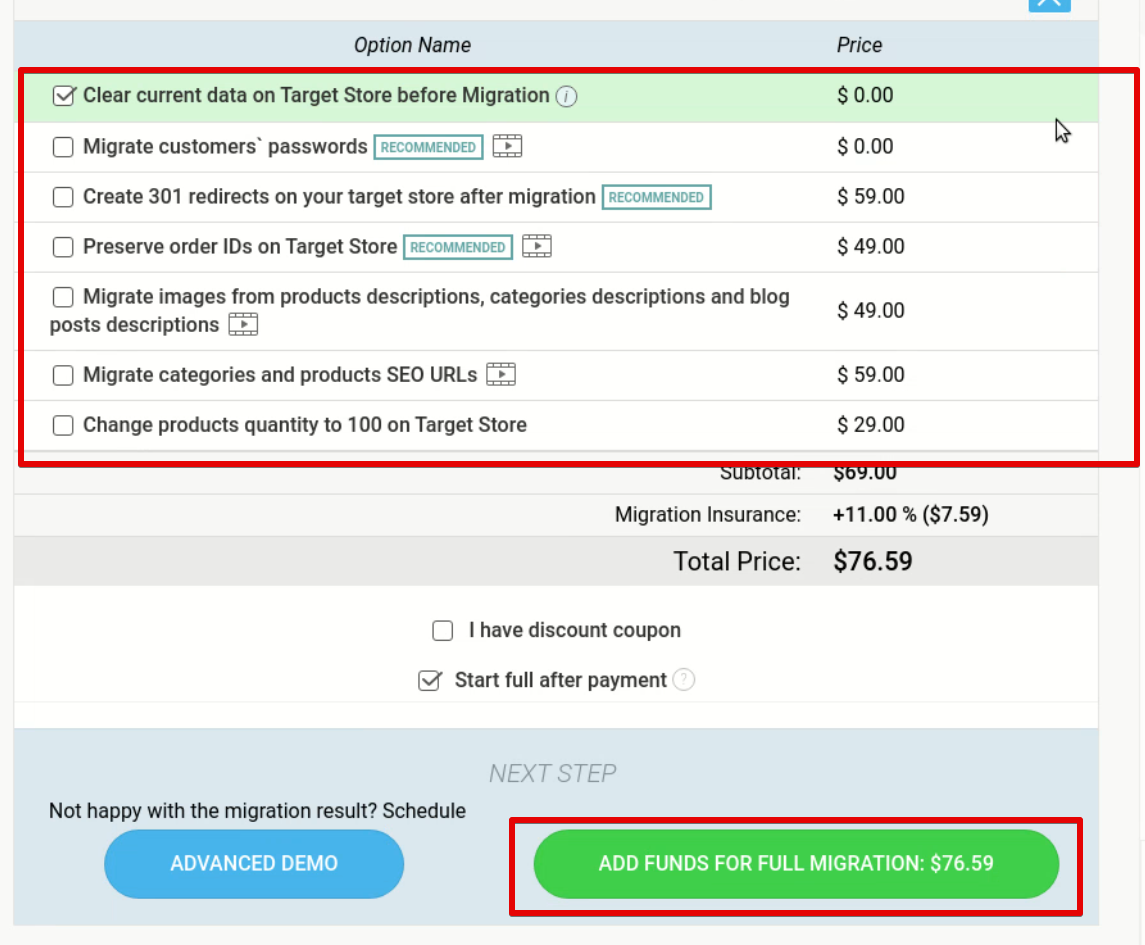
7. Cart2Cart will show the progress on the screen. Once it’s completed, Check the results and proceed to the full migration to transfer the rest of your data. You can also choose multiple additional services (e.g., 301 redirects, migration of product categories), but they’ll require paying extra fees.
The greatest thing about using Cart2Cart for store migration is that it automatically transfers different product variations as one product. So if you’re looking for a comprehensive migration service that will save your time, Cart2Cart is the best choice.
Using FG Magento to WooCommerce plugin
It’s also possible to migrate Magento to WooCommerce using the WordPress plugin called FG Magento to WooCommerce. It has two versions: free and premium. The free version will let you transfer only the basic data such as products, product categories, images, and CMS pages. The premium version costs $99.99 and can migrate the entire store, including the SEO metadata and customer groups.
To use this plugin, follow these steps:
1. On the WooCommerce dashboard, find the Plugins tab and click Add new. Now, search for ‘FG Magento to WooCommerce’ and click Install -> Activate.
If you want to buy the premium version, go to this site. After selecting Add new under the Plugins tab, you’ll need to Upload Plugin instead of looking for ‘FG Magento to WooCommerce’ in the WordPress base. Once the plugin is uploaded, Activate it.
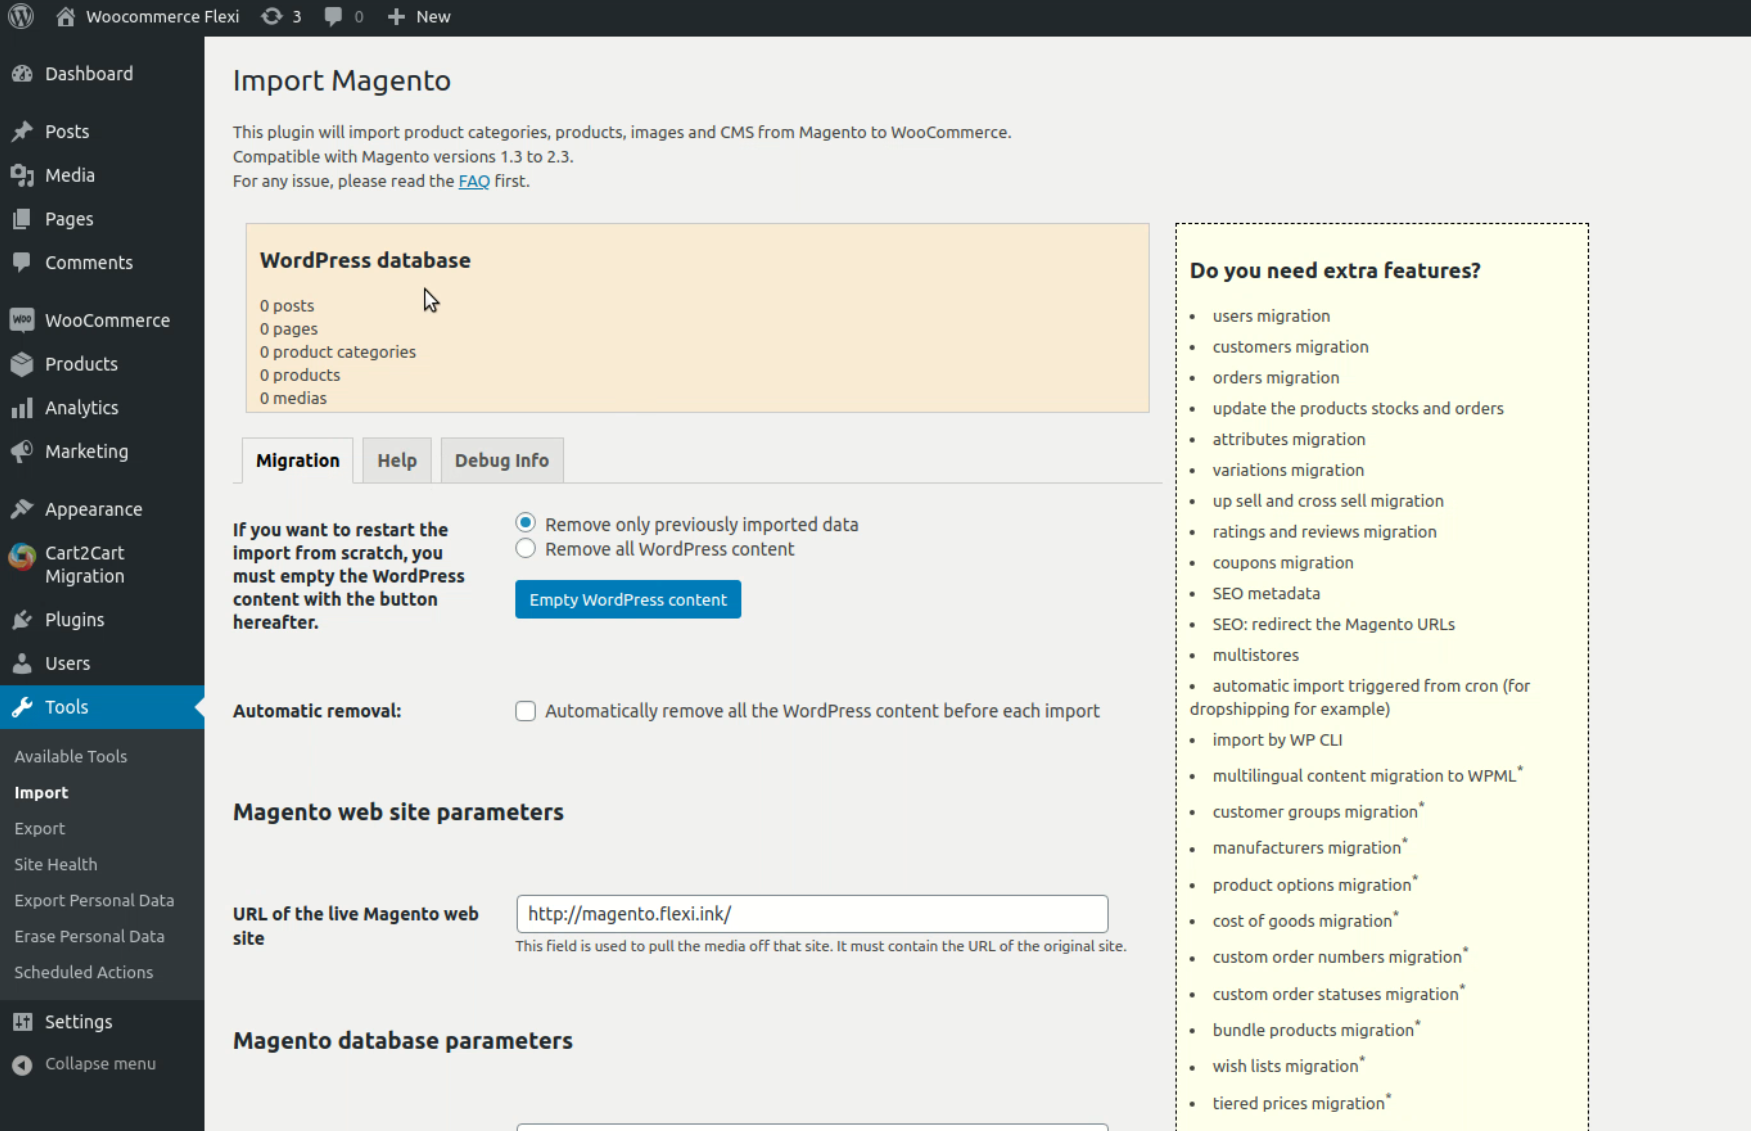
2. As the next step, you need to configure the plugin’s settings. On the WooCommerce dashboard, go to Tools -> Import and select Magento. You’ll be brought to the Import Magento page.
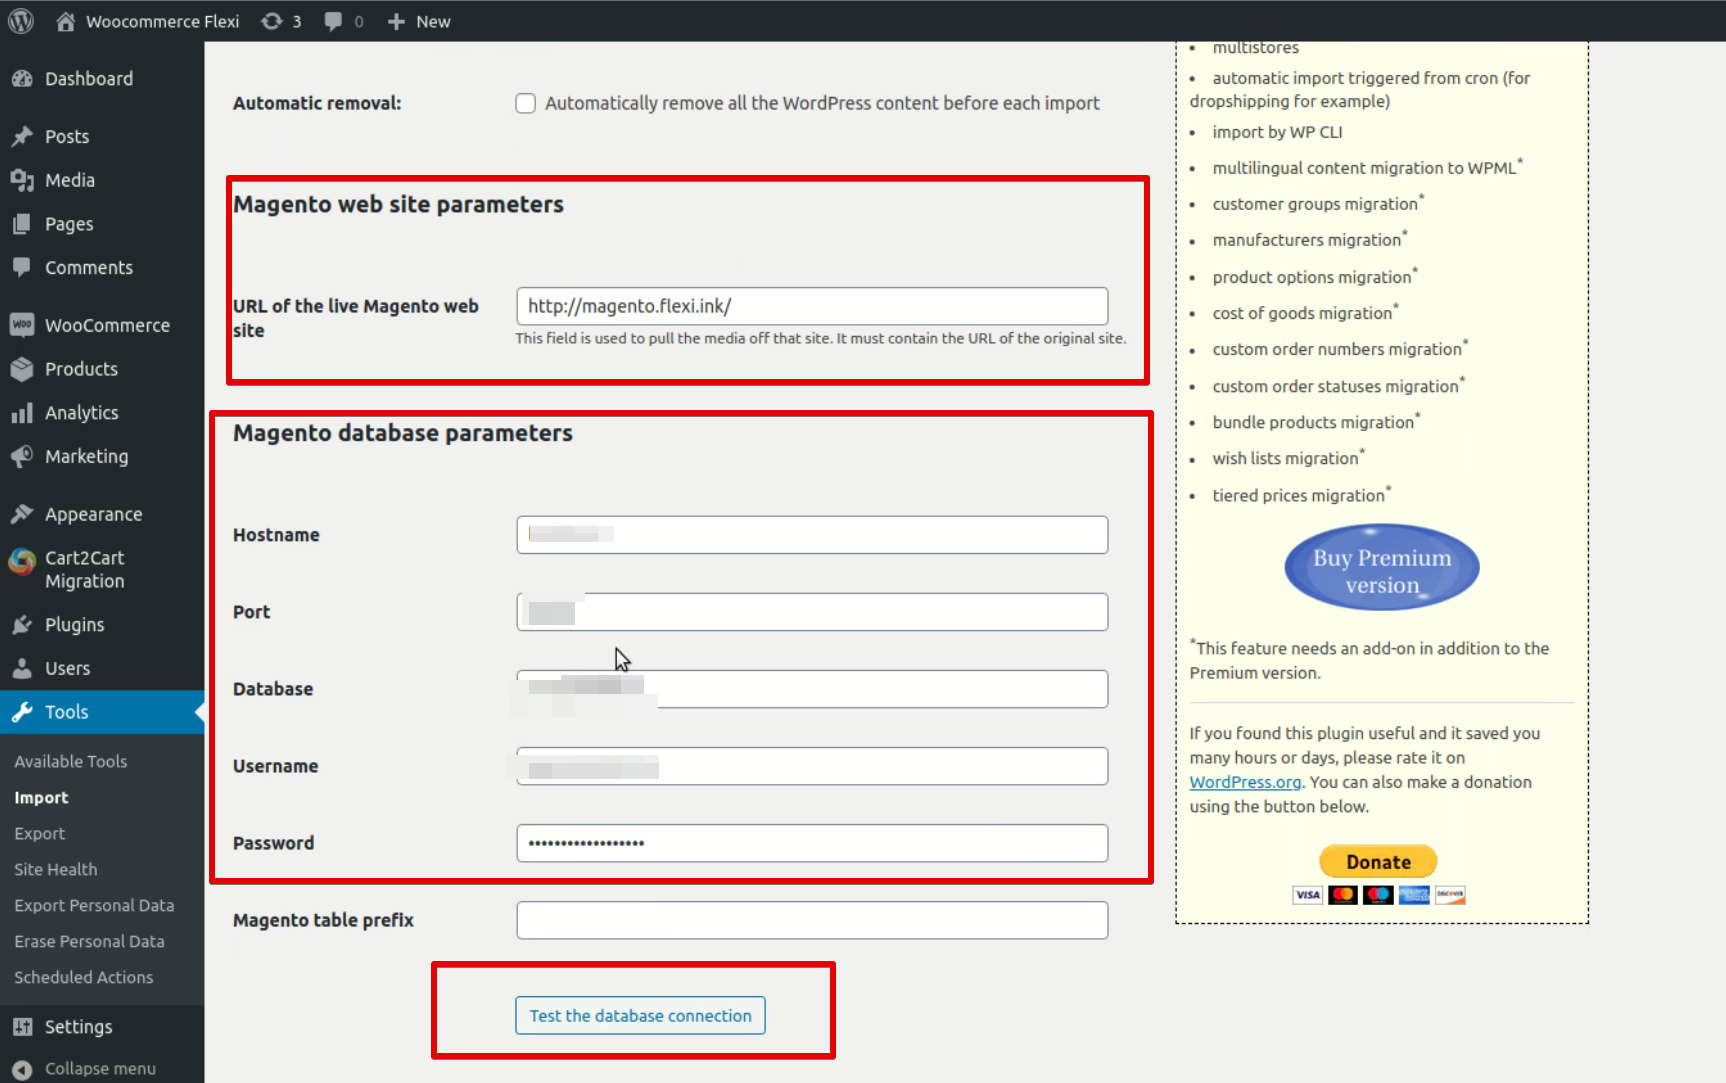
3. In Magento web site parameters, insert your store’s URL. In Magento database parameters, enter a hostname, port, database, username, password, and Magento table prefix. Then, click Test the database connection below.
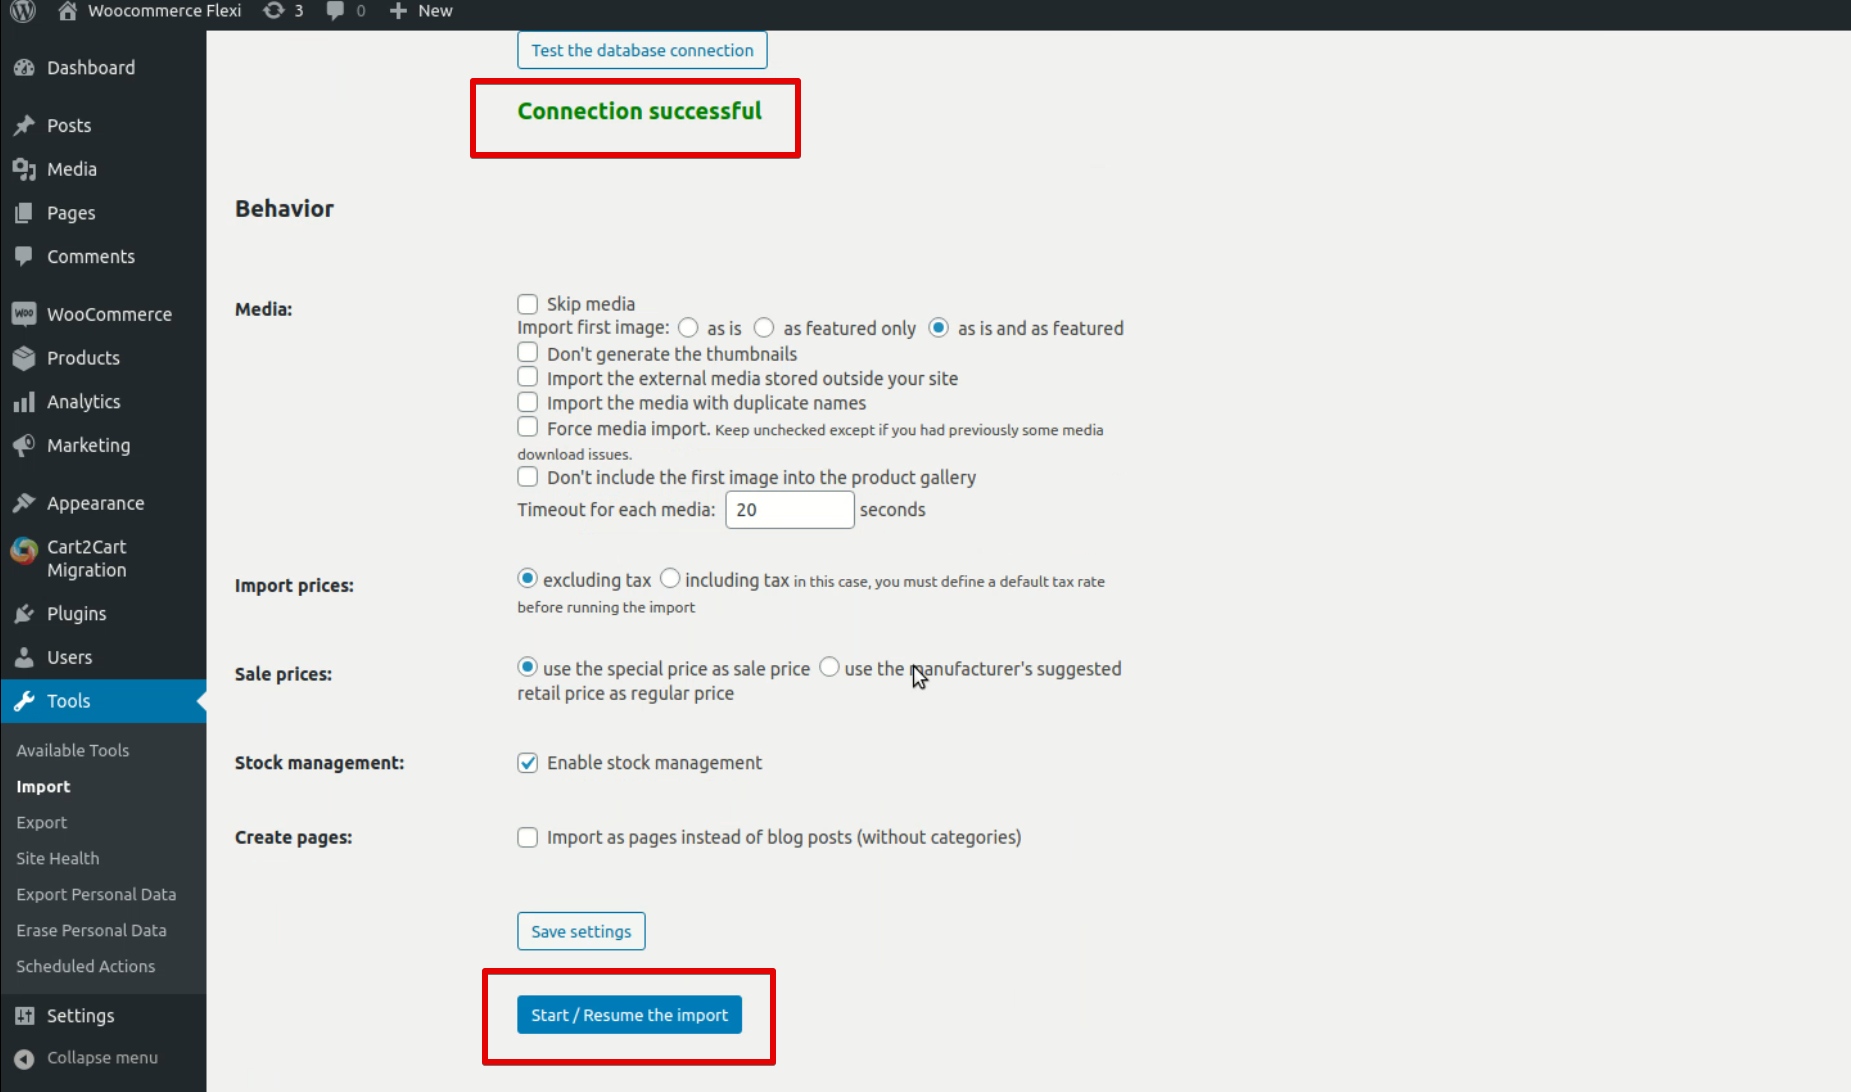
4. If the connection is successful, click Start/Resume the import on the bottom of the page.
The migration process will take some time. Once it’s over, you’ll see the “Import completed” message. The imported items will appear under the WooCommerce Products tab.
Wrapping-up
If in the Magento vs WordPress (WooCommerce) battle the latter wins for you, it’s time to launch the re-platforming process. All migration scenarios described in this article will let you migrate a Magento-based store to WooCommerce, either partially or fully. But if you still have questions or need professional support, our team will be happy to help. Flexi IT provides a wide range of WordPress development services, and we’re ready to cover any WordPress-related request you have.
