Moving from Shopify to WooCommerce requires precision and careful consideration of many aspects related to a migration process. The goal is not only to make an online store up and running on a different ecommerce platform but also to safely transfer all its data to a new place. While it may seem like a challenging task, especially if the store is large, there is more than one scenario that can ensure a seamless transition.
In this blog post, we’ll show you three alternative ways to migrate from Shopify to WooCommerce, so you can choose the option that meets your requirements best. But first, let’s briefly discuss why this change is worth the hassle.
Why switch to WooCommerce from Shopify
According to Statista, WooCommerce and Shopify are among the top 3 most popular ecommerce platforms worldwide with market shares of 28.24% and 10.98%, respectively. Shopify is a common first choice among beginner online retailers whose priority is to launch a store as fast as possible with no worries about technical stuff. But as a business scales up, internet merchants see more and more reasons to move a store to WooCommerce. Here are the main of them.
Flexibility
Shopify is explicitly tailored to the demands of e-commerce businesses and has a lot of great features that online retailers need. Still, it is a hosted solution, meaning that its customization options and capabilities are limited to the functionality offered by the vendor. As a result, internet merchants often reach the point where Shopify can no longer meet their requirements.
WooCommerce, on the contrary, gives you almost endless control over your online store. It is an open-source WordPress plugin, so anyone can access the source code and change it as they wish.
In addition, WordPress and WooCommerce have a huge ecosystem of free or paid add-ons that allow you to create a truly unique store. For example, the WooCommerce extension store contains more than 300 extensions, while the number of items in the WordPress plugin library is even impossible to count. You can also develop your own custom plugin or extension if there are no options that fit your specific needs.
Cost-effectiveness
Cost-effectiveness is the second important reason to carry out the Shopify-to-WooCommerce migration. The matter is that Shopify is a paid service. Its pricing starts at $29 per month, but it gets higher as your needs grow. The free trial lasts only 14 days, and it hardly makes any difference. If you want to have some advanced features like report generation or shipping rate calculation, you’ll need to pay for the entire Advanced Shopify package that costs $299 per month. Besides, most add-ons in Shopify App Store require monthly payments. So, improving the Shopify store is never a cheap endeavor.
Maintaining a WooCommerce store will also cost you some money, even though the plugin and a basic WordPress version are free. For example, you’ll have to pay for hosting, domain name, and some add-ons. But since there are no mandatory subscription fees, you’ll have full control over your spending. It means that you won’t have to pay for features you don’t need. Besides, using WooCommerce allows you to add custom functionality instead of purchasing out-of-the-box extensions. So you can stay completely independent of the vendor’s pricing.
No extra transaction fees
Shopify offers online retailers its own payment service but charges extra transaction fees of 0.5-2% for using third-party payment gateways. This amount might seem insignificant, but it’s only at first sight because you have to pay this money on top of fees charged by the payment gateway. So, when a store sells a lot of items, this commission can reach thousands of dollars. With WooCommerce, you can integrate any payment gateway you want — it imposes no extra transaction fees for either of them.
- Choose a hosting provider. After the migration, your online store will be self-hosted, so the first thing you need to do is pick a hosting provider. Hosting services are paid, but, in most cases, the fees are relatively insignificant. Some hosting companies also have WordPress pre-installation services in their kick-off plans. So, there should be no problem at this stage.
- Install WordPress. Since WooCommerce is a WordPress plugin, you have to install WordPress to create a store. If your hosting provider doesn’t offer WordPress pre-installs, you can download it from the WordPress official site and follow the instructions. They’ll guide you through the setup process.
- Install WooCommerce. To install the WooCommerce plugin, click on the Plugins tab that you can find on a WordPress dashboard. After that, select the Add new option and type ‘WooCommerce’ in the search bar. You’ll see the Install button in front of the plugin’s name. Click it to start the installation process. After that, click Activate and follow the instruction of the configuration wizard.
- Pick a theme. Since you won’t be able to migrate your Shopify design, you’ll need to choose the new one in the WooCommerce Theme Store. There are a wide variety of free and premium options. So, it’ll probably be possible to find a theme that looks very similar to your old Shopify design or pick something new and refreshing.
You can also extend the default functionality of your new WooCommerce store with extensions and plugins at this stage. But it’s optional. Once you’re done with the basic steps, you can start the transition process.
How to move a store from Shopify to WooCommerce
In general, there are two ways to migrate from Shopify to WooCommerce: manual and automatic. If you choose the manual option, you’ll have to transfer all the data yourself. Meanwhile, the automatic transition is carried out with the help of migration tools (e.g., applications, plugins). Below, we’ll discuss three different migration scenarios, so you can choose the right fit based on your preferences and requirements.
Manual migration
The manual Shopify-to-WoCommerce migration process consists of two main phases: first, exporting data from Shopify and, second, importing it to WooCommerce. Let’s see how you can do it:
I. Exporting data from Shopify
To start the manual migration, you need to export data about products from Shopify in the format of a CSV file. Here are the steps that you should take:
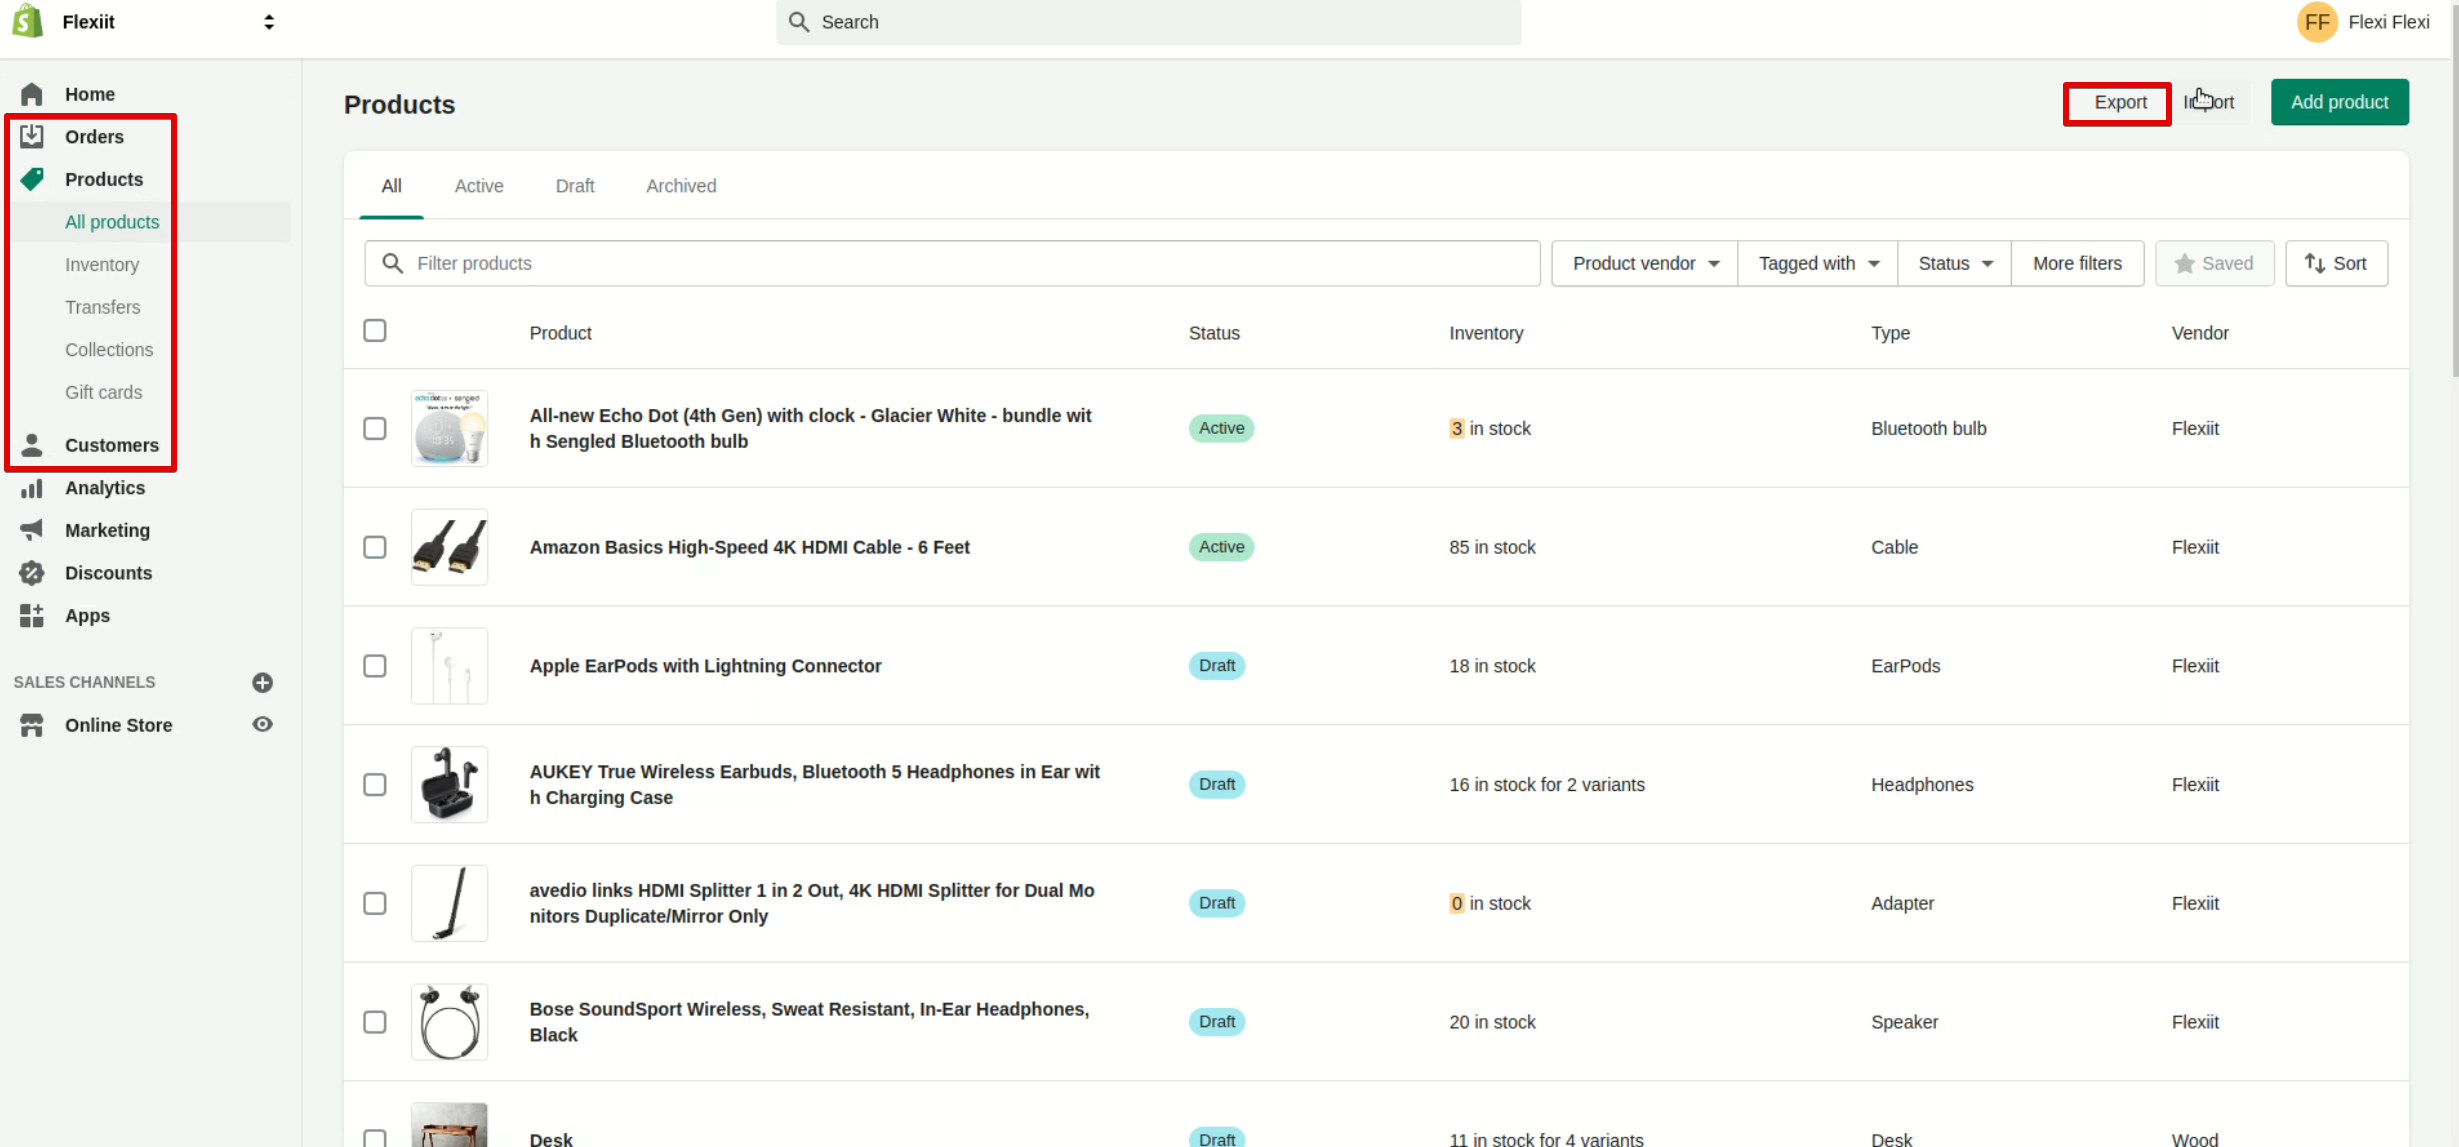
- Open your Shopify dashboard and choose the Products tab. Click Export in the upper left corner.
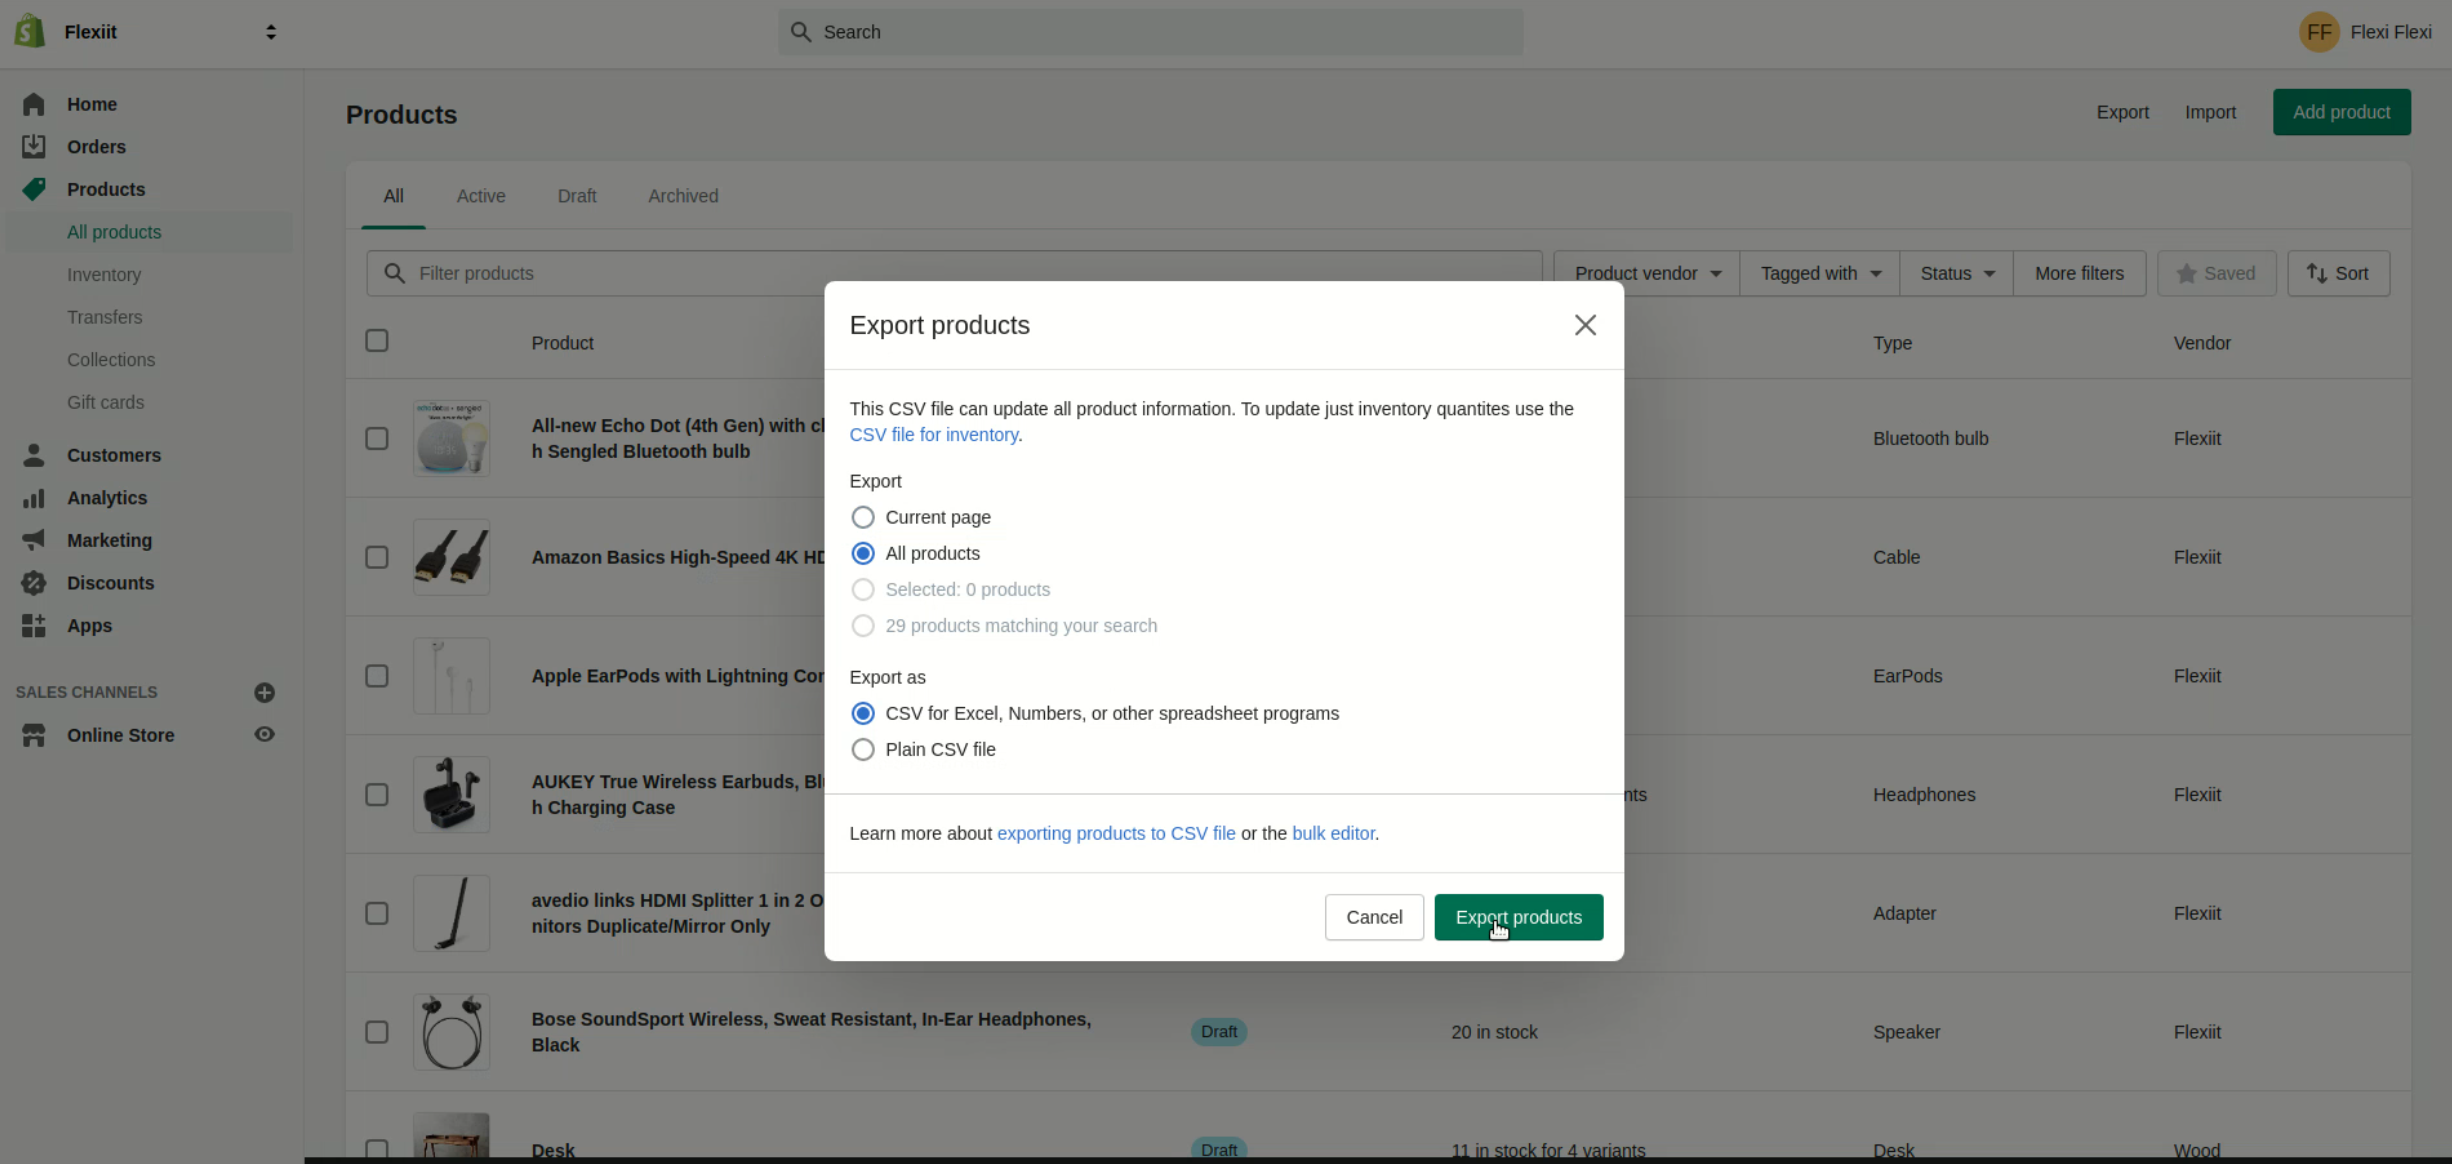
2. You’ll see a modal window asking you what products you want to export and what format of the output file you need. Choose All products and CSV for Excel, Numbers, or other spreadsheet programs, respectively. Then click Export products below. The Shopify CSV file will be sent to the email address connected to your Shopify account.
Comment: In the output CSV file, every product variation (i.e., the same item but in different sizes and/or colors) will appear in a separate row. That’s why you’ll need to make some edits to ensure the correct transfer of data to WooCommerce.
II. Importing data to WooCommerce
Once a CSV file is downloaded to your computer, you can start importing it to a WooCommerce store. Take the following steps:
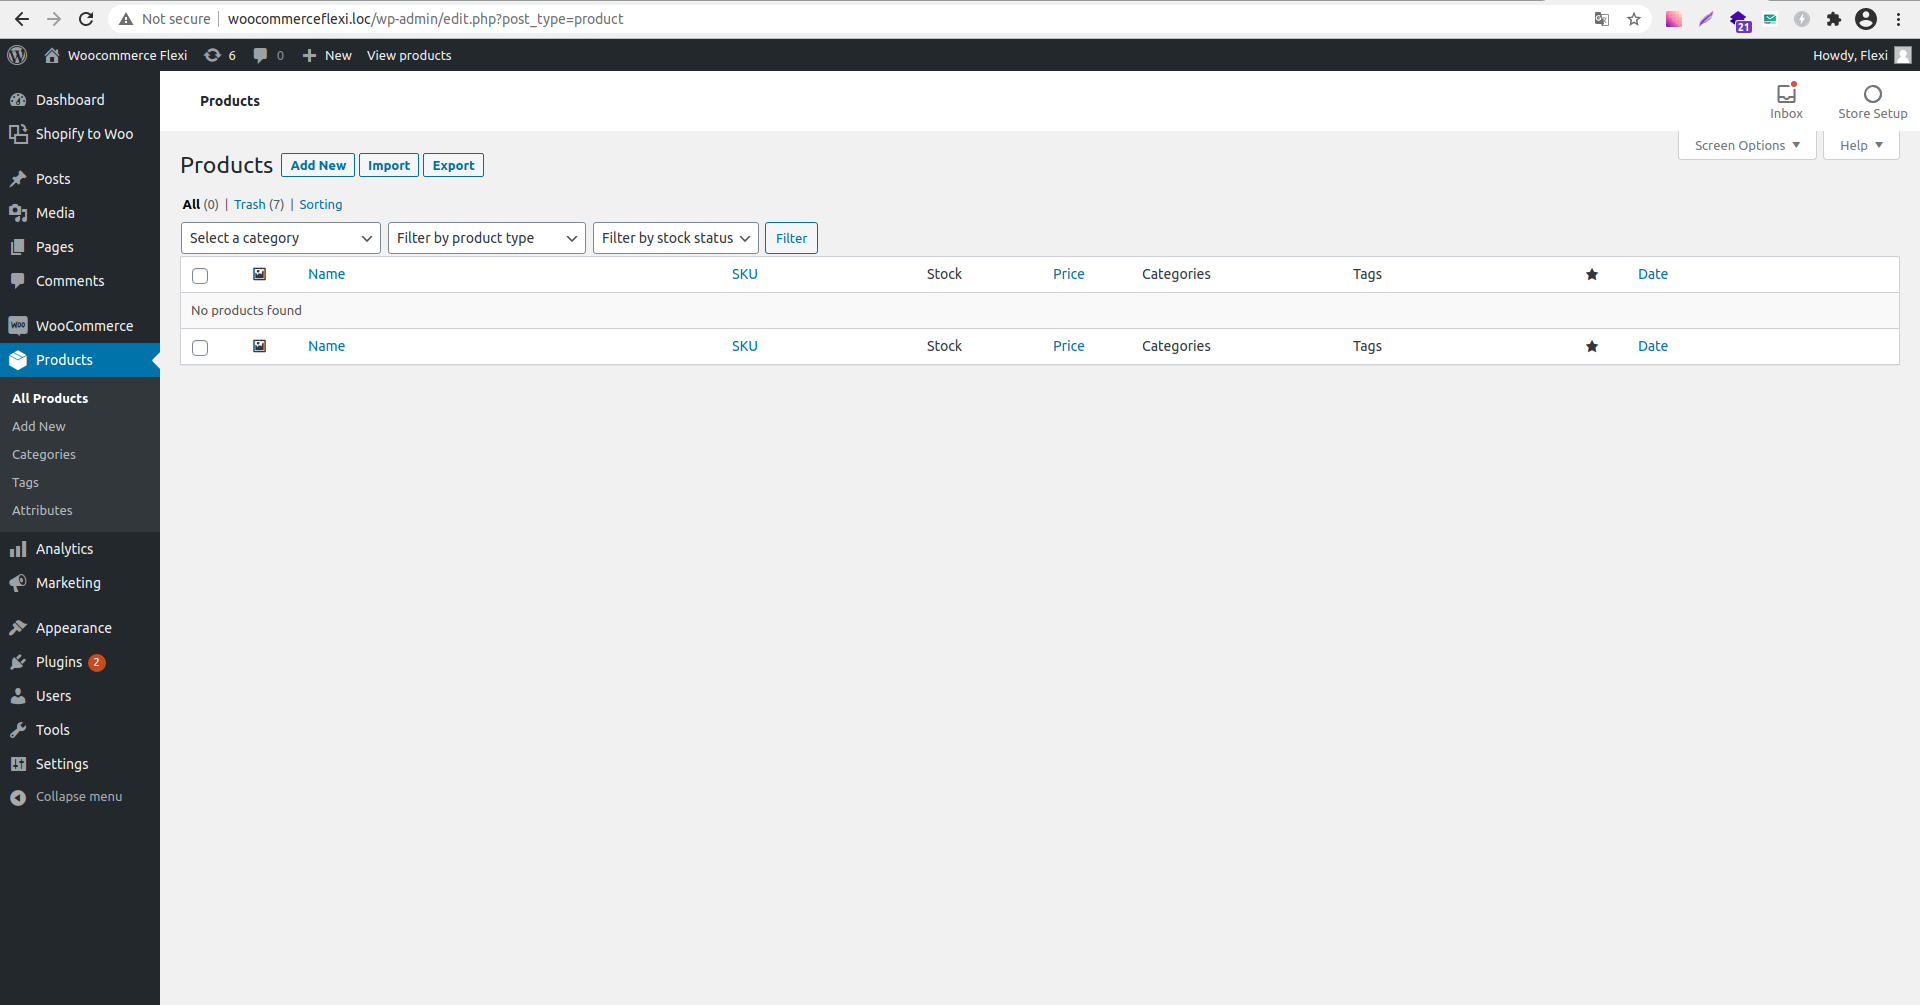
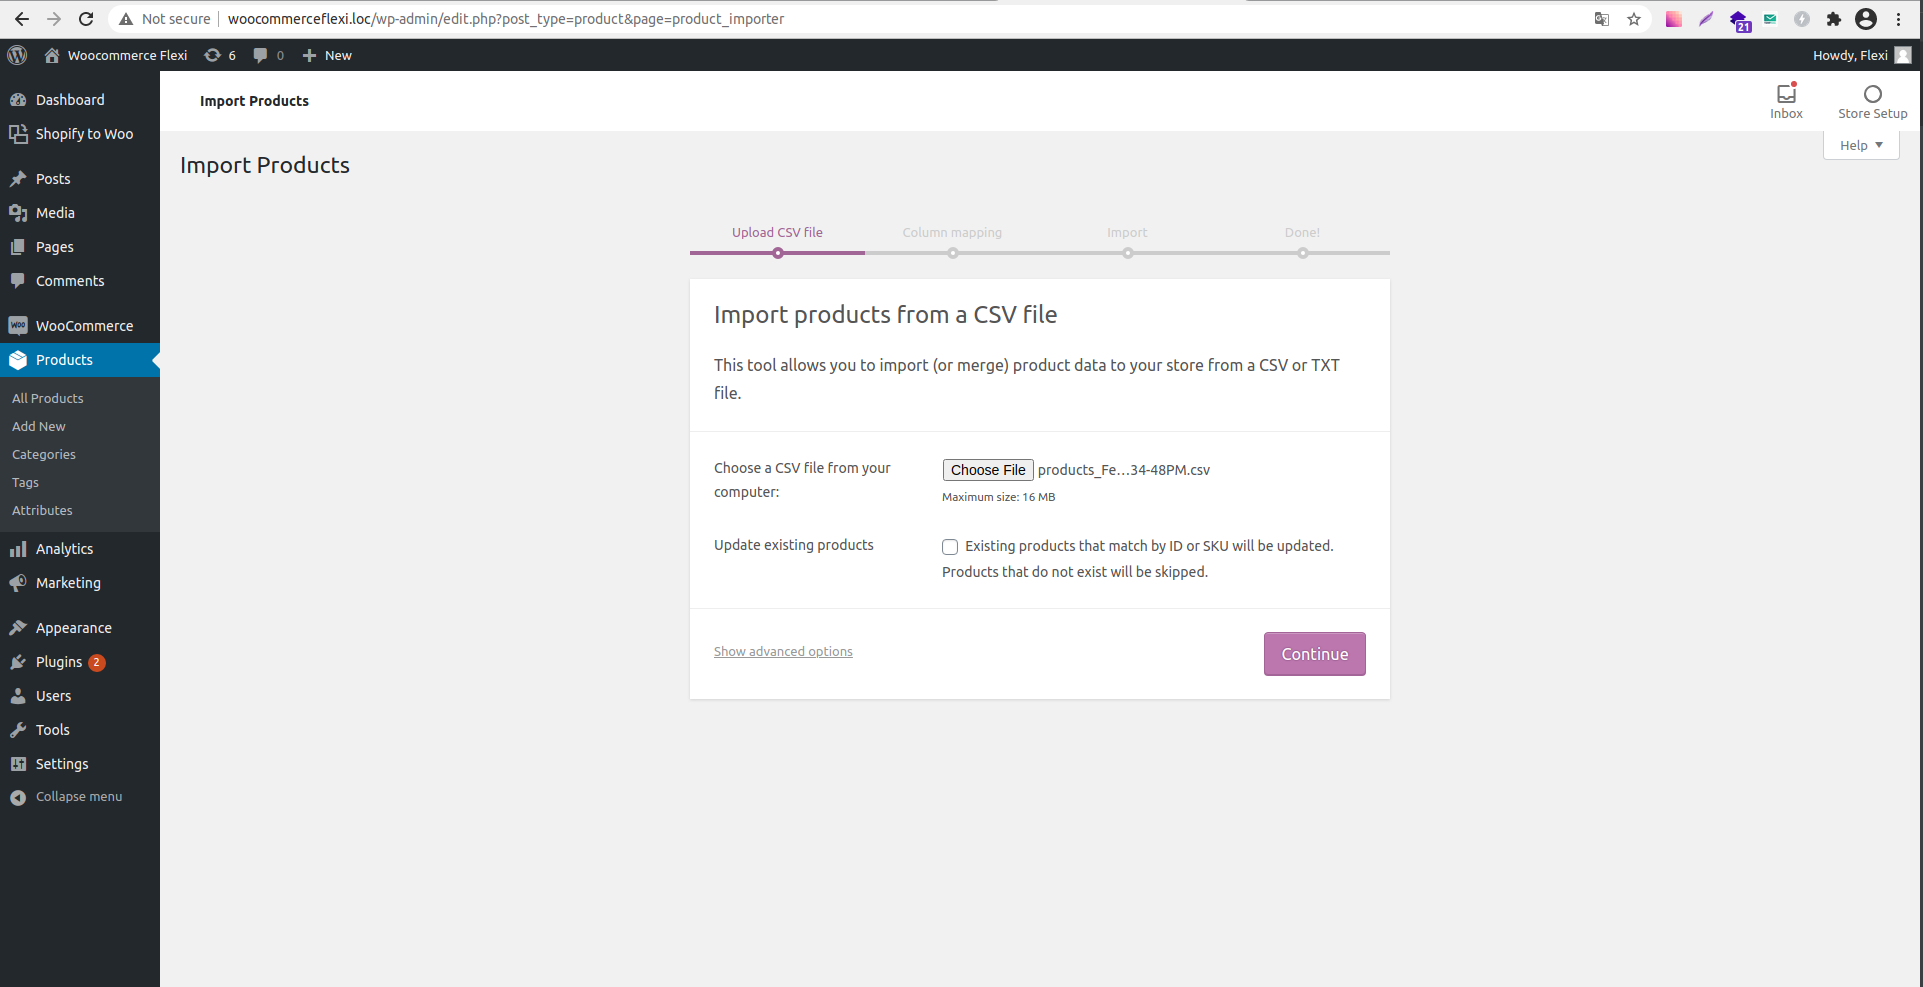
1. Open your WordPress dashboard, choose the Product tab, and click Import.
2. A modal window will ask you to choose a CSV file from your computer. Select the CSV file for Products and click Continue.
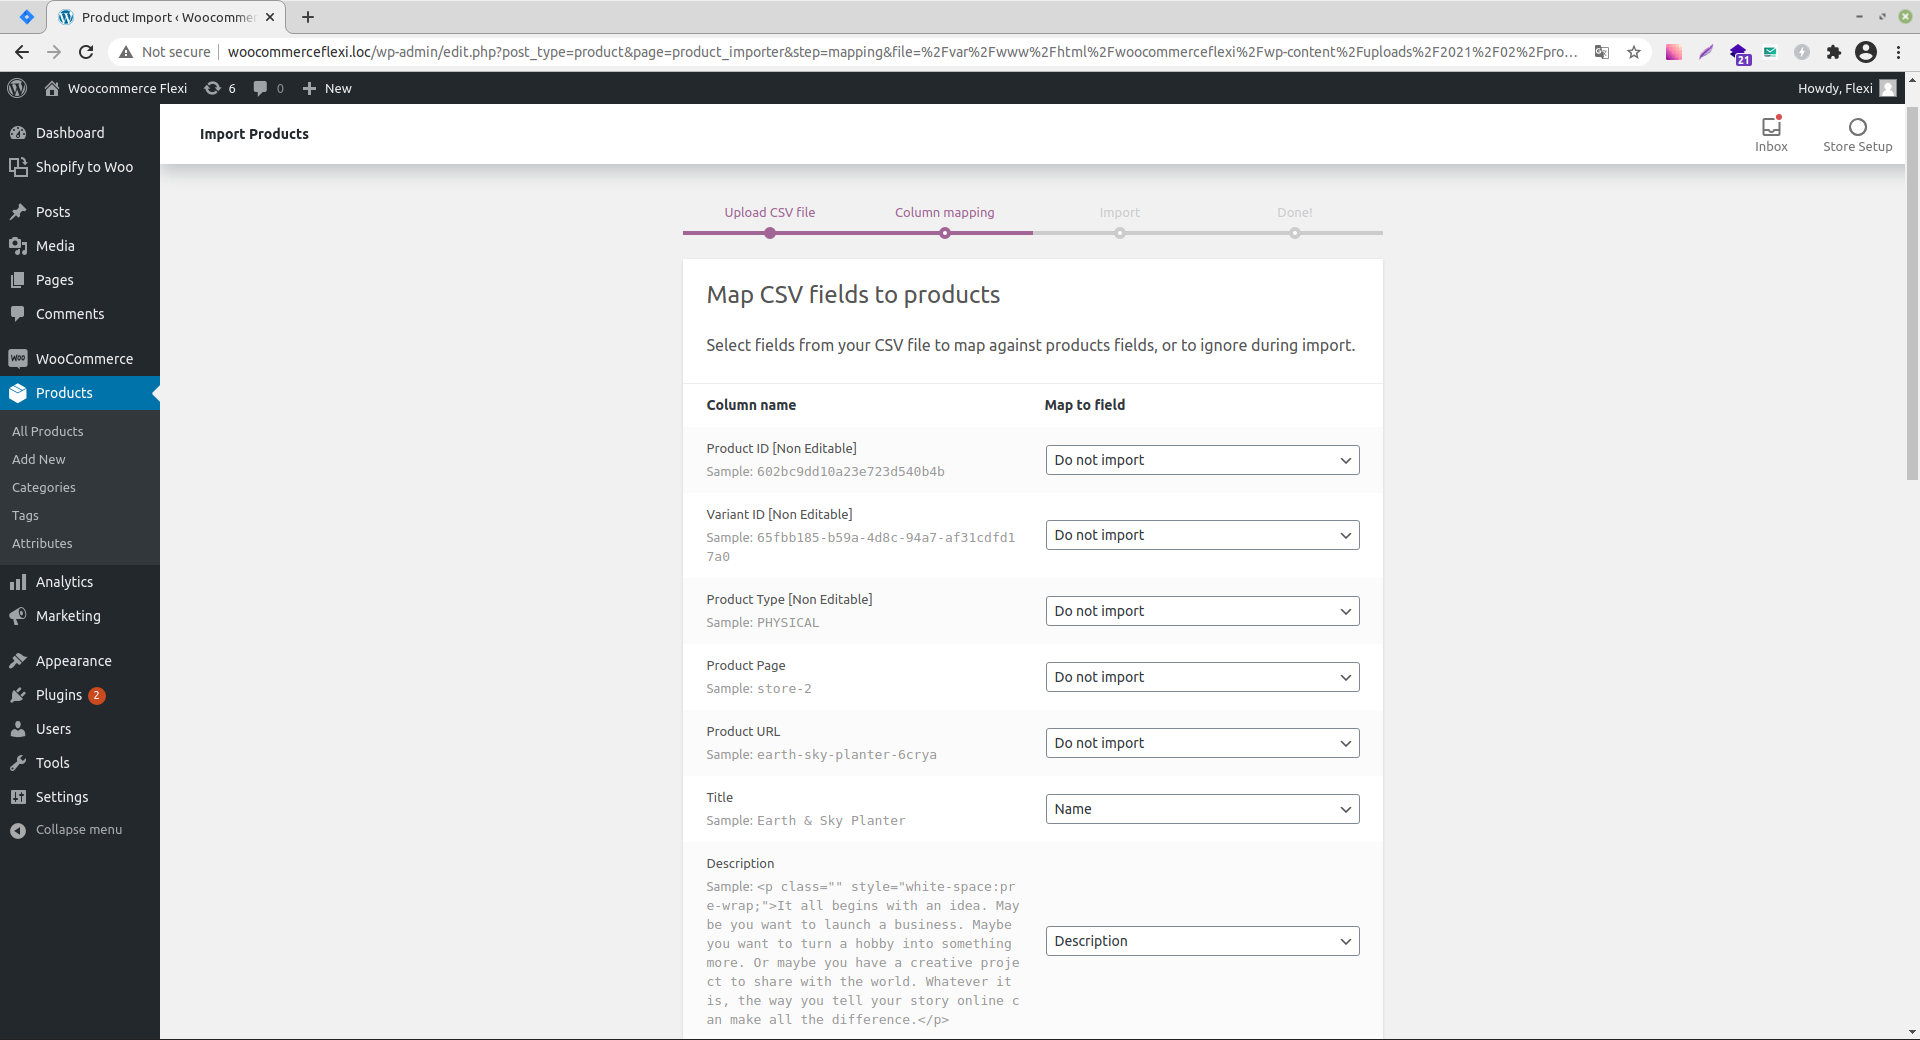
3. On the next modal window, you’ll need to match column names from the Shopify CSV file with WooCommerce product fields using a dropdown menu. You can also choose the “Do not import” option for some fields. Once you’re done with this task, click Run the importer.
4. You’ll need to wait for some time until the system completes the import. A success message will then pop up on your screen, and the imported products will appear under the Products tab.
The biggest advantage of manual migration is that it’s free. But it’s really time-consuming. After you export Shopify to WooCommerce manually, it might still be necessary to make some additional adjustments. Also, you will be able to transfer only a small amount of data using this method. So, think twice before choosing this option. It may turn out that you lose more than you save.
Using Cart2Cart app
The second way to migrate your store from Shopify to WooCommerce is to use a migration tool. Cart2Cart is probably one of the most popular options available in the market since it breaks down the entire process into several simple steps, and it is easy-to-use even for people with no technical background. Here’s how Cart2Cart can help you carry out data migration from Shopify to WooCommerce.
I. Creating a Cart2Cart account
To get started, visit the Cart2Cart website and create an account. After that, click Start Free Demo to launch the process.
The free mode will let you run a sample transition and move a small portion of the data from Shopify to WooCommerce. Once it’s done, you can check WooCommerce to make sure whether everything looks good (e.g., products, their attributes, photos, description, etc.). If yes, you’ll need to pay service fees in order to enable full migration.
The exact price will depend on the size of your e-commerce store and the amount of data you want to move to the new platform. For Shopify-to-WooCommerce migration, the pricing starts at $69 that covers 1,000 products, 500 customers, and 500 orders. You can also request a custom estimation for your store on the Cart2Cart website.
II. Connecting your source cart with a target cart
To automatically import Shopify to WooCommerce, you need to add information about your source cart (Shopify) and target cart (WooCommerce) to Cart2Cart. Here’s how to do it.
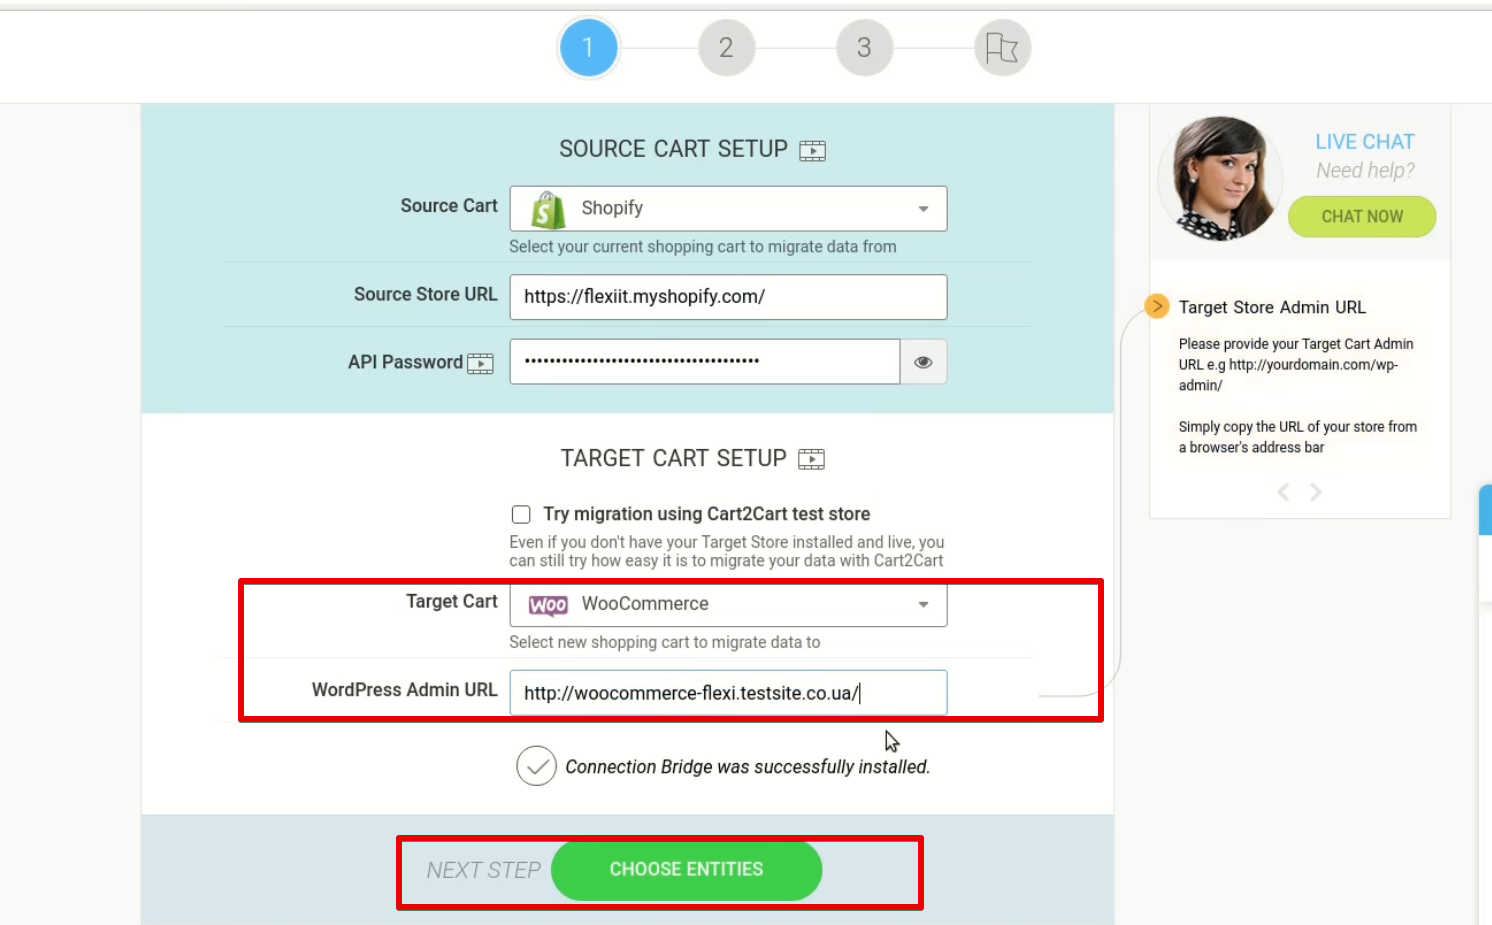
1. To set up the source cart, enter its URL and Shopify API password in the relevant fields.
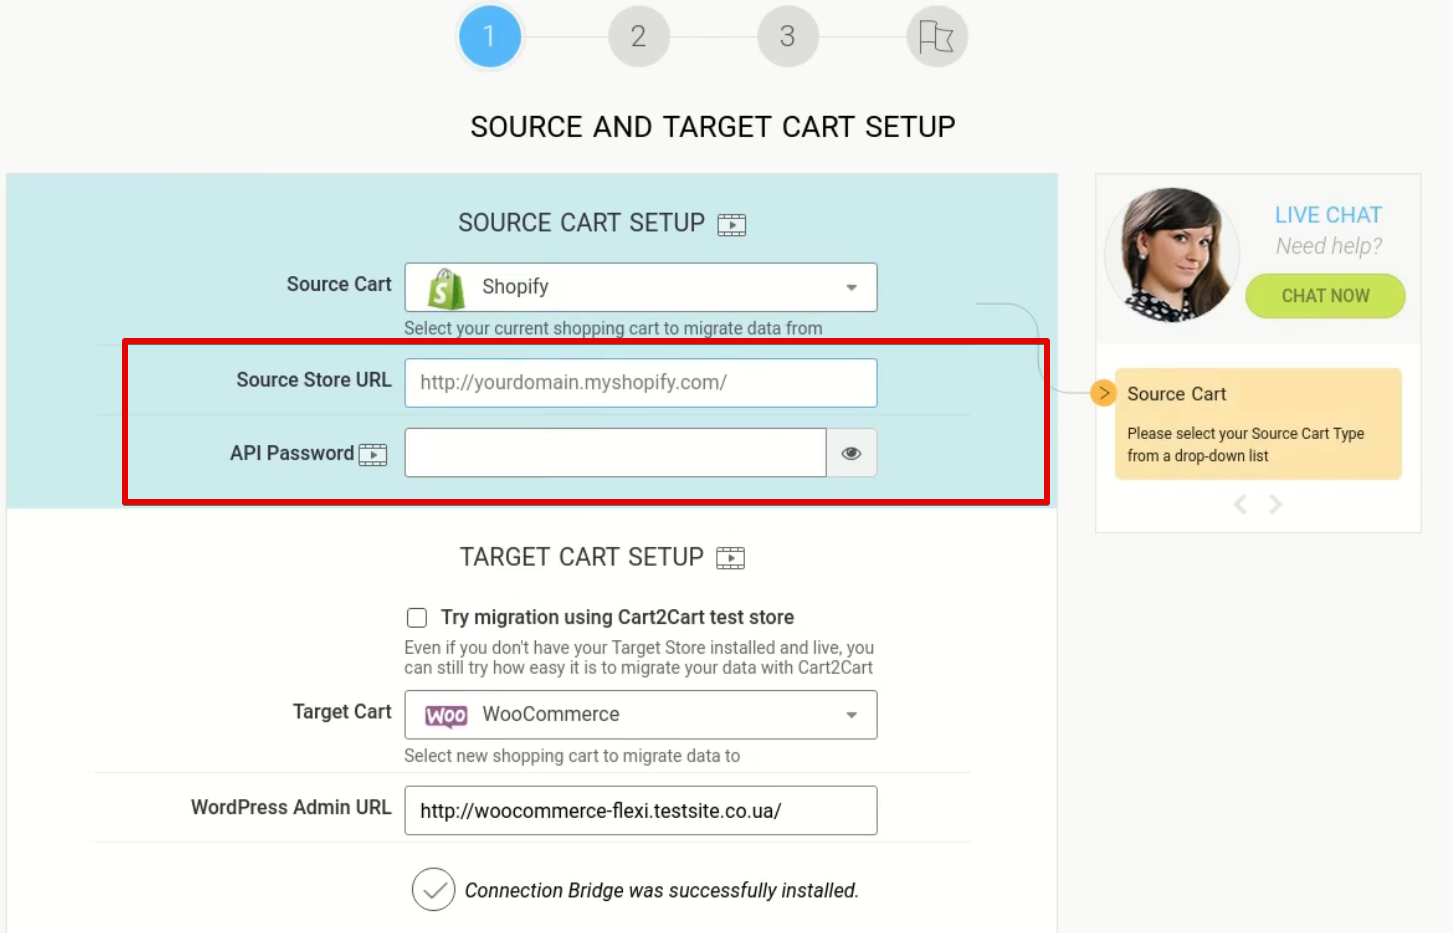
To get a Shopify API password, you need to take the following steps:
- On the Shopify dashboard, choose Apps, then Manage private apps.
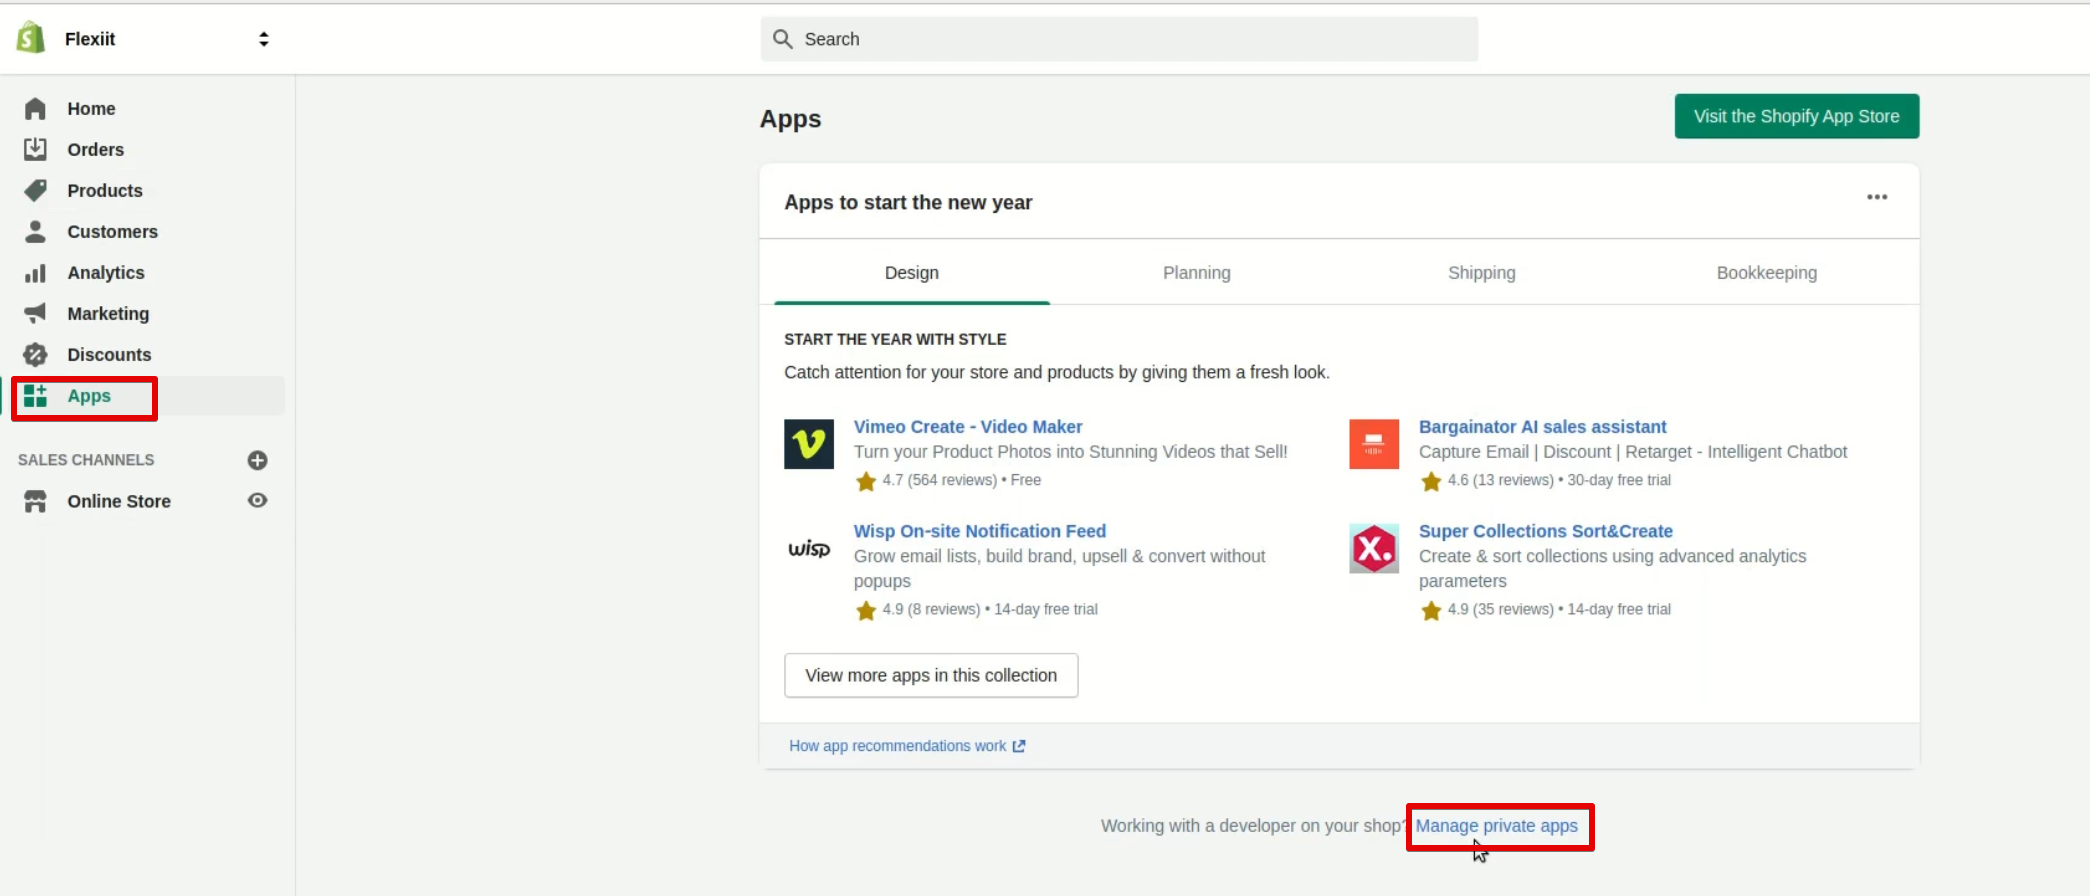
- Enable private app development, then click Create a new private app.
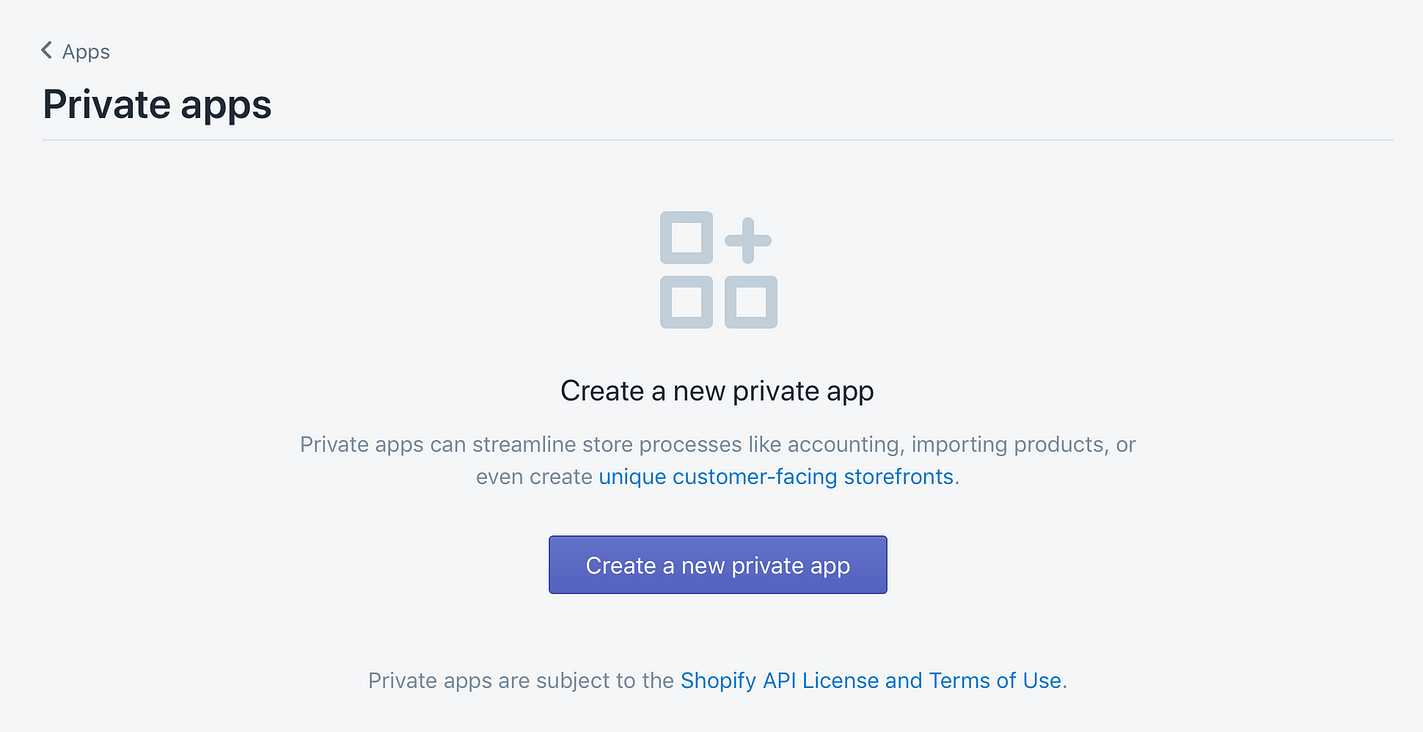
- On the next screen, enter an app’s name (e.g., Private app). In the Admin API section below, change the status of all fields to Read and write. Then click Save to generate a password.
- In admin credentials, you’ll see the Password field. Click Show, then Copy.
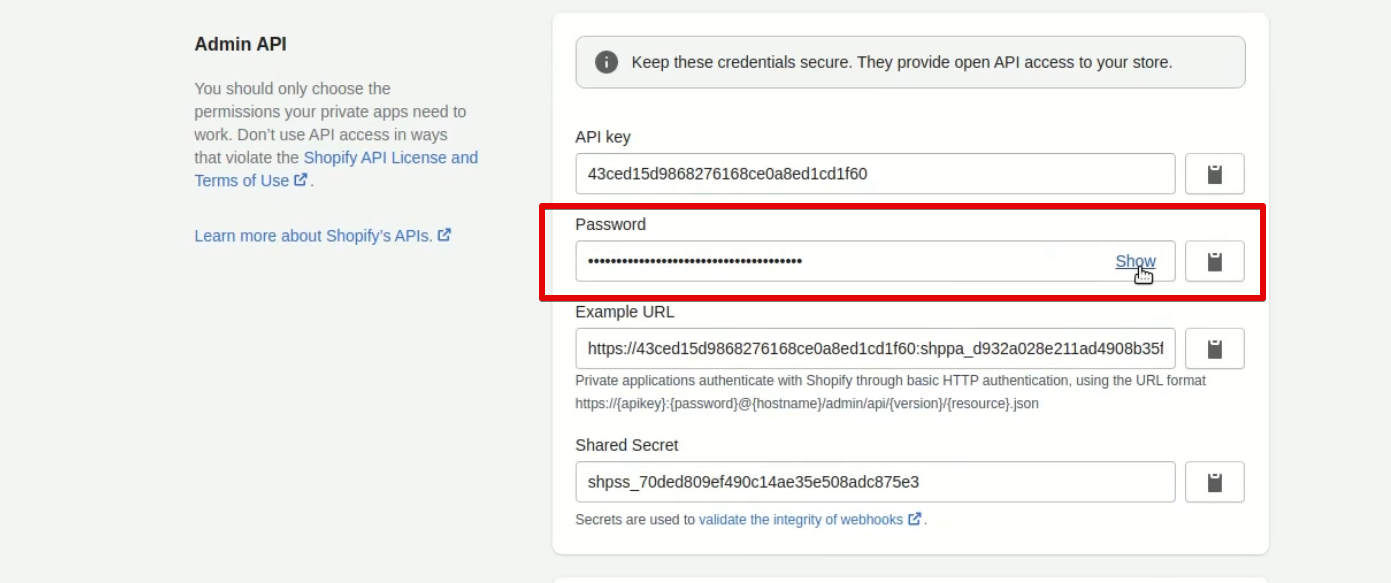
- Go back to Cart2Cart and paste the copied password in the relevant field.
2. Now, you need to add the target cart details to Cart2Cart. It’s much easier. Just choose WooCommerce from a drop-down menu and enter your WordPress URL. Then click Choose entities.
III. Choosing data categories to migrate
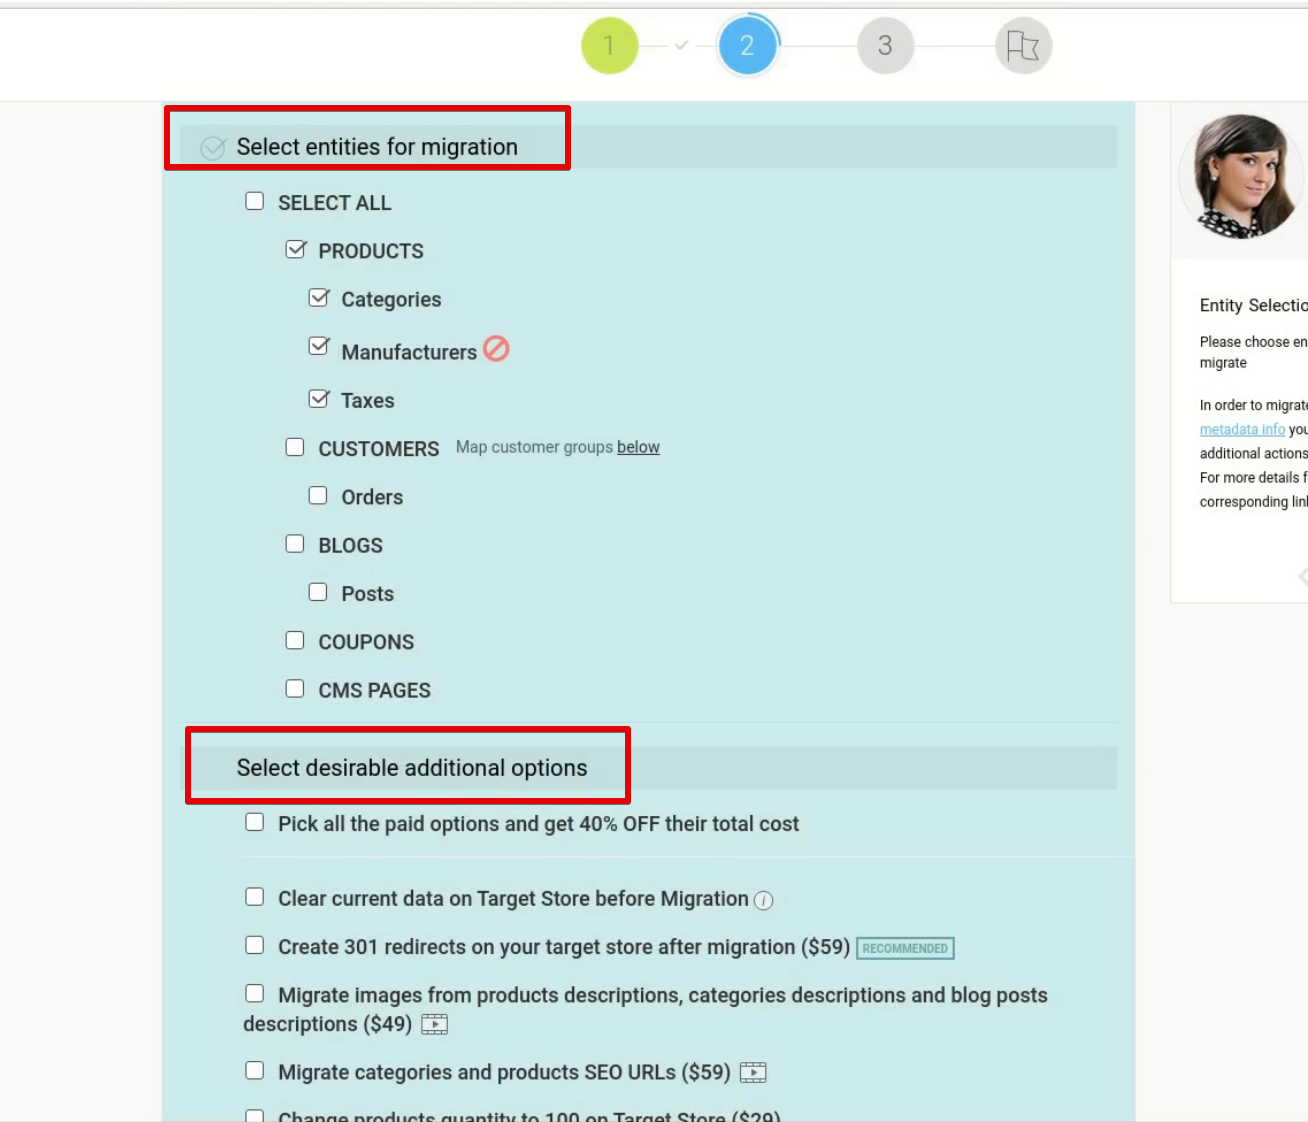
Once you’re done with connecting shopping carts, you’ll need to select entities that you want to migrate to WooCommerce.
You will see two sections on your screen: a section with standard options (e.g., products, customers, blogs, order) and a section with advanced options that require additional payments. If you want to save your domain authority, we recommend buying the most essential of them (e.g., 301 redirects).
IV. Completing the migration
After you select and double-check all entities that need to be transferred, click Start Free Demo to see how all the data looks on WooCommerce.
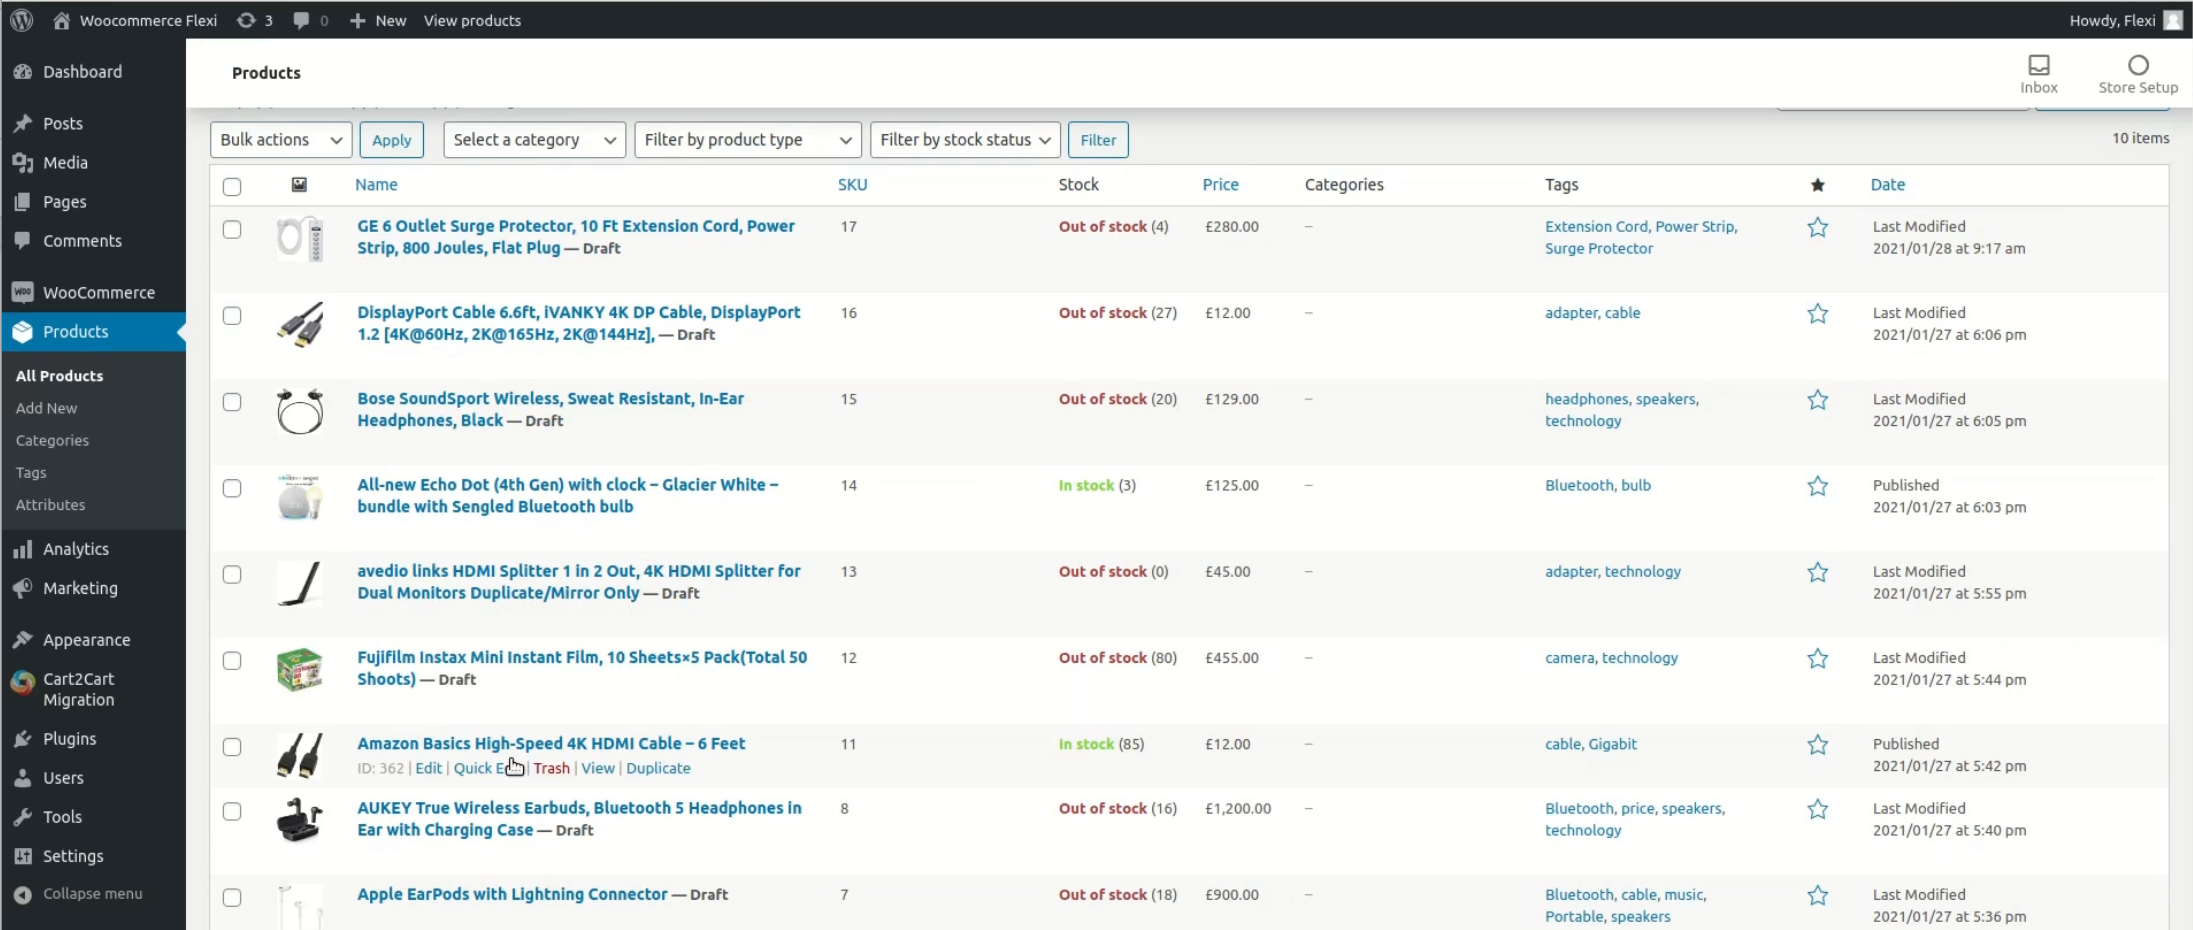
Note that the trial version doesn’t make actual changes to your WooCommerce store. It just shows you a preview. So, if you’re satisfied with the sample migration results, you’ll need to pay for the full migration to complete the process.
If compared to mutual migration, using Cart2Cart is a much more effective option. It doesn’t take so much time and allows you to transfer a lot of data categories, not just products, customers, and orders. Besides, Cart2Cart deals well with product variations (e.g., sizes, colors) by importing all of them as one product. Lastly, Cart2Cart is better for SEO since it can automatically create 301 redirects for product URLs. So, no doubt, the price of migration services will fully pay off in the end.
Using S2W – Import Shopify to WooCommerce plugin
S2W – Import Shopify to WooCommerce is the third method of the Shopify-to-WooCommerce migration that you may want to consider. Like Cart2Cart, it can save you a lot of trouble since the plugin enables automatic data transfer from Shopify to WooCommerce. So, here’s how to use it.
I. Installing the S2W plugin
Installing the S2W plugin is very similar to installing the WooCommerce plugin. Since you already have a WooCommerce store, you should be familiar with the process. But let’s cover it anyway.
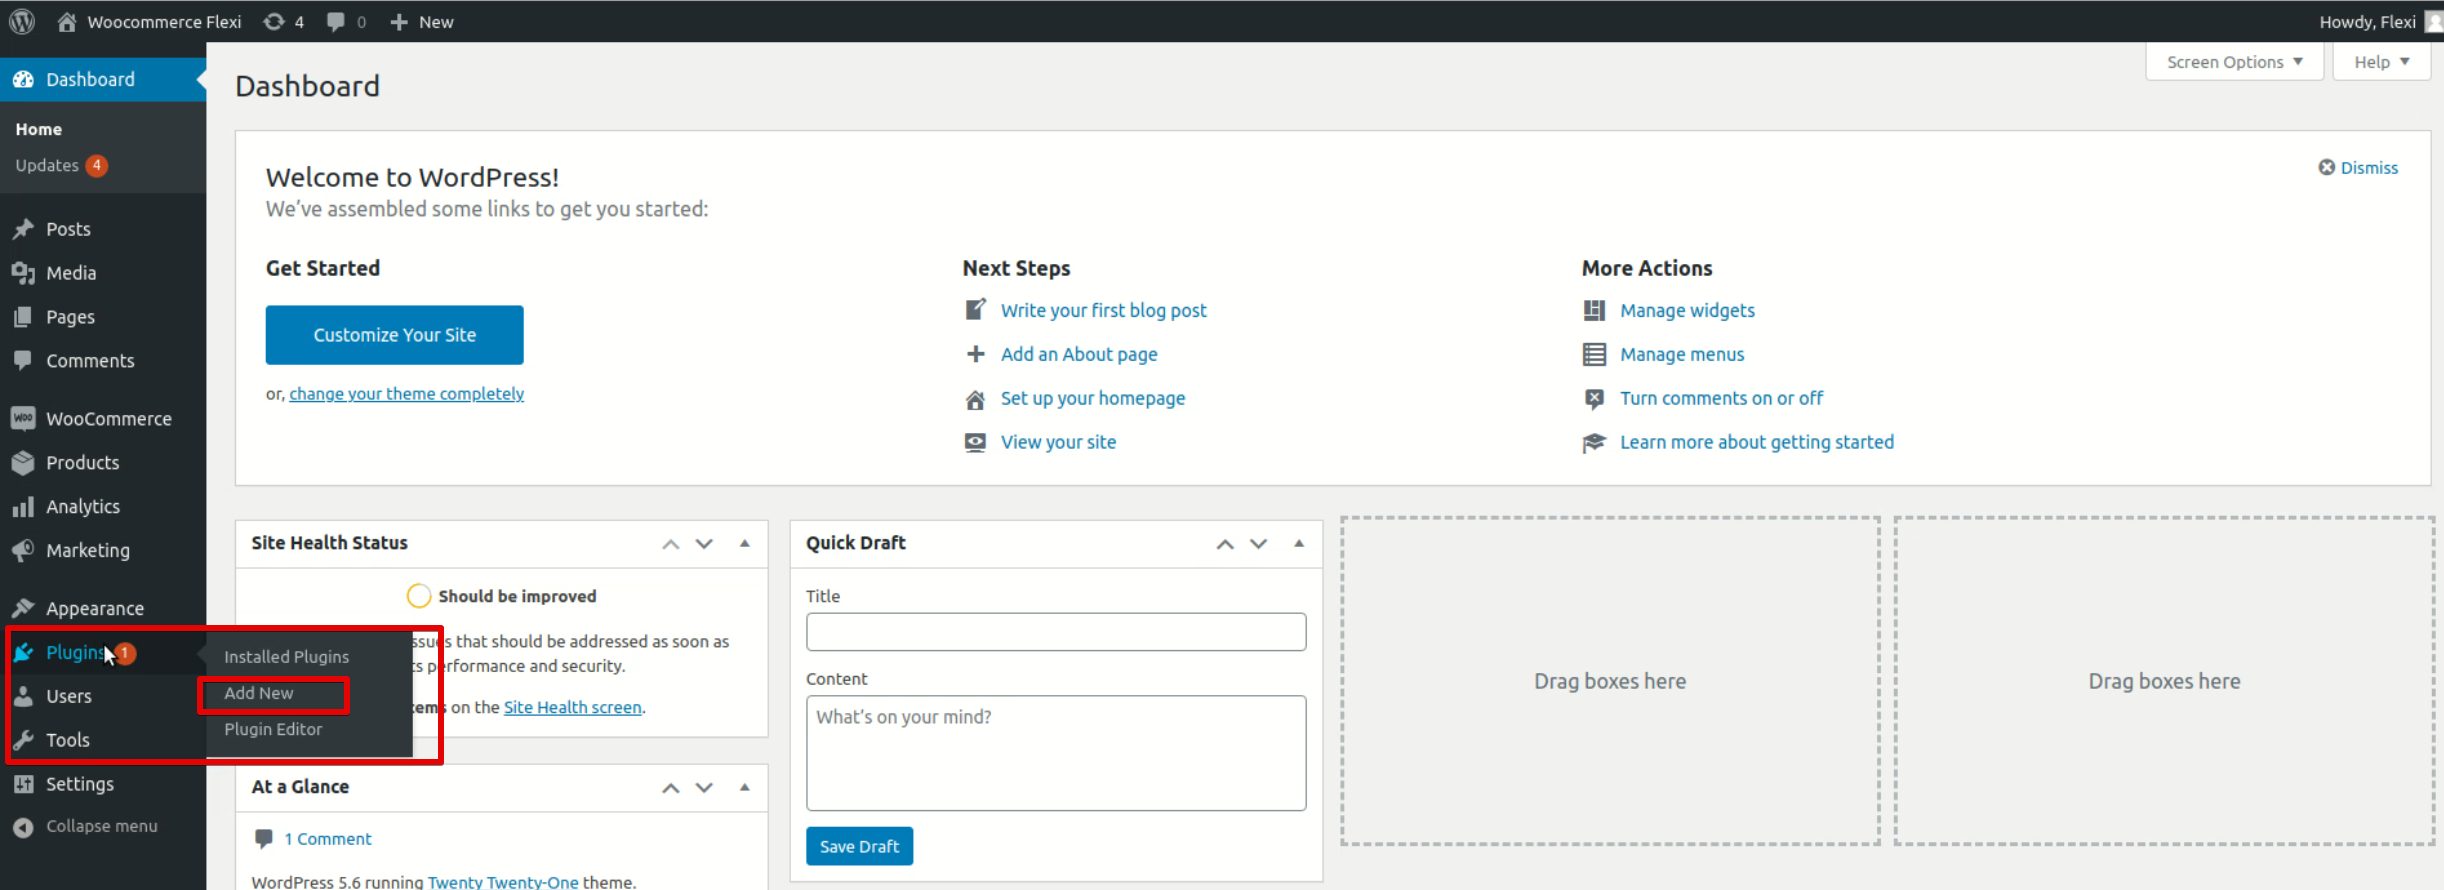
1. On the WooCommerce dashboard, find the Plugins tab and select Add new.
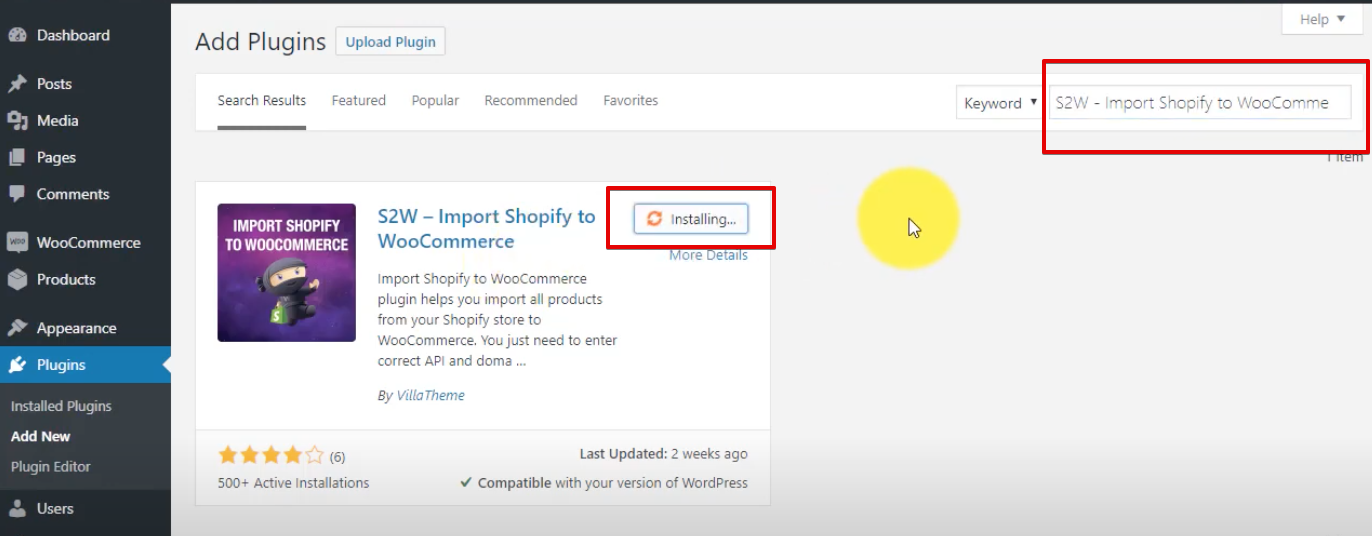
 2. Type ‘S2W – Import Shopify to WooCommerce’ in the search bar. Then click Install and Activate.
3. Once the plugin is installed, you’ll need to insert the Shopify store’s URL, API key, and API secret (password) in General settings.
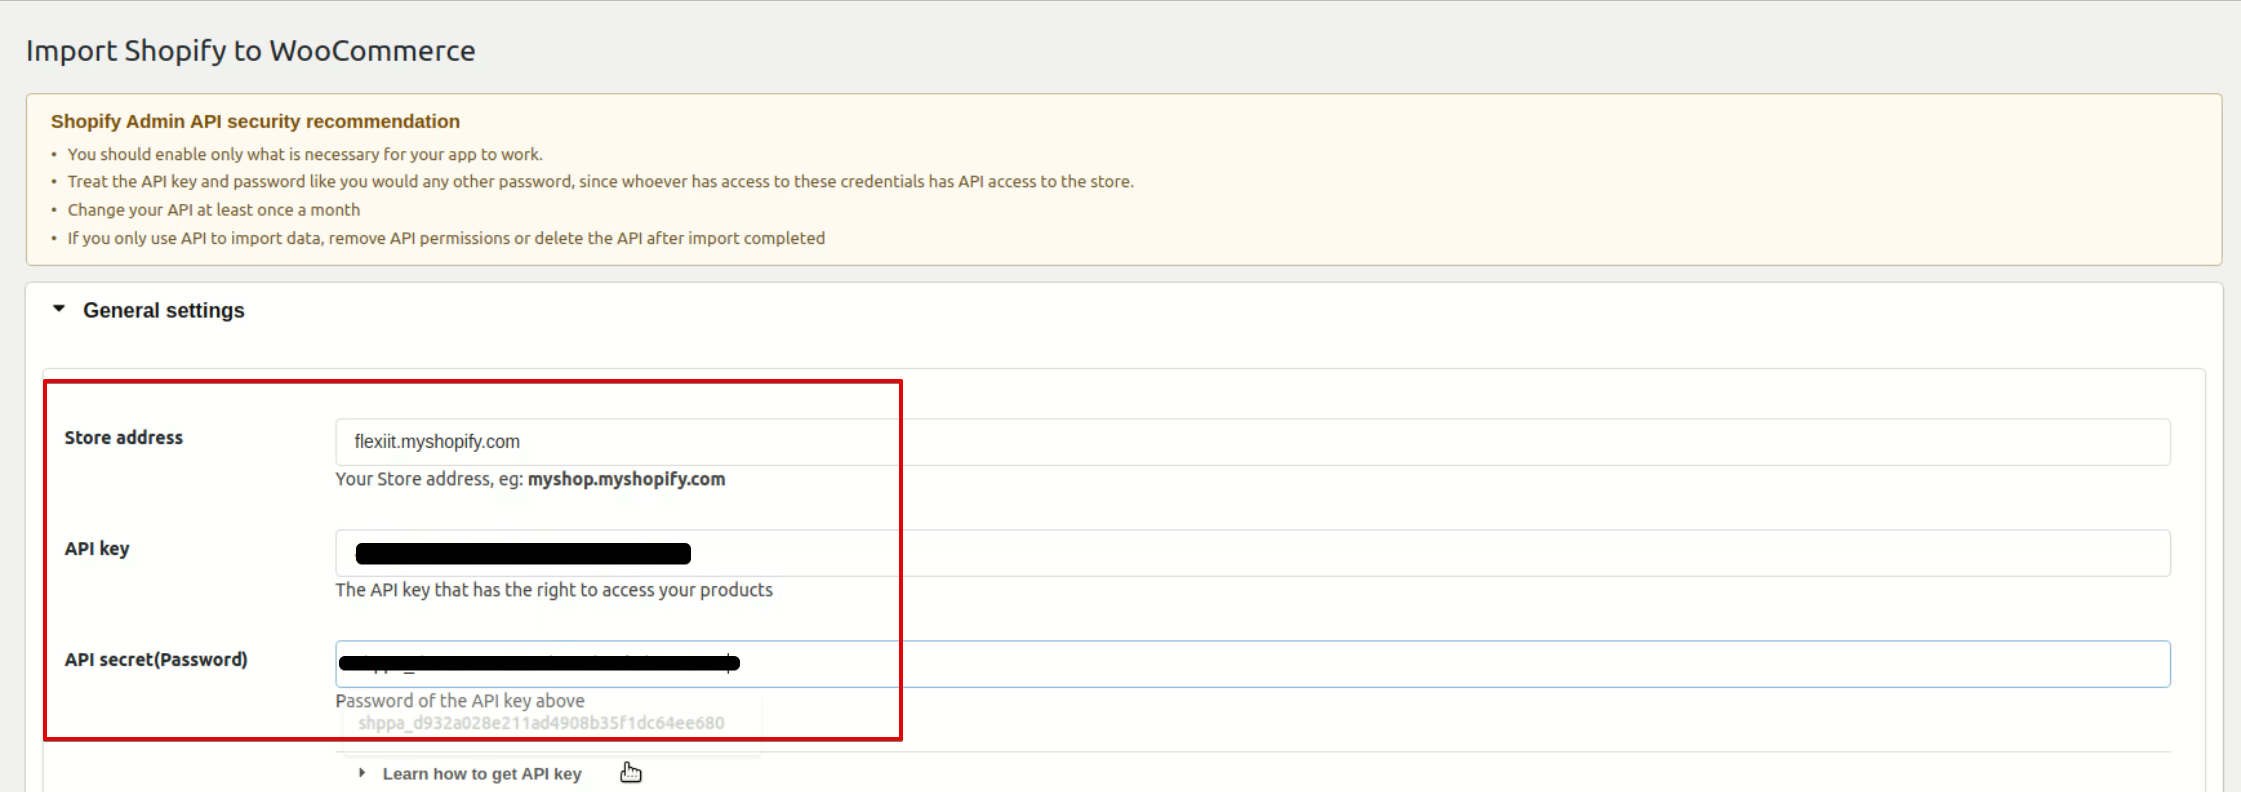
You can find the API key and API password on Shopify’s admin panel under the Private app tab. See the detailed instructions on how to get there in the section Using Cart2Cart app-> Connecting your source cart with a target cart above.
II. Choosing data categories to migrate
Once you enter all the credentials in the General settings section, click Import on the bottom of the page. You’ll see the list of entities that the S2W plugin can move from Shopify to the WooCommerce store. The free version allows for the migration of Products and Product categories only. So, make sure that these entities are enabled.
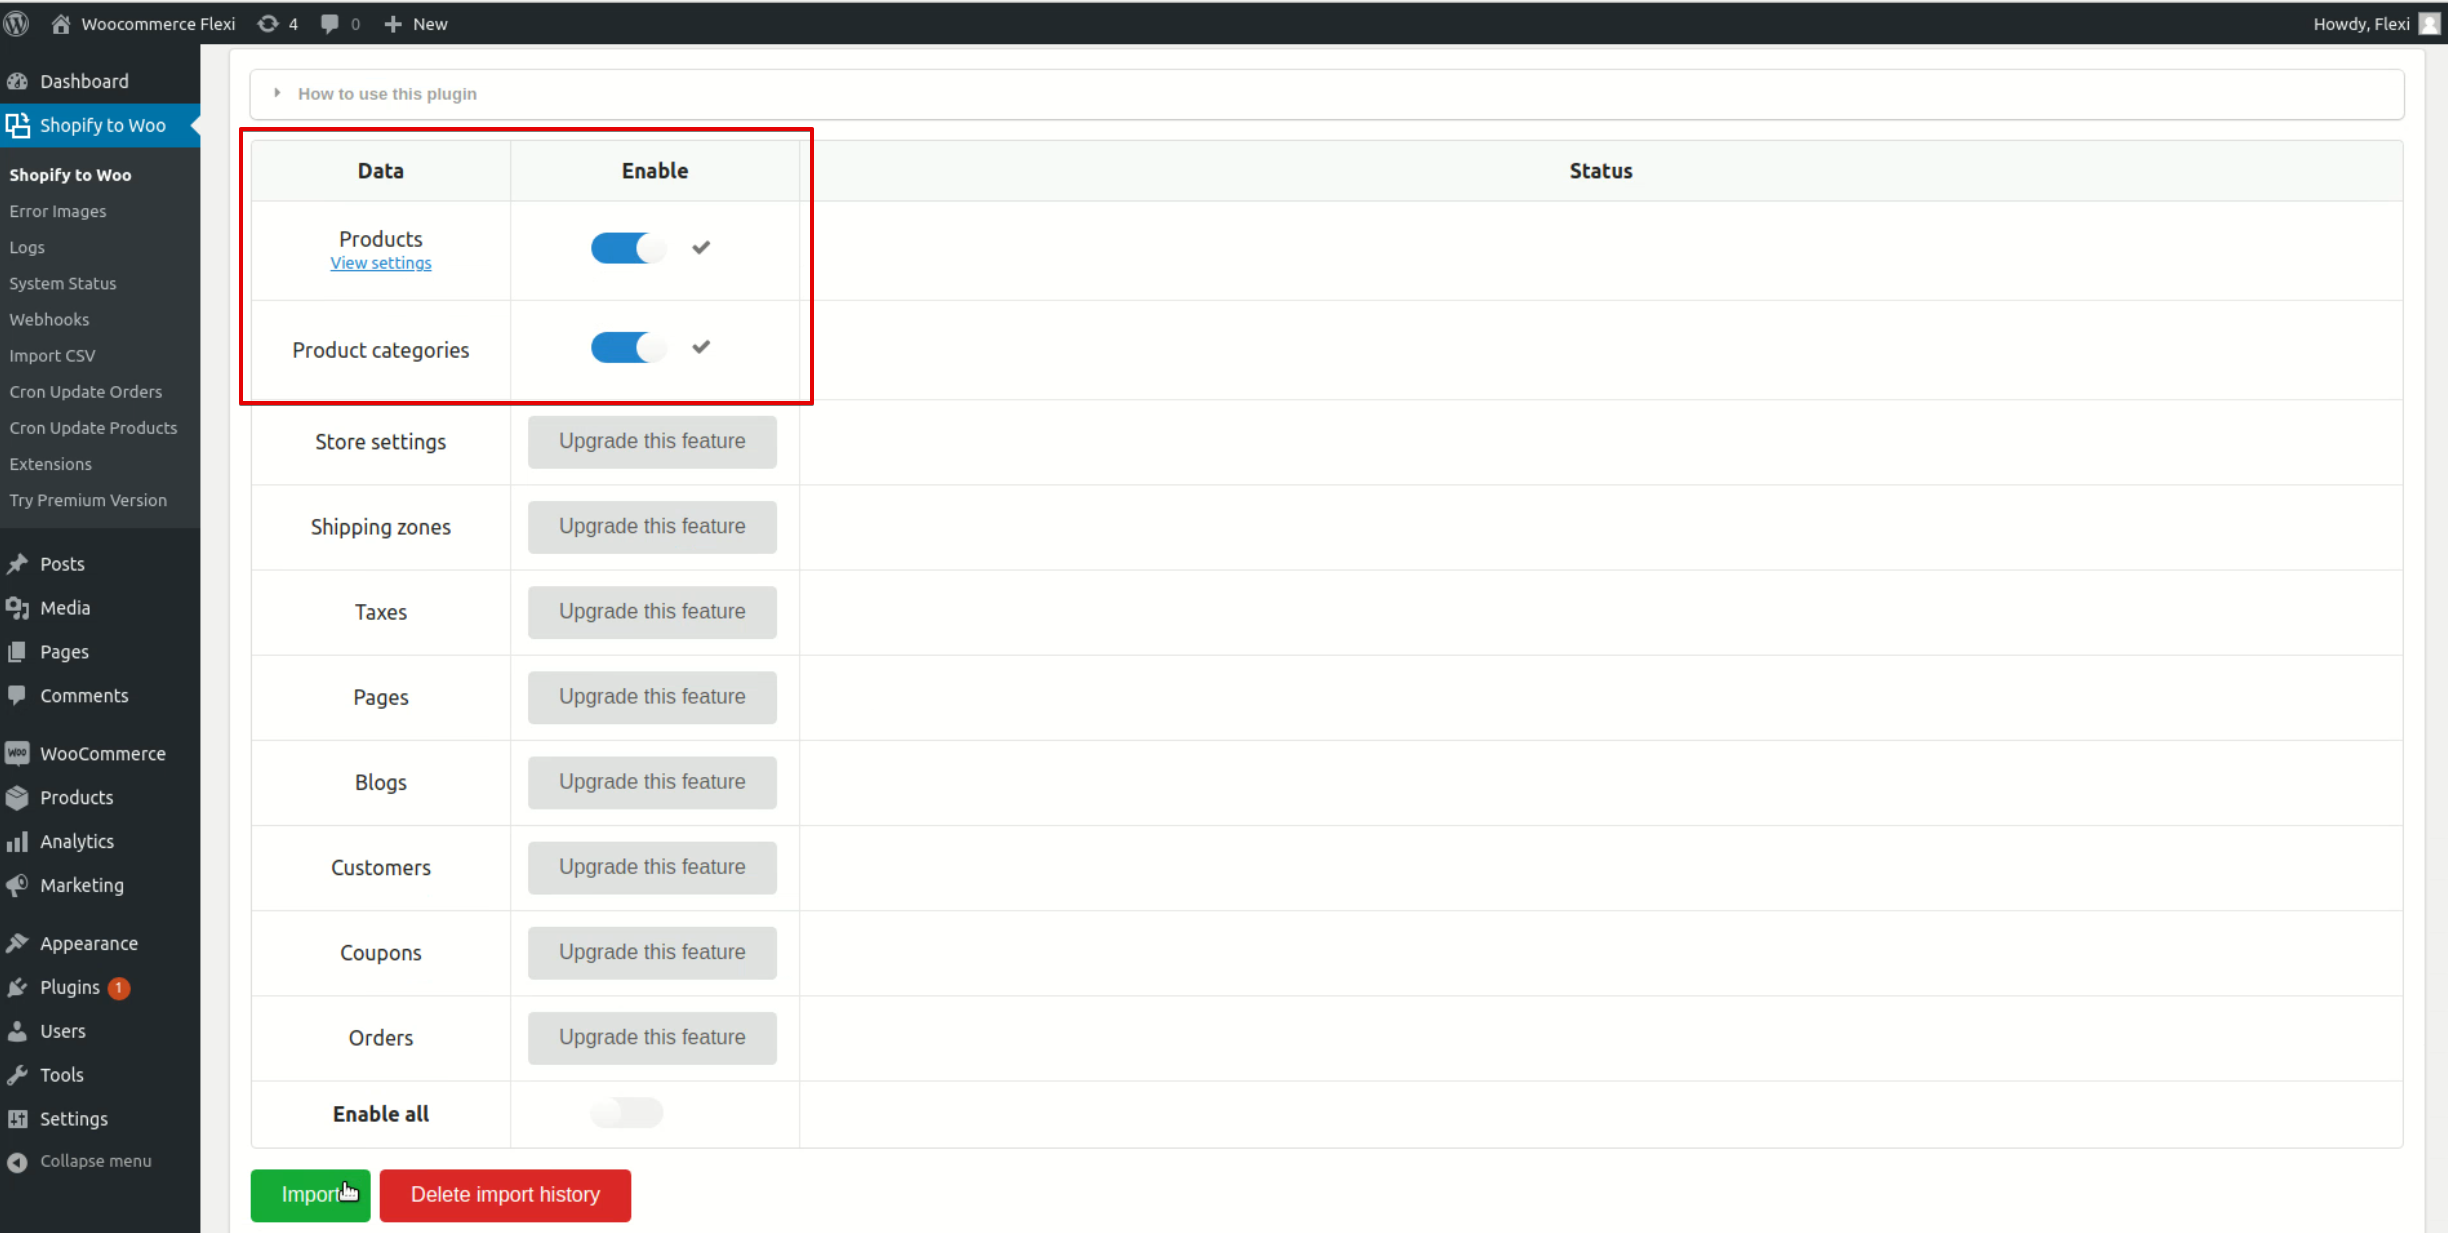
For more comprehensive migration, you’ll need to upgrade to the Pro version. Select entities that need to be transferred or Enable all of them (below) to proceed with the purchasing process. In general, a paid version of the S2W plugin allows you to migrate the following categories of data: Store settings, Shipping zones, Taxes, Pages, Blogs, Customers, Coupons, and Orders. Migration of each of these entities will cost you about $50-60.
III. Completing the migration
After choosing all the entities you need, click Import, and the plugin will transfer the relevant data to WooCommerce. Basically, this step wraps up the Shopify-to-WooCommerce migration process.
Conclusion
If you want to build a growth-oriented e-commerce business, WooCommerce is definitely a better choice than Shopify since it’s more flexible and cost-effective. Although the migration process might seem overwhelming, there are several proven ways to complete it seamlessly and safely. Our Flexi IT team has already helped many businesses carry out similar transitions, so we know it for sure. If you also need our professional support, just reach out, and we’ll do the job.
